Oki MC770 MC770/780 User Guide - Troubleshooting - Page 61
Replacing the Fuser Unit, Recommendation for Replacing the Fuser Unit
 |
View all Oki MC770 manuals
Add to My Manuals
Save this manual to your list of manuals |
Page 61 highlights
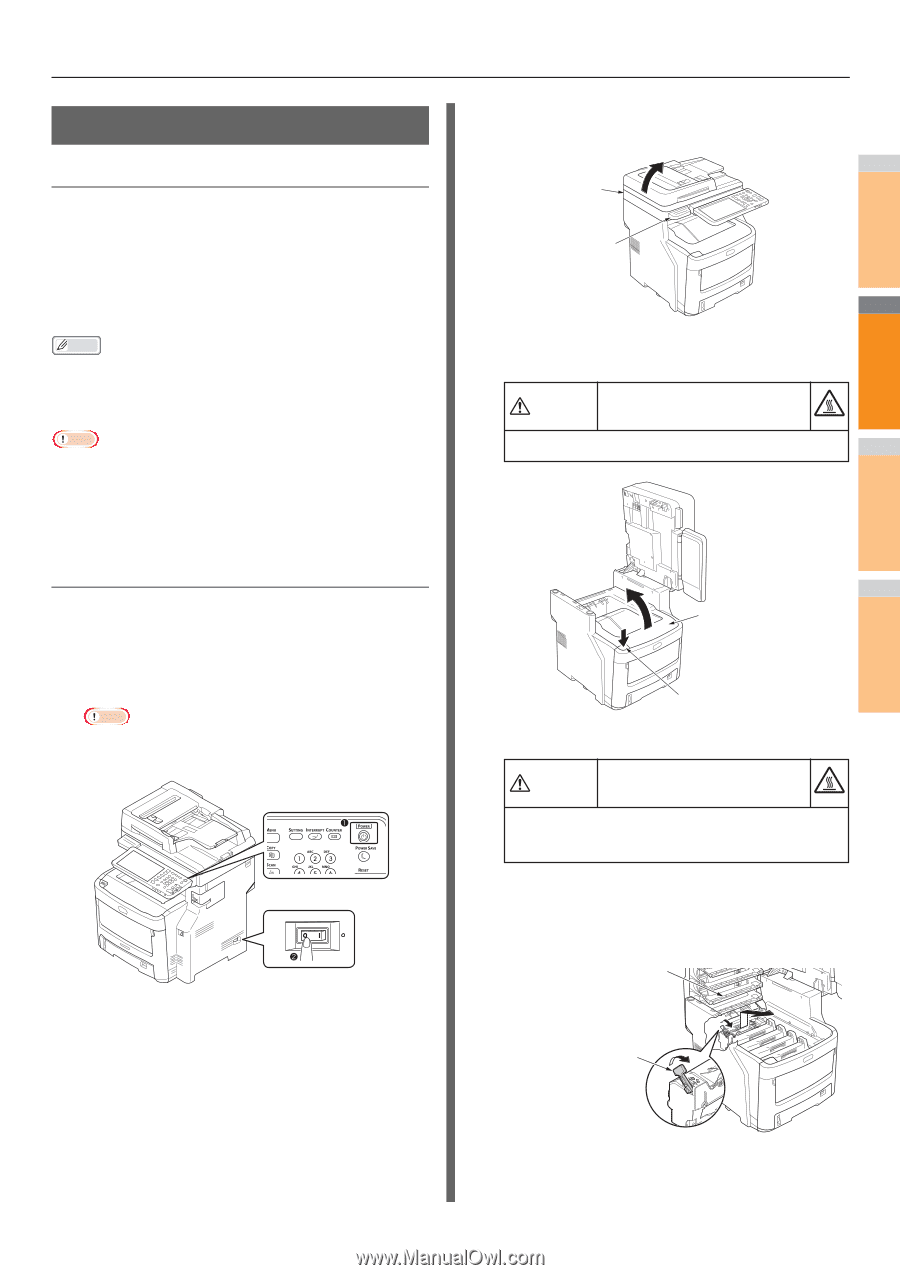
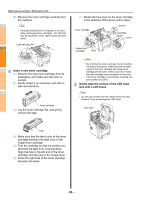
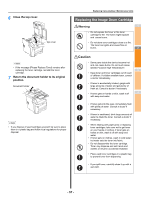
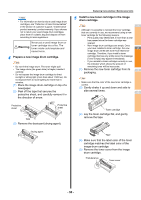
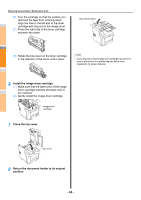
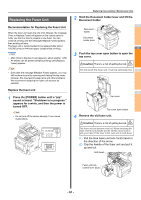
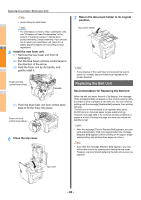
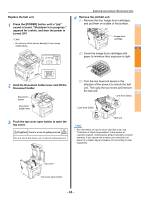
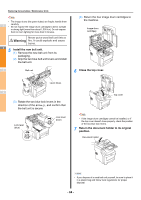
Replacing the Fuser Unit Recommendation for Replacing the Fuser Unit When the fuser unit nears the end of its lifespan, the message [Time to Replace Fuser] will appear on the control panel to notify you that it is time to prepare a new fuser. You can continue printing until the message [Replace Fuser] appears, then printing will stop. The fuser unit is recommended to be replaced after about 100,000 prints on A4-sized paper (single-sided printing). Memo • After [Time to Replace Fuser] appears, about another 1,250 A4 sheets can be printed (simplex printing) until [Replace Fuser] appears. Note • Even after the message [Replace Fuser] appears, you may still continue to print by opening and closing the top cover; however, this may lead to paper jams and other problems. We recommend replacing the fuser unit as soon as possible. Replace the fuser unit 1 Press the [POWER] button until a "pip" sound is heard. "Shutdown is in progress." appears for a while, and then the power is turned OFF. Note • Do not turn off the device abruptly. It can cause malfunctions. Replacing Consumables / Maintenance Units 2 Hold the Document holder lever and lift the Document holder. 1 Document holder Document holder lever 2 3 Push the top cover open button to open the top cover. Caution There is a risk of getting burned. Do not touch the fuser unit. It can be extremely hot. 3 4 Top cover Top cover open button 4 Remove the old fuser unit. 5 Caution There is a risk of getting burned. The fuser unit can become very hot. When removing the fuser, hold it by its handle and be careful not to touch it with your hand. If the fuser is hot, wait until it cools down. (1) Pull the blue fuser unit lock control lever in 6 the direction of the arrow. (2) Grip the handle of the fuser unit and pull it up and out. LED head 7 Fuser unit lock control lever (blue) - 61 -
-
 1
1 -
2
-
3
-
4
-
5
-
6
-
7
-
8
-
9
-
10
-
11
-
12
-
13
-
14
-
15
-
16
-
17
-
18
-
19
-
20
-
21
-
22
-
23
-
24
-
25
-
26
-
27
-
28
-
29
-
30
-
31
-
32
-
33
-
34
-
35
-
36
-
37
-
38
-
39
-
40
-
41
-
42
-
43
-
44
-
45
-
46
-
47
-
48
-
49
-
50
-
51
-
52
-
53
-
54
-
55
-
 56
56 -
 57
57 -
 58
58 -
 59
59 -
 60
60 -
 61
61 -
 62
62 -
 63
63 -
 64
64 -
 65
65 -
 66
66 -
67
-
68
-
69
-
70
-
71
-
72
-
73
-
74
-
75
-
76
-
77
-
78
-
79
 |
 |