Ricoh Aficio SP 204SN User Guide - Page 43
Placing Originals on the Exposure Glass, Placing Originals in the Auto Document Feeder
 |
View all Ricoh Aficio SP 204SN manuals
Add to My Manuals
Save this manual to your list of manuals |
Page 43 highlights
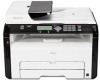
1. Approx. 4.1 mm (0.2 inches) 2. Approx. 3 mm (0.1 inches) 3. Approx. 4.3 mm (0.2 inches) Scanner (Scan to E-mail, Scan to FTP, Scan to Folder, Scan to USB) 1. Approx. 1 mm (0.05 inches) 2. Approx. 1 mm (0.05 inches) 3. Approx. 2 mm (0.08 inches) Placing Originals on the Exposure Glass Placing Originals • Do not place originals until all correction fluid or toner becomes completely dry. Doing so may create marks on the exposure glass that will appear on copies. 1. Lift the exposure glass cover. 2. Place the original face down on the exposure glass. The original should be aligned to the rear left corner. CTT023 3. Lower the exposure glass cover. Hold down the cover with your hands when using thick, folded, or bound originals and when the cover cannot be lowered completely. Placing Originals in the Auto Document Feeder • Do not place originals mixed with different in the ADF all at once. • To prevent multiple sheets from being fed at once, fan the bundle of your original before placing them in the ADF. 41
-
 1
1 -
2
-
3
-
4
-
5
-
6
-
7
-
8
-
9
-
10
-
11
-
12
-
13
-
14
-
15
-
16
-
17
-
18
-
19
-
20
-
21
-
22
-
23
-
24
-
25
-
26
-
27
-
28
-
29
-
30
-
31
-
32
-
33
-
34
-
35
-
36
-
37
-
 38
38 -
 39
39 -
 40
40 -
 41
41 -
 42
42 -
 43
43 -
 44
44 -
 45
45 -
 46
46 -
 47
47 -
 48
48 -
49
-
50
-
51
-
52
-
53
-
54
-
55
-
56
-
57
-
58
-
59
-
60
-
61
-
62
-
63
-
64
-
65
-
66
-
67
-
68
-
69
-
70
-
71
-
72
-
73
-
74
-
75
-
76
-
77
-
78
-
79
-
80
-
81
-
82
-
83
-
84
-
85
-
86
-
87
-
88
-
89
-
90
-
91
-
92
-
93
-
94
-
95
-
96
-
97
-
98
-
99
-
100
-
101
-
102
-
103
-
104
-
105
-
106
-
107
-
108
-
109
-
110
-
111
-
112
-
113
-
114
-
115
-
116
-
117
-
118
-
119
-
120
-
121
-
122
-
123
-
124
-
125
-
126
-
127
-
128
-
129
-
130
-
131
-
132
-
133
-
134
-
135
-
136
-
137
-
138
-
139
-
140
-
141
-
142
-
143
-
144
-
145
-
146
-
147
-
148
-
149
-
150
-
151
-
152
-
153
-
154
-
155
-
156
-
157
-
158
-
159
-
160
-
161
-
162
-
163
-
164
-
165
-
166
-
167
-
168
-
169
-
170
-
171
-
172
-
173
-
174
-
175
-
176
-
177
-
178
-
179
-
180
-
181
-
182
-
183
-
184
-
185
-
186
-
187
-
188
-
189
-
190
-
191
-
192
-
193
-
194
-
195
-
196
 |
 |