Ricoh Aficio SP 204SN User Guide - Page 72
Basic Operation for Scan to USB, When all originals have been scanned
 |
View all Ricoh Aficio SP 204SN manuals
Add to My Manuals
Save this manual to your list of manuals |
Page 72 highlights
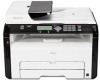
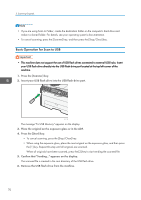
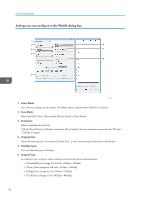
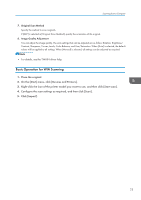
5. Scanning Originals • If you are using Scan to Folder, create the destination folder on the computer's hard drive and make it a shared folder. For details, see your operating system's documentation. • To cancel scanning, press the [Scanner] key, and then press the [Stop/Clear] key. Basic Operation for Scan to USB • This machine does not support the use of USB flash drives connected to external USB hubs. Insert your USB flash drive directly into the USB flash drive port located at the top left corner of the machine. 1. Press the [Scanner] key. 2. Insert your USB flash drive into the USB flash drive port. CTT112 The message "To USB Memory" appears on the display. 3. Place the original on the exposure glass or in the ADF. 4. Press the [Start] key. • To cancel scanning, press the [Stop/Clear] key. • When using the exposure glass, place the next original on the exposure glass, and then press the [1] key. Repeat this step until all originals are scanned. When all originals have been scanned, press the [2] key to start sending the scanned file. 5. Confirm that "Sending..." appears on the display. The scanned file is created in the root directory of the USB flash drive. 6. Remove the USB flash drive from the machine. 70
-
 1
1 -
2
-
3
-
4
-
5
-
6
-
7
-
8
-
9
-
10
-
11
-
12
-
13
-
14
-
15
-
16
-
17
-
18
-
19
-
20
-
21
-
22
-
23
-
24
-
25
-
26
-
27
-
28
-
29
-
30
-
31
-
32
-
33
-
34
-
35
-
36
-
37
-
38
-
39
-
40
-
41
-
42
-
43
-
44
-
45
-
46
-
47
-
48
-
49
-
50
-
51
-
52
-
53
-
54
-
55
-
56
-
57
-
58
-
59
-
60
-
61
-
62
-
63
-
64
-
65
-
66
-
 67
67 -
 68
68 -
 69
69 -
 70
70 -
 71
71 -
 72
72 -
 73
73 -
 74
74 -
 75
75 -
 76
76 -
 77
77 -
78
-
79
-
80
-
81
-
82
-
83
-
84
-
85
-
86
-
87
-
88
-
89
-
90
-
91
-
92
-
93
-
94
-
95
-
96
-
97
-
98
-
99
-
100
-
101
-
102
-
103
-
104
-
105
-
106
-
107
-
108
-
109
-
110
-
111
-
112
-
113
-
114
-
115
-
116
-
117
-
118
-
119
-
120
-
121
-
122
-
123
-
124
-
125
-
126
-
127
-
128
-
129
-
130
-
131
-
132
-
133
-
134
-
135
-
136
-
137
-
138
-
139
-
140
-
141
-
142
-
143
-
144
-
145
-
146
-
147
-
148
-
149
-
150
-
151
-
152
-
153
-
154
-
155
-
156
-
157
-
158
-
159
-
160
-
161
-
162
-
163
-
164
-
165
-
166
-
167
-
168
-
169
-
170
-
171
-
172
-
173
-
174
-
175
-
176
-
177
-
178
-
179
-
180
-
181
-
182
-
183
-
184
-
185
-
186
-
187
-
188
-
189
-
190
-
191
-
192
-
193
-
194
-
195
-
196
 |
 |