Samsung SM-N900P User Manual Sprint Wireless Sm-n900p Galaxy Note 3 Jb English - Page 60
Save a Phone Number to a Contact
 |
View all Samsung SM-N900P manuals
Add to My Manuals
Save this manual to your list of manuals |
Page 60 highlights
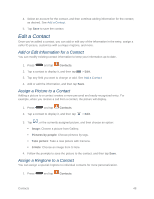
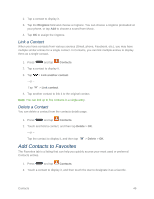
3. Touch contact fields to enter information. Tap to assign a picture to the new entry: • Image: Choose a picture from Gallery. • Pictures by people: Choose pictures by tags. • Take picture: Take a new picture with Camera. • S Note: Choose an image from S Note. Tap the Name field and use the onscreen keyboard to enter the full name. Tap beside the Name field to display additional fields. Tap the Phone number field, and then enter the phone number. Tap to add another Phone number. Tap , and then choose a label for the number. Tap the Email address field, and then enter an email address. Tap to add another Email address. Tap , and then choose a label for the address Tap Groups to assign the contact to a group. Tap Ringtone to choose a ringtone to play for calls from the contact. Tap Message alert to choose a ringtone to play for new messages from the contact. Tap Vibration pattern to choose a vibration to play for new calls or messages from the contact. Tap Add another field to add new fields for the contact. 4. Tap Save to save the new contact. Save a Phone Number to a Contact You can save a phone number to Contacts directly from the phone keypad. Note: If you have accounts set up on your phone, you can save the contact to an account. 1. Press and tap Phone. 2. Enter a phone number on the keypad. 3. Tap Add to contacts, and then tap Create contact or Update existing. Contacts 47
-
 1
1 -
2
-
3
-
4
-
5
-
6
-
7
-
8
-
9
-
10
-
11
-
12
-
13
-
14
-
15
-
16
-
17
-
18
-
19
-
20
-
21
-
22
-
23
-
24
-
25
-
26
-
27
-
28
-
29
-
30
-
31
-
32
-
33
-
34
-
35
-
36
-
37
-
38
-
39
-
40
-
41
-
42
-
43
-
44
-
45
-
46
-
47
-
48
-
49
-
50
-
51
-
52
-
53
-
54
-
 55
55 -
 56
56 -
 57
57 -
 58
58 -
 59
59 -
 60
60 -
 61
61 -
 62
62 -
 63
63 -
 64
64 -
 65
65 -
66
-
67
-
68
-
69
-
70
-
71
-
72
-
73
-
74
-
75
-
76
-
77
-
78
-
79
-
80
-
81
-
82
-
83
-
84
-
85
-
86
-
87
-
88
-
89
-
90
-
91
-
92
-
93
-
94
-
95
-
96
-
97
-
98
-
99
-
100
-
101
-
102
-
103
-
104
-
105
-
106
-
107
-
108
-
109
-
110
-
111
-
112
-
113
-
114
-
115
-
116
-
117
-
118
-
119
-
120
-
121
-
122
-
123
-
124
-
125
-
126
-
127
-
128
-
129
-
130
-
131
-
132
-
133
-
134
-
135
-
136
-
137
-
138
-
139
-
140
-
141
-
142
-
143
-
144
-
145
-
146
-
147
-
148
-
149
-
150
-
151
-
152
-
153
-
154
-
155
-
156
-
157
-
158
-
159
-
160
-
161
-
162
-
163
-
164
-
165
-
166
-
167
-
168
-
169
-
170
-
171
-
172
-
173
-
174
-
175
-
176
-
177
-
178
-
179
-
180
-
181
-
182
-
183
-
184
-
185
-
186
-
187
-
188
-
189
-
190
-
191
-
192
-
193
-
194
-
195
-
196
-
197
-
198
-
199
-
200
-
201
-
202
-
203
-
204
-
205
-
206
-
207
-
208
-
209
 |
 |
