Samsung SM-N900P User Manual Sprint Wireless Sm-n900p Galaxy Note 3 Jb English - Page 69
Compose and Send Email, Microsoft Exchange ActiveSync
 |
View all Samsung SM-N900P manuals
Add to My Manuals
Save this manual to your list of manuals |
Page 69 highlights
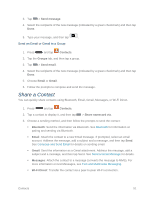
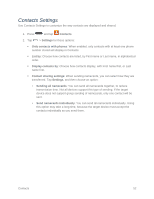
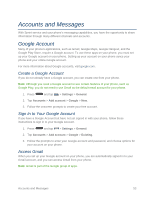
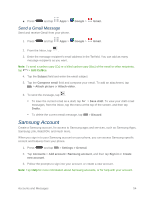
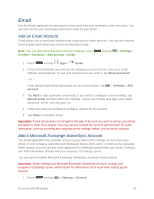
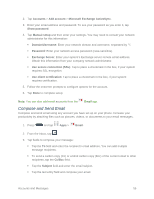
2. Tap Accounts > Add account > Microsoft Exchange ActiveSync. 3. Enter your email address and password. To see your password as you enter it, tap Show password. 4. Tap Manual setup and then enter your settings. You may need to consult your network administrator for this information: Domain\Username: Enter your network domain and username, separated by "\". Password: Enter your network access password (case-sensitive). Exchange Server: Enter your system's Exchange server remote email address. Obtain this information from your company network administrator. Use secure connection (SSL): Tap to place a checkmark in the box, if your system requires SSL encryption. Use client certification: Tap to place a checkmark in the box, if your system requires certification. 5. Follow the onscreen prompts to configure options for the account. 6. Tap Done to complete setup. Note: You can also add email accounts from the Email app. Compose and Send Email Compose and send email using any account you have set up on your phone. Increase your productivity by attaching files such as pictures, videos, or documents to your email messages. 1. Press and tap Apps > Email. 2. From the Inbox, tap . 3. Tap fields to compose your message: Tap the To field and enter the recipient's email address. You can add multiple message recipients. To send a carbon copy (Cc) or a blind carbon copy (Bcc) of the current email to other recipients, tap the Cc/Bcc field. Tap the Subject field and enter the email subject. Tap the text entry field and compose your email. Accounts and Messages 56
-
 1
1 -
2
-
3
-
4
-
5
-
6
-
7
-
8
-
9
-
10
-
11
-
12
-
13
-
14
-
15
-
16
-
17
-
18
-
19
-
20
-
21
-
22
-
23
-
24
-
25
-
26
-
27
-
28
-
29
-
30
-
31
-
32
-
33
-
34
-
35
-
36
-
37
-
38
-
39
-
40
-
41
-
42
-
43
-
44
-
45
-
46
-
47
-
48
-
49
-
50
-
51
-
52
-
53
-
54
-
55
-
56
-
57
-
58
-
59
-
60
-
61
-
62
-
63
-
 64
64 -
 65
65 -
 66
66 -
 67
67 -
 68
68 -
 69
69 -
 70
70 -
 71
71 -
 72
72 -
 73
73 -
 74
74 -
75
-
76
-
77
-
78
-
79
-
80
-
81
-
82
-
83
-
84
-
85
-
86
-
87
-
88
-
89
-
90
-
91
-
92
-
93
-
94
-
95
-
96
-
97
-
98
-
99
-
100
-
101
-
102
-
103
-
104
-
105
-
106
-
107
-
108
-
109
-
110
-
111
-
112
-
113
-
114
-
115
-
116
-
117
-
118
-
119
-
120
-
121
-
122
-
123
-
124
-
125
-
126
-
127
-
128
-
129
-
130
-
131
-
132
-
133
-
134
-
135
-
136
-
137
-
138
-
139
-
140
-
141
-
142
-
143
-
144
-
145
-
146
-
147
-
148
-
149
-
150
-
151
-
152
-
153
-
154
-
155
-
156
-
157
-
158
-
159
-
160
-
161
-
162
-
163
-
164
-
165
-
166
-
167
-
168
-
169
-
170
-
171
-
172
-
173
-
174
-
175
-
176
-
177
-
178
-
179
-
180
-
181
-
182
-
183
-
184
-
185
-
186
-
187
-
188
-
189
-
190
-
191
-
192
-
193
-
194
-
195
-
196
-
197
-
198
-
199
-
200
-
201
-
202
-
203
-
204
-
205
-
206
-
207
-
208
-
209
 |
 |
