Sony PDWHD1500 User Manual (PDW-HD1500 / F1600 Operation Manual for Firmware V - Page 126
Basic menu operations, To display the setup menu, Buttons used to change settings
 |
View all Sony PDWHD1500 manuals
Add to My Manuals
Save this manual to your list of manuals |
Page 126 highlights
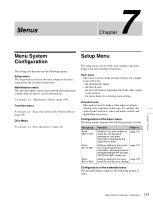
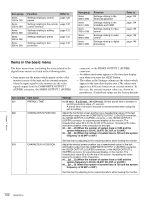
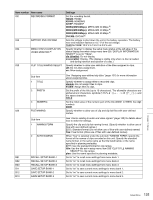
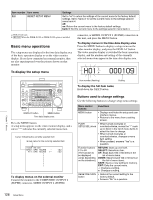
Item number Item name B20 RESET SETUP MENU Settings Set to "on" to return the settings of the current menu to the factory default settings. Set to "bank-4" to set the current menu to the settings saved in menu bank 4. off: on: Return the current menu to the factory default settings. bank-4: Set the current menu to the settings saved in menu bank 4. a) PDW-F1600 only b) HD1500 When the PDBK-S1500 or PDBK-F1500 option is installed. Basic menu operations The setup menus are displayed in the time data display area of the basic operation display or on the video monitor display. If you have connected an external monitor, they are also superimposed over the picture shown on that monitor. To display the setup menu connector, or HDSDI OUTPUT 2 (SUPER) connector on this unit, and press the MENU button. To display menus in the time data display area Press the MENU button to display a setup menu on the video monitor display, and press the DISPLAY button. The video monitor display is switched the basic operation display, and the number and setting of the currently selected menu item appear in the time data display area. H01: 000109 Item number (flashing) To display the full item name Hold down the NEXT button. Setting DISPLAY button MENU button Time data display area Press the MENU button. A setup menu appears on the video monitor display, and a cursor "*" indicates the currently selected menu item. Cursor indicating the currently selected item Group name for the currently selected item HOUR METER *HO1:OPE HOURS - 102 H11:OPE HOURS r- 102 I I I I I I I To display menus on the external monitor Connect the monitor to the COMPOSITE OUTPUT 2 (SUPER) connector, SDSDI OUTPUT 2 (SUPER) Buttons used to change settings Use the following buttons to change setup menu settings. Menu control buttons Functions MENU button • Displays and hides the setup and user interface menus. • Returns to the menu from a setting screen. PUSH SET(S.SEL) knob • When turned clockwise or counterclockwise, moves the "*" mark up or down in the list of menu items to select the item to change. • When turned clockwise or counterclockwise, changes a menu item setting. • When pressed, answers "Yes" to a question. Function buttons F1 to F6 (The function to be displayed varies depending on the situations.) RETURN: Goes up one level. SELECT: Selects an item. UP: Skips back 100 or 50 items in the list of menu items. DOWN: Skips forward 100 or 50 items in the list of menu items. SAVE: Saves a new setting to memory. EXIT: Exits the current menu. -: Changes a setting. +: Changes a setting. RESET/RETURN • Returns the current setting to the button factory default. • Answers "No" to a question. Chapter 7 Menus 126 Setup Menu
-
 1
1 -
2
-
3
-
4
-
5
-
6
-
7
-
8
-
9
-
10
-
11
-
12
-
13
-
14
-
15
-
16
-
17
-
18
-
19
-
20
-
21
-
22
-
23
-
24
-
25
-
26
-
27
-
28
-
29
-
30
-
31
-
32
-
33
-
34
-
35
-
36
-
37
-
38
-
39
-
40
-
41
-
42
-
43
-
44
-
45
-
46
-
47
-
48
-
49
-
50
-
51
-
52
-
53
-
54
-
55
-
56
-
57
-
58
-
59
-
60
-
61
-
62
-
63
-
64
-
65
-
66
-
67
-
68
-
69
-
70
-
71
-
72
-
73
-
74
-
75
-
76
-
77
-
78
-
79
-
80
-
81
-
82
-
83
-
84
-
85
-
86
-
87
-
88
-
89
-
90
-
91
-
92
-
93
-
94
-
95
-
96
-
97
-
98
-
99
-
100
-
101
-
102
-
103
-
104
-
105
-
106
-
107
-
108
-
109
-
110
-
111
-
112
-
113
-
114
-
115
-
116
-
117
-
118
-
119
-
120
-
 121
121 -
 122
122 -
 123
123 -
 124
124 -
 125
125 -
 126
126 -
 127
127 -
 128
128 -
 129
129 -
 130
130 -
 131
131 -
132
-
133
-
134
-
135
-
136
-
137
-
138
-
139
-
140
-
141
-
142
-
143
-
144
-
145
-
146
-
147
-
148
-
149
-
150
-
151
-
152
-
153
-
154
-
155
-
156
-
157
-
158
-
159
-
160
-
161
-
162
-
163
-
164
-
165
-
166
-
167
-
168
-
169
-
170
-
171
-
172
-
173
-
174
-
175
-
176
-
177
-
178
-
179
-
180
-
181
-
182
-
183
-
184
-
185
-
186
-
187
-
188
 |
 |