Sony PDWHD1500 User Manual (PDW-HD1500 / F1600 Operation Manual for Firmware V - Page 149
To change a menu item setting, To change network settings, To cancel changing a setting
 |
View all Sony PDWHD1500 manuals
Add to My Manuals
Save this manual to your list of manuals |
Page 149 highlights
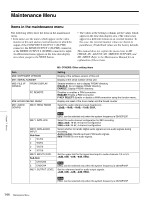
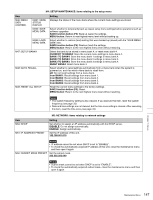
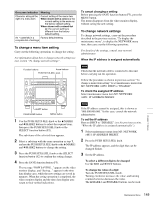
On-screen indication Meaning Character string at the right of a menu item Current setting of the menu item When shown with a colon (:): the current setting is the same as the factory default setting. When shown with a raised dot (.): the current setting is different from the factory default setting. An * (asterisk) in a Factory default setting complete list of settings To change a menu item setting Carry out the following operations to change the setting. For information about how to change network settings see next section "To change network settings". Function buttons Arrow buttons PUSH SET(S.SEL) knob EJECT ACCESS CH-1 CH-3 PUSH SET(S.SEL) MARK1 IN OUT ALL CH CH-2 CH-4 CHAPTER NET LOCAL REMOTE VARIABLE KEY INHI REC PRE- ON SET OFF PB EXPAND PAGE HOME PHONES LEVEL DISPLAY PREV PLAY NEXT STOP REC THUMBNAIL MENU RESET SHTL/JOG MARK2 VAR/JOG RETURN SHIFT SUB CLIP TOP F REV F FWD END STANDBY REC INHI DISC MENU SHIFT button PAGE/HOME button MENU button 1 Use the PUSH SET(S.SEL) knob or the V/MARK1 and v/MARK2 buttons to select the required item, then press the PUSH SET(S.SEL) knob or the SELECT function button (F2). The sub-items of the selected item appears. 2 Select a sub-item with the same operation as step 1, and use the PUSH SET(S.SEL) knob or the V/MARK1 and v/MARK2 buttons to change the setting. 3 Press the PUSH SET(S.SEL) knob or the SELECT function button (F2) to confirm the setting change. 4 Press the SAVE function button (F5). The message "NOW SAVING..." appears on the video monitor display, and "Saving..." appears in the time data display area, while the new settings are saved in memory. When the saving operation is completed, the video monitor display and the time data display area return to their normal indications. To cancel changing a setting Before pressing the SAVE function button (F5), press the MENU button. The menu disappears from the video monitor display, without saving the new setting. To change network settings To change network settings, carry out the procedure described in the previous section, "To display the maintenance menu", to display the NETWORK menu item, then carry out the following operations. For details of the settings, consult your network administrator. When the IP address is assigned automatically Note Check that the network cable is connected to this unit before carrying out the operation. Follow the procedure as shown in previous section "To change a menu item setting" to set maintenance menu item M5: NETWORK >M50: DHCP to "ENABLE". To check the assigned IP address Select maintenance menu item M5: NETWORK >M51: IP ADDRESS PRESET. Note If the IP address cannot be assigned, this is shown as "000.000.000.000." In this case, consult the network administrator. To set the IP address First set DHCP to "DISABLE" (see the previous section, "When the IP address is assigned automatically"). 1 Select maintenance menu item M5: NETWORK >M51: IP ADDRESS PRESET. 2 Press the PUSH SET(S.SEL) knob. The IP address appears, and the digit that can be changed flashes. 3 Set the IP address. To select a different digit to be changed Use the B/IN and b/OUT buttons. To change the value of a digit Turn the PUSH SET(S.SEL) knob. Turning clockwise increases the value, and turning counterclockwise decreases the value. The V/MARK1 and v/MARK2 buttons can be used. Chapter 7 Menus 149 Maintenance Menu
-
 1
1 -
2
-
3
-
4
-
5
-
6
-
7
-
8
-
9
-
10
-
11
-
12
-
13
-
14
-
15
-
16
-
17
-
18
-
19
-
20
-
21
-
22
-
23
-
24
-
25
-
26
-
27
-
28
-
29
-
30
-
31
-
32
-
33
-
34
-
35
-
36
-
37
-
38
-
39
-
40
-
41
-
42
-
43
-
44
-
45
-
46
-
47
-
48
-
49
-
50
-
51
-
52
-
53
-
54
-
55
-
56
-
57
-
58
-
59
-
60
-
61
-
62
-
63
-
64
-
65
-
66
-
67
-
68
-
69
-
70
-
71
-
72
-
73
-
74
-
75
-
76
-
77
-
78
-
79
-
80
-
81
-
82
-
83
-
84
-
85
-
86
-
87
-
88
-
89
-
90
-
91
-
92
-
93
-
94
-
95
-
96
-
97
-
98
-
99
-
100
-
101
-
102
-
103
-
104
-
105
-
106
-
107
-
108
-
109
-
110
-
111
-
112
-
113
-
114
-
115
-
116
-
117
-
118
-
119
-
120
-
121
-
122
-
123
-
124
-
125
-
126
-
127
-
128
-
129
-
130
-
131
-
132
-
133
-
134
-
135
-
136
-
137
-
138
-
139
-
140
-
141
-
142
-
143
-
 144
144 -
 145
145 -
 146
146 -
 147
147 -
 148
148 -
 149
149 -
 150
150 -
 151
151 -
 152
152 -
 153
153 -
 154
154 -
155
-
156
-
157
-
158
-
159
-
160
-
161
-
162
-
163
-
164
-
165
-
166
-
167
-
168
-
169
-
170
-
171
-
172
-
173
-
174
-
175
-
176
-
177
-
178
-
179
-
180
-
181
-
182
-
183
-
184
-
185
-
186
-
187
-
188
 |
 |