Sony PDWHD1500 User Manual (PDW-HD1500 / F1600 Operation Manual for Firmware V - Page 89
To delete sub clips, To play the clip list, To change the starting timecode of clip, lists
 |
View all Sony PDWHD1500 manuals
Add to My Manuals
Save this manual to your list of manuals |
Page 89 highlights
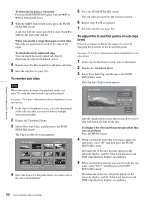
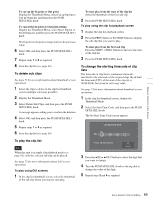
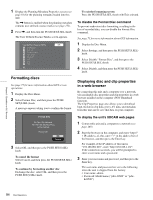
Chapter 5 Operations in GUI Screens To cue up the In point or Out point Display the Thumbnail Menu, select Cue up Inpoint or Cue up Outpoint, and then press the PUSH SET(S.SEL) knob. To cancel the In point or Out point setting Display the Thumbnail Menu, select Reset Inpoint or Reset Outpoint, and then press the PUSH SET(S.SEL) knob. The In point or Out point setting returns to the previous value. 6 Select OK, and then press the PUSH SET(S.SEL) knob. 7 Repeat steps 1 to 6 as required. 8 Save the clip list (see page 90). To delete sub clips See page 73 for more information about thumbnail screen operations. 1 Select the clips to delete in the clip list thumbnail screen (multiple selections possible). 2 Display the Thumbnail Menu. 3 Select Delete Sub Clips, and then press the PUSH SET(S.SEL) knob. A message appears asking you to confirm the deletion. 4 Select OK, and then press the PUSH SET(S.SEL) knob. 5 Repeat steps 1 to 4 as required. 6 Save the clip list (see page 90). To play the clip list Note When this unit is in single clip playback mode (see page 62), only the selected sub clip can be played. See page 73 for more information about GUI screen operations. To play using GUI screens 1 In the clip list thumbnail screen, select the thumbnail of the sub clip where you want to start play. To start play from the start of the clip list Select the thumbnail of the first sub clip. 2 Press the PUSH SET(S.SEL) knob. To play using the clip list playback screen 1 Display the clip list playback screen. 2 Press the PREV button or the NEXT button to display the sub clip that you want to play. To start play from the first sub clip Press the SHIFT + PREV buttons to move to the start of the clip list. 3 Press the PUSH SET(S.SEL) knob. To change the starting timecode of clip lists The timecode of clip lists is continuous timecode, unrelated to the timecode of the original clips. By default the timecode (LTC) of the start of the clip list is 00:00:00:00, but it can be set to any value. See page 73 for more information about thumbnail screen operations. 1 In the clip list thumbnail screen, display the Thumbnail Menu. 2 Select Set Start Time Code, and then press the PUSH SET(S.SEL) knob. The Set Start Time Code screen appears. Set Start Time Code TC 2 2 : 3 4 . 5 6 : 1 7 H MIN SEC FRM Preset TC 00:00:00:00 OK Cancel 3 Press the B/IN or b/OUT button to select the digit that you want to change. 4 Turn the PUSH SET(S.SEL) konb or the jog dial to change the value of the digit. 5 Repeat steps 3 and 4 as required. 89 Scene Selection (Clip List Editing)
-
 1
1 -
2
-
3
-
4
-
5
-
6
-
7
-
8
-
9
-
10
-
11
-
12
-
13
-
14
-
15
-
16
-
17
-
18
-
19
-
20
-
21
-
22
-
23
-
24
-
25
-
26
-
27
-
28
-
29
-
30
-
31
-
32
-
33
-
34
-
35
-
36
-
37
-
38
-
39
-
40
-
41
-
42
-
43
-
44
-
45
-
46
-
47
-
48
-
49
-
50
-
51
-
52
-
53
-
54
-
55
-
56
-
57
-
58
-
59
-
60
-
61
-
62
-
63
-
64
-
65
-
66
-
67
-
68
-
69
-
70
-
71
-
72
-
73
-
74
-
75
-
76
-
77
-
78
-
79
-
80
-
81
-
82
-
83
-
 84
84 -
 85
85 -
 86
86 -
 87
87 -
 88
88 -
 89
89 -
 90
90 -
 91
91 -
 92
92 -
 93
93 -
 94
94 -
95
-
96
-
97
-
98
-
99
-
100
-
101
-
102
-
103
-
104
-
105
-
106
-
107
-
108
-
109
-
110
-
111
-
112
-
113
-
114
-
115
-
116
-
117
-
118
-
119
-
120
-
121
-
122
-
123
-
124
-
125
-
126
-
127
-
128
-
129
-
130
-
131
-
132
-
133
-
134
-
135
-
136
-
137
-
138
-
139
-
140
-
141
-
142
-
143
-
144
-
145
-
146
-
147
-
148
-
149
-
150
-
151
-
152
-
153
-
154
-
155
-
156
-
157
-
158
-
159
-
160
-
161
-
162
-
163
-
164
-
165
-
166
-
167
-
168
-
169
-
170
-
171
-
172
-
173
-
174
-
175
-
176
-
177
-
178
-
179
-
180
-
181
-
182
-
183
-
184
-
185
-
186
-
187
-
188
 |
 |