Sony PDWHD1500 User Manual (PDW-HD1500 / F1600 Operation Manual for Firmware V - Page 34
MONTH, TIME ZONE, To return to the original screen without saving, settings
 |
View all Sony PDWHD1500 manuals
Add to My Manuals
Save this manual to your list of manuals |
Page 34 highlights
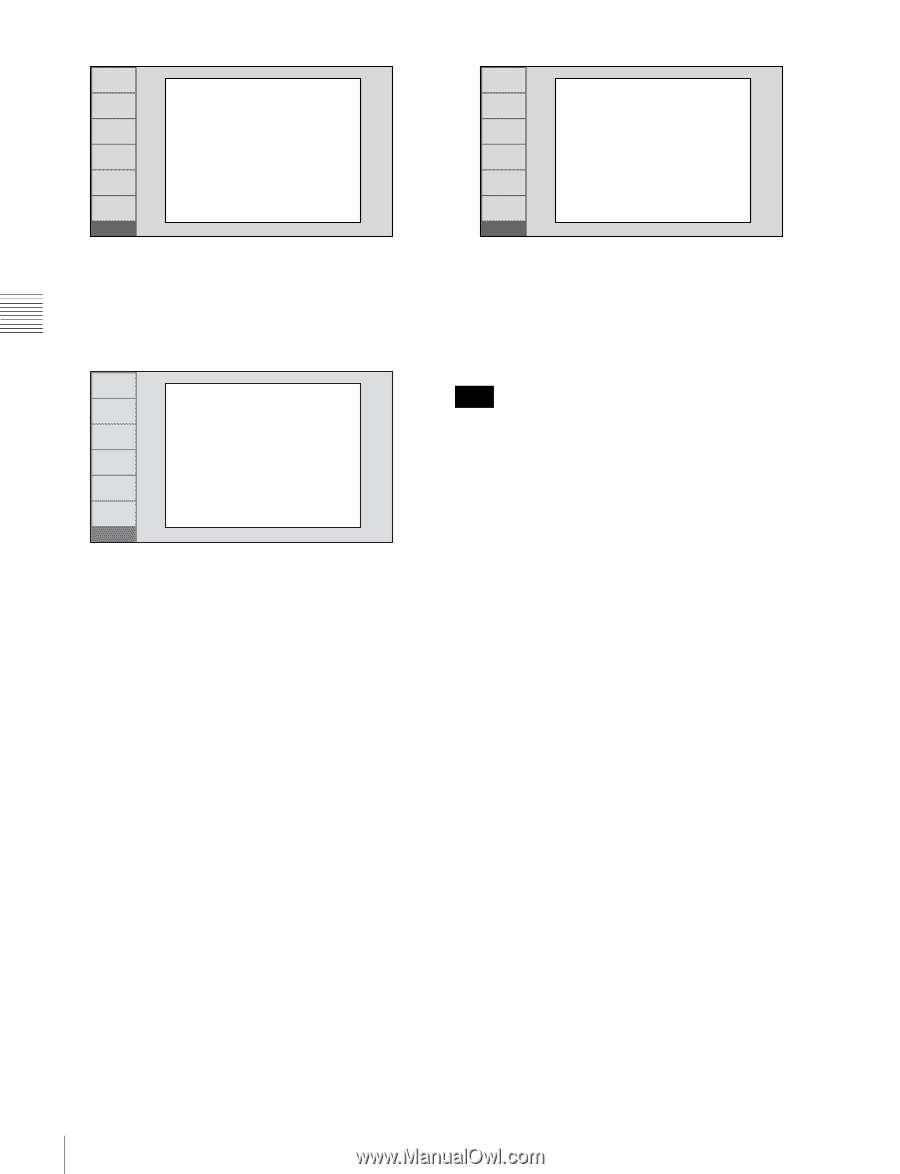
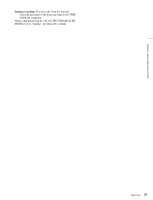
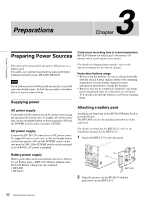
Chapter 3 Preparations RETURN INITIAL SETUP SYSTEM FREQUENCY SELECT 1080/50i SET INC/DEC : CTRL.KNOB CANCEL&PREV : F1(RET) SET&NEXT : F5(SET) INIT Display the system frequency that you want to use, and then press the SET function button (F5). The DATE/TIME PRESET screen appears. 4 In the DATE/TIME PRESET screen, set the current date and time by setting the following items. RETURN DATE/TIME PRESET YEAR 2008 MONTH 11 DAY 19 TIME 16:49:00 TIME ZONE UTC+00:00 SET INC/DEC : CTRL.KNOB SHIFT : (P)(p)KEY CANCEL&PREV : F1(RET) SET&NEXT : F5(SET) INIT YEAR: Year MONTH: Month DAY: Day TIME: Time TIME ZONE: Time zone (as a difference in hours with respect to Coordinated Universal Time (UTC)) In the setting screen, you can change the value of the flashing digit. Press the B/IN or b/OUT button to make the previous digit or next digit start flashing. Press the V/MARK1 or v/MARK2 button (or turn the PUSH SET(S.SEL) knob) to increment or decrement the value of the flashing digit. When you have finished making settings, press the SET function button (F5). The date, time, and time zone settings are saved, and the message "NOW SAVING..." appears. 5 If you want to save the settings made up to this point, press the SET function button (F5) again. RETURN INITIAL SETUP Push F5(SAVE) Key!! SET CANCEL&PREV : F1(RET) SAVE&REBOOT : F5(SET) INIT The message "NOW SAVING..." appears again, and the setting screen disappears. Then the unit powers itself off and on again. To return to the original screen without saving settings Press the RETURN function button (F1). Note The time zone is reset to the factory default when you execute the maintenance menu item M49: RESET ALL SETUP. You will need to set it again. The date and time are not reset. 34 Initial Setup
-
 1
1 -
2
-
3
-
4
-
5
-
6
-
7
-
8
-
9
-
10
-
11
-
12
-
13
-
14
-
15
-
16
-
17
-
18
-
19
-
20
-
21
-
22
-
23
-
24
-
25
-
26
-
27
-
28
-
 29
29 -
 30
30 -
 31
31 -
 32
32 -
 33
33 -
 34
34 -
 35
35 -
 36
36 -
 37
37 -
 38
38 -
 39
39 -
40
-
41
-
42
-
43
-
44
-
45
-
46
-
47
-
48
-
49
-
50
-
51
-
52
-
53
-
54
-
55
-
56
-
57
-
58
-
59
-
60
-
61
-
62
-
63
-
64
-
65
-
66
-
67
-
68
-
69
-
70
-
71
-
72
-
73
-
74
-
75
-
76
-
77
-
78
-
79
-
80
-
81
-
82
-
83
-
84
-
85
-
86
-
87
-
88
-
89
-
90
-
91
-
92
-
93
-
94
-
95
-
96
-
97
-
98
-
99
-
100
-
101
-
102
-
103
-
104
-
105
-
106
-
107
-
108
-
109
-
110
-
111
-
112
-
113
-
114
-
115
-
116
-
117
-
118
-
119
-
120
-
121
-
122
-
123
-
124
-
125
-
126
-
127
-
128
-
129
-
130
-
131
-
132
-
133
-
134
-
135
-
136
-
137
-
138
-
139
-
140
-
141
-
142
-
143
-
144
-
145
-
146
-
147
-
148
-
149
-
150
-
151
-
152
-
153
-
154
-
155
-
156
-
157
-
158
-
159
-
160
-
161
-
162
-
163
-
164
-
165
-
166
-
167
-
168
-
169
-
170
-
171
-
172
-
173
-
174
-
175
-
176
-
177
-
178
-
179
-
180
-
181
-
182
-
183
-
184
-
185
-
186
-
187
-
188
 |
 |