Sony PDWHD1500 User Manual (PDW-HD1500 / F1600 Operation Manual for Firmware V - Page 130
R.ST clip & rec start mark, Menu items in the 100s, relating to the control panels
 |
View all Sony PDWHD1500 manuals
Add to My Manuals
Save this manual to your list of manuals |
Page 130 highlights
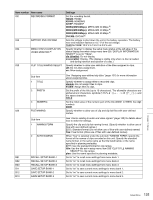
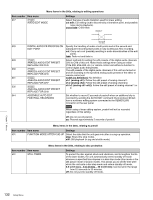
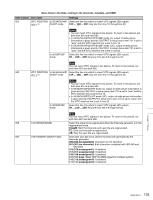
Menu items in the 100s, relating to the control panels Item number Item name 131 AUDIO VOLUME Settings Select whether each of the CH-1/ALL CH, CH-2 to CH-4 adjustment knobs on the control panel is effective to control the audio recording level and playback level on each channel or the CH-1/ALL CH adjustment knob alone functions as a master control to control the audio level on all channels together. each: Each of the CH-1/ALL CH, CH-2 to CH-4 adjustment knobs is effective to control each channel. all: The CH-1/ALL CH adjustment knob alone functions as a master control. When "all" is selected, the ALL CH indicator under the CH-1/ALL CH adjustment knob lights up. 140 AREA MARKER Select whether to display the display area of SD output on the color LCD. off: Do not display. on: Display. 142 REPEAT MODE Put the unit into repeat playback mode, or exit from repeat playback mode. off: Exits from repeat playback mode. play: Puts the unit into repeat playback mode. 143 INDEX PICTURE POSITION Select the frame of the clip to use as the thumbnail image (index picture) when recording. 0sec to 10sec: Can be set in the range from 0 seconds (first frame of the clip) to10 seconds, in units of 1 second. 145 MODE KEY ENABLE DURING Select whether the STOP button is the only button that stops recording. RECORDING ena (all enable): Recording stops when the EJECT button a), PLAY button, STOP button, SHTL/JOG button, and VAR/JOG button b) are pressed. stop: Recording stops only when the STOP button is pressed. 150 REC MODE Select the recording mode. normal: Normal recording mode D.EXC (disc exchange cache): Disc Exchange Cache mode C.REC (clip continuous rec): Clip Continuous Rec mode 151 GUI OPERATION Select whether to disable the display of the Thumbnail Menu and Disc Menu when this unit is in any mode other than stop mode. ena(enable): Do not disable. stop(via stop): Enable the display of menus in the stop mode. dis(disable): Disable. 153 FIND MODE Specify the frame to be cued up when the PREV or NEXT button is pressed. clip: The first frame of the clip R.ST (clip & rec start mark): The frame where a Rec Start essence mark is set (if no essence mark is set, the first frame of the clip) 154 SINGLE CLIP PLAY MODE Put the unit into single clip playback mode, or exit from single clip playback mode. off: Exits from single clip playback mode. (Puts the unit into continuous playback mode.) on: Puts the unit into single clip playback mode. a) The disc is ejected after recording stops. b) The unit enters stop mode when the PLAY button is pressed. It enters freeze picture mode (jog, shuttle, or variable mode) when the SHTL/JOG button or VAR/JOG button is pressed. Menu items in the 200s, relating to the remote control interface Item number Item name 201 PARA RUN Settings Select whether to use synchronized operation for two or more VTRs. dis (disable): No synchronized operationena ena (enable): Use synchronized operation Note To use synchronized operation for two or more VTRs, set item 201 to ena on all of the VTRs. Chapter 7 Menus 130 Setup Menu
-
 1
1 -
2
-
3
-
4
-
5
-
6
-
7
-
8
-
9
-
10
-
11
-
12
-
13
-
14
-
15
-
16
-
17
-
18
-
19
-
20
-
21
-
22
-
23
-
24
-
25
-
26
-
27
-
28
-
29
-
30
-
31
-
32
-
33
-
34
-
35
-
36
-
37
-
38
-
39
-
40
-
41
-
42
-
43
-
44
-
45
-
46
-
47
-
48
-
49
-
50
-
51
-
52
-
53
-
54
-
55
-
56
-
57
-
58
-
59
-
60
-
61
-
62
-
63
-
64
-
65
-
66
-
67
-
68
-
69
-
70
-
71
-
72
-
73
-
74
-
75
-
76
-
77
-
78
-
79
-
80
-
81
-
82
-
83
-
84
-
85
-
86
-
87
-
88
-
89
-
90
-
91
-
92
-
93
-
94
-
95
-
96
-
97
-
98
-
99
-
100
-
101
-
102
-
103
-
104
-
105
-
106
-
107
-
108
-
109
-
110
-
111
-
112
-
113
-
114
-
115
-
116
-
117
-
118
-
119
-
120
-
121
-
122
-
123
-
124
-
 125
125 -
 126
126 -
 127
127 -
 128
128 -
 129
129 -
 130
130 -
 131
131 -
 132
132 -
 133
133 -
 134
134 -
 135
135 -
136
-
137
-
138
-
139
-
140
-
141
-
142
-
143
-
144
-
145
-
146
-
147
-
148
-
149
-
150
-
151
-
152
-
153
-
154
-
155
-
156
-
157
-
158
-
159
-
160
-
161
-
162
-
163
-
164
-
165
-
166
-
167
-
168
-
169
-
170
-
171
-
172
-
173
-
174
-
175
-
176
-
177
-
178
-
179
-
180
-
181
-
182
-
183
-
184
-
185
-
186
-
187
-
188
 |
 |
