Sony PDWHD1500 User Manual (PDW-HD1500 / F1600 Operation Manual for Firmware V - Page 20
SUB CLIP/DISC MENU button and indicator, SUB CLIP button
 |
View all Sony PDWHD1500 manuals
Add to My Manuals
Save this manual to your list of manuals |
Page 20 highlights
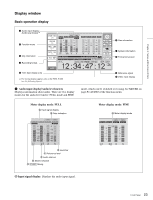
Chapter 2 Names and Functions of Parts setup menu item 101 SELECTION FOR SEARCH DIAL ENABLE to "dial"). e Shuttle dial Turn this for playback in shuttle mode or variable speed mode. Turn clockwise for forward direction playback, and counterclockwise for reverse direction playback. • In shuttle mode, the playback speed varies in the range ±20 times normal speed, according to the angular position of the shuttle dial. • In variable speed mode, you can finely adjust the playback speed from -2 to +2 times normal speed, according to the angular position of the shuttle dial. The shuttle dial has a detent at the center position, for still image playback. Normally, you press the SHTL/JOG button before turning the shuttle dial, but it is also possible to make a setting to enable shuttle mode directly by turning the dial (set setup menu item 101 SELECTION FOR SEARCH DIAL ENABLE to "dial"). Note When setup menu item 101 SELECTION FOR SEARCH DIAL ENABLE is set to "dial", after using the shuttle dial, return it to the center position. If the shuttle dial is not in the center position, it is possible occasionally for vibration from other operations to activate the dial, and start playback in shuttle mode. 4 Display/menu control section 5 RESET/RETURN button 4 MENU button 3 PUSH SET(S.SEL) knob 1 Function buttons (F1 to F6) 2 Display 6 SUB CLIP/DISC MENU button and indicator 7 THUMBNAIL button and indicator 8 DISPLAY button 9 SHIFT button 0 PAGE/HOME button qa EXPAND button qs CHAPTER button a Function buttons (F1 to F6) These buttons are enabled when the function menu (see page 48) is visible. Each press of a button changes the setting of the corresponding item in the menu. For convenience, this manual refers to these buttons as buttons F1 to F6, in order from the top. b Display Displays menus, audio level meters, and data such as time data or clip information. The DISPLAY button lets you switch to the video monitor display. For details, see "Display window" on page 23. c PUSH SET(S.SEL) knob Use for menu and GUI screen operations. Turn the knob to select items, and press it to confirm the selection. This button is also used to set numerical and timecode values. You can also change the playback speed by pressing the PLAY button and turning this knob during playback (see page 65). See "GUI screen operations" (page 73) for more information about how to use the thumbnail screens. d MENU button Displays the setup menu or the GUI screen menu. The setup menu appears when no GUI screen is visible. The same information is also superimposed on the display on a monitor connected to the unit. Press once more to return to the original display. See "GUI screen operations" (page 73) for more information about how to use the thumbnail screens. e RESET/RETURN button Functions as the RESET button or the RETURN button. RESET button: Reset counters or the setting values of the timecode generator. This button is also used to abort or cancel setup menu, scene selection, and thumbnail search operations. RETURN button: In setup menu and GUI screens, returns to the previous procedure. f SUB CLIP/DISC MENU button and indicator When pressed alone, functions as the SUB CLIP button. When pressed together with the SHIFT button, functions as the DISC MENU button. SUB CLIP button: Press the button, lighting the indicator, to carry out playback in clip list order (see page 85). Jog and shuttle operations are supported during clip list playback. To return to playback in recording order, press the button again, turning the indicator off. 20 Front Panel
-
 1
1 -
2
-
3
-
4
-
5
-
6
-
7
-
8
-
9
-
10
-
11
-
12
-
13
-
14
-
 15
15 -
 16
16 -
 17
17 -
 18
18 -
 19
19 -
 20
20 -
 21
21 -
 22
22 -
 23
23 -
 24
24 -
 25
25 -
26
-
27
-
28
-
29
-
30
-
31
-
32
-
33
-
34
-
35
-
36
-
37
-
38
-
39
-
40
-
41
-
42
-
43
-
44
-
45
-
46
-
47
-
48
-
49
-
50
-
51
-
52
-
53
-
54
-
55
-
56
-
57
-
58
-
59
-
60
-
61
-
62
-
63
-
64
-
65
-
66
-
67
-
68
-
69
-
70
-
71
-
72
-
73
-
74
-
75
-
76
-
77
-
78
-
79
-
80
-
81
-
82
-
83
-
84
-
85
-
86
-
87
-
88
-
89
-
90
-
91
-
92
-
93
-
94
-
95
-
96
-
97
-
98
-
99
-
100
-
101
-
102
-
103
-
104
-
105
-
106
-
107
-
108
-
109
-
110
-
111
-
112
-
113
-
114
-
115
-
116
-
117
-
118
-
119
-
120
-
121
-
122
-
123
-
124
-
125
-
126
-
127
-
128
-
129
-
130
-
131
-
132
-
133
-
134
-
135
-
136
-
137
-
138
-
139
-
140
-
141
-
142
-
143
-
144
-
145
-
146
-
147
-
148
-
149
-
150
-
151
-
152
-
153
-
154
-
155
-
156
-
157
-
158
-
159
-
160
-
161
-
162
-
163
-
164
-
165
-
166
-
167
-
168
-
169
-
170
-
171
-
172
-
173
-
174
-
175
-
176
-
177
-
178
-
179
-
180
-
181
-
182
-
183
-
184
-
185
-
186
-
187
-
188
 |
 |