TRENDnet TV-IP762IC User Guide
TRENDnet TV-IP762IC Manual
 |
View all TRENDnet TV-IP762IC manuals
Add to My Manuals
Save this manual to your list of manuals |
TRENDnet TV-IP762IC manual content summary:
- TRENDnet TV-IP762IC | User Guide - Page 1
TRENDnet User's Guide TV-IP762IC © Copyright 2013 TRENDnet. All Rights Reserved. 1 - TRENDnet TV-IP762IC | User Guide - Page 2
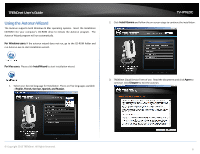
32 Step 4: Camera Name Settings 32 Step 5: Time Settings 32 Step 6: Setup Complete 35 System...35 © Copyright 2013 TRENDnet. All Rights Reserved. TV-IP762IC Admin ...36 Time and Date 37 Network ...38 Network...39 Wireless Setup 40 Dynamic DNS 40 Cloud Setting 41 Cloud Status 41 Audio - TRENDnet TV-IP762IC | User Guide - Page 3
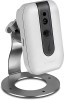
online retailer, or reseller/distributor that the item was purchased. © Copyright 2013 TRENDnet. All Rights Reserved. TV-IP762IC Features The Wireless HD Day/Night Cloud Camera, model TV-IP762IC, takes the work out of viewing HD video over the internet. After a brief installation, simply open a web - TRENDnet TV-IP762IC | User Guide - Page 4
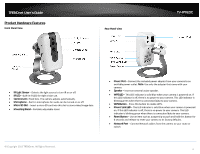
TRENDnet User's Guide Product Hardware Features Front Panel View Rear Panel View TV-IP762IC IR Light Sensor - Detects the light source to turn IR on or off. IR LED - Built-in IR LED for night vision use. Camera Lens -Fixed lens. The camera adjusts automatically. Microphone - Built-in - TRENDnet TV-IP762IC | User Guide - Page 5
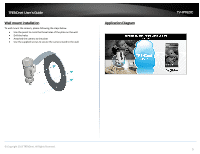
the camera, please following the steps below. Use the pencil to mark the three holes of the plate on the wall. Drill the holes Attached the camera to the plate Use the supplied screws to secure the camera stand to the wall. Application Diagram TV-IP762IC © Copyright 2013 TRENDnet. All - TRENDnet TV-IP762IC | User Guide - Page 6
go to the CD-ROM folder and run Autorun.exe to start installation wizard. TV-IP762IC 2. Click Install Camera and follow the on-screen steps to continue the installation. For Mac users: Please click InstallWizard to start installation wizard. 1. Select your desired language for Installation. There - TRENDnet TV-IP762IC | User Guide - Page 7
TRENDnet User's Guide 4. Write down the MAC address of your camera. This can be found on the device label. Click Next to continue, Back to go to the previous screen or Home to return to the main menu. The packaging also included a sticker with the same information. TV-IP762IC Option A: Wired - TRENDnet TV-IP762IC | User Guide - Page 8
TRENDnet User's Guide 3. Connect one end of the network cable to your camera and the other end to your router. Click Next to continue, Back to go to the previous screen or Home to return to the Main Menu. TV-IP762IC 5. Select your camera. The wizard will show all cameras in the network. If there is - TRENDnet TV-IP762IC | User Guide - Page 9
TRENDnet User's Guide 6. Changing Password. You must change the default password of the camera. The default username and password is admin. Click the Change Password checkbox to enter a new password. The password should be between 8 and 16 characters. Click Next to continue. TV-IP762IC 7. The - TRENDnet TV-IP762IC | User Guide - Page 10
TRENDnet User's Guide 8. The Mobile App option allows the user to download the TRENDnet CloudView mobile app for either use your camera. Click Finish to exit. TV-IP762IC Option B: Wireless Connection Using WPS Button 1. Click Connect camera to your wireless using Wi-Fi Protected Setup (WPS) button - TRENDnet TV-IP762IC | User Guide - Page 11
TRENDnet User's Guide 3. Press the WPS button on your wireless router or access point for 5 seconds. Within 2 minutes press and hold WPS button on the IP Camera for 5 seconds. The WPS button will be start blinking. Wait until the WPS LED turns off and Power/Link LED turn green. It can take - TRENDnet TV-IP762IC | User Guide - Page 12
, click Retry. If the Cloud server isn't found, the server may be busy or under maintenance. Under these circumstances, click Retry again. If there is no warning, click Next to continue. TV-IP762IC 8. The Mobile App option allows the user to download the TRENDnet CloudView mobile app for either - TRENDnet TV-IP762IC | User Guide - Page 13
TRENDnet User's Guide Option C: Wireless Connection by Manual Setup 1. Click Connect camera to your wireless network manually radio button and click Next to continue. TV-IP762IC 3. Connect one end of the network cable to your camera and the other end to your router. Click Next to continue, Back to - TRENDnet TV-IP762IC | User Guide - Page 14
TRENDnet User's Guide 5. Changing Password. You must change the default password of the camera. The username and password is admin. Click the Change Password checkbox to enter a new password. The password should be between 8 and 16 characters. Click Next to continue. TV-IP762IC 7. Disconnect your - TRENDnet TV-IP762IC | User Guide - Page 15
, click Retry. If the Cloud server isn't found, the server may be busy or under maintenance. Under these circumstances, click Retry again. If there is no warning, click Next to continue. TV-IP762IC 10. The Mobile App option allows the user to download the TRENDnet CloudView mobile app for either - TRENDnet TV-IP762IC | User Guide - Page 16
TRENDnet User's Guide Starting the TRENDnet Cloud Service Using the Cloud Service to connect the camera from any location or computer. Follow these steps to setup the process: Ensure the TV-IP762IC has successfully connected to the network and Internet. Look underneath the camera for the cloud - TRENDnet TV-IP762IC | User Guide - Page 17
TRENDnet User's Guide 4. TRENDnet Cloud Terms of Use. Read the document and click the Accept checkbox and click Next to continue. TV-IP762IC 5. Changing the username and password. The change password option only appears when your password has not changed from the default setting admin. If you have - TRENDnet TV-IP762IC | User Guide - Page 18
TRENDnet User's Guide 6. The next screen verifies your settings are successful. Click Login. TV-IP762IC 7. Login with the new username and password and click Login. 8. After you login, the following Cloud Service page will appear. © Copyright 2013 TRENDnet. All Rights Reserved. 18 - TRENDnet TV-IP762IC | User Guide - Page 19
and management options. TV-IP762IC Cloud Mode 2: Mode 2 indicates the camera is connecting to media in a peer-to-peer fashion to the Internet or local network. This mode offers configuration and management options but not an Advanced Configuration mode. © Copyright 2013 TRENDnet. All Rights - TRENDnet TV-IP762IC | User Guide - Page 20
TRENDnet User's Guide Cloud Mode 3: Mode 3 indicates the camera is users of the limited time. Refresh this screen continuously if you wish to view your camera's live stream. Cloud Interface and Configuration Interface This section described the cloud interface. TV-IP762IC © Copyright 2013 TRENDnet - TRENDnet TV-IP762IC | User Guide - Page 21
TRENDnet User's Guide 6. Microphone on your PC. Toggle between On/Off. 7. Snapshot - take a snapshot 8. Start recording. Toggle between Start/Stop Live View recording into your TV-IP762IC folder, under the "My Document" folder, on your PC. 9. Configure settings in the cloud service. 10. Profiles ( - TRENDnet TV-IP762IC | User Guide - Page 22
TRENDnet User's Guide For Audio Configuration 1. Click to enable the speaker. 2. Adjust the volume. 3. Click to enable the microphone. 4. Adjust the microphone volume. Click OK to apply the settings. TV-IP762IC For Image Configuration 1. Brightness: Use the slider to adjust the brightness. 2. - TRENDnet TV-IP762IC | User Guide - Page 23
TRENDnet User's Guide For System Configuration 1. Username: Only change the Admin username here. 2. Existing Password: Enter the existing Admin Password. 3. New Password: Enter the new password. 4. Confirm the Password: Enter the new password again. Click OK to apply the settings. TV-IP762IC For - TRENDnet TV-IP762IC | User Guide - Page 24
TRENDnet User's Guide For Advanced Configuration (Please Note: Only Admin can use this option in Mode 1) Click the Settings button to redirect to your IP camera's web page. This configuration method is similar to the one you already have locally if you use your local IP address. TV-IP762IC Aspect - TRENDnet TV-IP762IC | User Guide - Page 25
and record it. TV-IP762IC You will be directed to the Google Play™ to download the app. The app will copy the QR link and provide a HTML link to the TRENDnet CloudView app. Click on the link. Download the app, install it and use the app on your mobile device to view the TRENDnet camera. 2 Please - TRENDnet TV-IP762IC | User Guide - Page 26
TRENDnet User's Guide Apple iOS version Scan the QR Code using one of IOS's QR Code apps. The app will automatically create an HTML link to the iTunes App Store. Click the link. TV-IP762IC Web Browser Management After completing the AutoRun Wizard, you are ready to use your camera. The camera's - TRENDnet TV-IP762IC | User Guide - Page 27
TRENDnet User's Guide After you have logged in, Internet Explorer will prompt you to install the camera add-on required. Click Allow to install the add-on. TV-IP762IC These initial steps are using a non-Internet Explorer web browser. After you have logged in, you need to install the plug-in. Click - TRENDnet TV-IP762IC | User Guide - Page 28
TRENDnet User's Guide Download the plug-in to a folder on the local PC and run the downloaded plug-in installation file after the download. Click Next to continue. TV-IP762IC Main Live View Interface After successfully logging into the Live View Interface of the camera, the following window will - TRENDnet TV-IP762IC | User Guide - Page 29
light) environment. When the Day Mode is active, the video feed will be in color. When the Night Mode is active, the video feed will be in black and white. From the drop-down menu, select a language. © Copyright 2013 TRENDnet. All Rights Reserved. TV-IP762IC Icon Please select a language Icon - TRENDnet TV-IP762IC | User Guide - Page 30
TRENDnet User's Guide Setup In the Setup section , you can view and configure more advanced features available on the IP camera. After clicking the Setup button, the following page will be displayed. TV-IP762IC Wizard The first category option available is Wizard. The setup wizard will guide users - TRENDnet TV-IP762IC | User Guide - Page 31
TRENDnet User's Guide Step 1: LAN Settings Step 2: Internet Settings TV-IP762IC This camera can connect to the Internet directly through the means of a PPPoE connection. On this page users can enter the PPPoE Internet connection's Username and Password. Click the checkbox to enable this feature. - TRENDnet TV-IP762IC | User Guide - Page 32
TRENDnet User's Guide Step 3: DDNS Settings Step 4: Camera Name Settings TV-IP762IC On this page users can configure the camera's name. Enter a name for the camera. This feature is helpful when you have more than one camera setup. Click Next to continue. Step 5: Time Settings On this page users - TRENDnet TV-IP762IC | User Guide - Page 33
TRENDnet User's Guide After enabling the daylight saving feature, the following will appear. TV-IP762IC After selecting the Set DST Manually option, the following will appear. To allow the camera to automatically detect the daylight saving time, select the Auto Daylight Saving option or select the - TRENDnet TV-IP762IC | User Guide - Page 34
TRENDnet User's Guide After selecting the Synchronize with Network Time Protocol server option, the following will appear. TV-IP762IC After selecting the Setup Date and Time Manually option, the following will appear. Select and enter the NTP Server address used here or alternatively select the - TRENDnet TV-IP762IC | User Guide - Page 35
TRENDnet User's Guide Step 6: Setup Complete TV-IP762IC System The next category option available is System the Apply button, a notice will appear to mention that the camera will restart in 60 seconds and that it is saving the settings to the camera. After the restart, the Web UI will direct back to - TRENDnet TV-IP762IC | User Guide - Page 36
TRENDnet User's Guide Admin TV-IP762IC In the User List section, The User Name list will be populated with the names of the user accounts created in the previous section. To delete a user, select the user from the drop-down list and click the Delete button. In the Admin Settings section, you can - TRENDnet TV-IP762IC | User Guide - Page 37
TRENDnet User's Guide Time and Date TV-IP762IC In the Device Settings section, enter the Camera Name in the space provided. Click server. Select the Set DST Manually option to manually configure the daylight saving time options. After selecting to manually configure the daylight saving time, - TRENDnet TV-IP762IC | User Guide - Page 38
TRENDnet User's Guide TV-IP762IC Network The next category option available is Network. In the Network category, you can configure the wired and wireless network settings. Also available for configuration in this category is Dynamic DNS. In the Set Date and Time Manually section, click the Setup - TRENDnet TV-IP762IC | User Guide - Page 39
TRENDnet User's Guide Network In the LAN Settings section, you can configure the following. TV-IP762IC In the IPv6 Settings part, you can configure the IPv6 network settings used by this camera. Select the DHCP Connection option to automatically obtain the IPv6 network settings, for this camera, - TRENDnet TV-IP762IC | User Guide - Page 40
following page will be available. TV-IP762IC the ad-hoc mode. After selecting the ad-hoc mode, we will be able to manually select the wireless Channel number used for the connection. Select the Security Mode for this camera. The four supported security modes for this camera are None, WEP, WPA-PSK - TRENDnet TV-IP762IC | User Guide - Page 41
TRENDnet User's Guide Click the Enable option to enable the Dynamic DNS feature. Select the DDNS service provider from the drop-down list after which the service provider's name will be moved to the Server Address field. Enter the Host Name, User Name, Password, and Timeout information in the spaces - TRENDnet TV-IP762IC | User Guide - Page 42
TRENDnet User's Guide Audio and Video In the Video Profile sections, you can configure the following. TV-IP762IC In the Day/Night Mode section, you can configure the following. Select the Encode Type option from the drop-down list. Encoding types that can be selected are MPEG4, H. - TRENDnet TV-IP762IC | User Guide - Page 43
TRENDnet User's Guide After selecting the Auto option as the Day/Night Mode, you can configure the following. In the Audio Setup section, you can configure the following. TV-IP762IC Day/Night Mode, you can configure the following. Tick the Speaker option to enable the audio feed from the camera - TRENDnet TV-IP762IC | User Guide - Page 44
TRENDnet User's Guide Image Setup In the Live Video section, you can view the live video feed while we do image modifications in the Image Settings section. TV-IP762IC the Reset to Default button to return the image settings to their default values. © Copyright 2013 TRENDnet. All Rights Reserved. 44 - TRENDnet TV-IP762IC | User Guide - Page 45
TRENDnet User's Guide Recording This camera allows users to record video, based on a trigger event, and then save the video recording either on a micro SD card or on a Samba server shared folder. In the Recording section, you can configure the following. TV-IP762IC After selecting the Motion option - TRENDnet TV-IP762IC | User Guide - Page 46
TRENDnet User's Guide After selecting the Sound option as the Trigger by event, the following can be configured. TV-IP762IC When selecting the Video option, the following can be configured. Selecting Sound, will tell the camera only to record when sound is detected. Tick the Schedule option to - TRENDnet TV-IP762IC | User Guide - Page 47
TRENDnet User's Guide After selecting Samba Network Storage as the recording Target, the recording will be saved on the Samba network attached storage available on the local network. TV-IP762IC Video Clip This camera allows users to record video clips and then send it to an FTP server or email the - TRENDnet TV-IP762IC | User Guide - Page 48
TRENDnet User's Guide Selecting Motion, will tell the camera only to record when motion is detected. Tick the Schedule option to only record motion at specific times of the week. Tick the Day and enter the Start and End times. After selecting the Schedule option as the Trigger by event, the - TRENDnet TV-IP762IC | User Guide - Page 49
TRENDnet User's Guide After selecting E-mail as the Target, the following will be available. TV-IP762IC Snapshot Snapshots can be taken by this camera based on the trigger by event. Enter the Recipient E-mail Address, SMTP Mail Server address, Port number, User Name, Password, Sender E-mail - TRENDnet TV-IP762IC | User Guide - Page 50
TRENDnet User's Guide After selecting the Schedule option as the Trigger by event, the following can be configured. Selecting Schedule will tell the camera to always take snapshots within the scope of the schedule configured. Click the Day and enter the Start and End times. After selecting the - TRENDnet TV-IP762IC | User Guide - Page 51
TRENDnet User's Guide After selecting E-mail as the Target, the following will be available. SD Management On this page the micro SD card can be managed. TV-IP762IC Enter the Recipient E-mail Address, SMTP Mail Server address, Port number, User Name, Password Delete button to manually remove a - TRENDnet TV-IP762IC | User Guide - Page 52
TRENDnet User's Guide Motion Detection The next category option available is Motion Detection. In the Motion Detection category, you can configure the motion detection area and settings for this camera. TV-IP762IC Sound Detection The next category option available is Sound Detection. In the Sound - TRENDnet TV-IP762IC | User Guide - Page 53
TRENDnet User's Guide Tools The next category option available is Tools. In the Tools category, you can backup and restore configuration files, reset or reboot the camera, and perform a firmware update. System In the System section, you can configure the following. TV-IP762IC Click the Backup - TRENDnet TV-IP762IC | User Guide - Page 54
TRENDnet User's Guide Firmware Update In the Firmware section, it displays firmware information. TV-IP762IC Advanced In the Advanced category, it shows the detailed information about the camera as well as the system log file. In the Firmware Information section, information regarding the current - TRENDnet TV-IP762IC | User Guide - Page 55
TRENDnet User's Guide Device Info In the Information section, you can view more detailed information about the camera's configuration. TV-IP762IC Log In the Current Log section , you can view a list of system log entries that was generated based on events that occurred during the runtime - TRENDnet TV-IP762IC | User Guide - Page 56
TRENDnet User's Guide Setup Wizard Utility Setup Wizard utility will help you to find the camera's IP address in the network. 1. Insert the included CD-ROM into your CD/DVD drive, browse to the CD drive of the SetupWizard folder and run - TRENDnet TV-IP762IC | User Guide - Page 57
TRENDnet User's Guide 7. Login to your camera by entering the ID and Password. By default, both the ID and Password are set to admin. Click Next to continue. TV-IP762IC 9. It is strongly recommended that you change your password to secure the camera from being accessed by others. Check the Change - TRENDnet TV-IP762IC | User Guide - Page 58
TRENDnet User's Guide 11. Select whether you want to use the camera over an wireless connection or on a wired connection. Click No, I don't want to use wireless for the camera. Then click Next to continue. (skip to step 12 for wireless configuration) TV-IP762IC 13. After the Setup Wizard configures - TRENDnet TV-IP762IC | User Guide - Page 59
TRENDnet User's Guide 15. When selecting the wireless setup choose "I want to use wireless for the camera" and then click Next to continue. TV-IP762IC 16. A summary screen of the settings you have chosen appears. Click Next to continue. Wireless Connection Find the access point (AP) you wish to - TRENDnet TV-IP762IC | User Guide - Page 60
TRENDnet User's Guide 18. Connecting over wireless Disconnect the Ethernet cable from the camera and wait for 1 minute for the camera to turn to wireless mode then click Next to continue. TRENDnetVIEW Pro Software Click Autorun. TV-IP762IC 19. When the Setup Wizard has finished, the configuration - TRENDnet TV-IP762IC | User Guide - Page 61
to continue. Please view the TRENDnetVIEW Pro User Guide for more details on the software. © Copyright 2013 TRENDnet. All Rights Reserved. TV-IP762IC Troubleshooting 1. The Power LED and Ethernet Activity LED do not light up. The power supply or camera might be faulty. Check that the connection - TRENDnet TV-IP762IC | User Guide - Page 62
software in order to view the streaming video transmitted by the Network Camera. Try also viewing the video using Java. Ensure that you have the latest version of Java installed before you do. Go to www.java.com for more information. © Copyright 2013 TRENDnet. All Rights Reserved. TV-IP762IC - TRENDnet TV-IP762IC | User Guide - Page 63
of the R&TTE Directive 1999/5/EC. The following test methods have been applied in order to prove presumption of conformity with the essential requirements of the R&TTE Directive 1999/5/EC: © Copyright 2013 TRENDnet. All Rights Reserved. TV-IP762IC EN 60950-1:2006+A11:2009+A1:2010+A12:2011 - TRENDnet TV-IP762IC | User Guide - Page 64
TRENDnet User's Guide This device is designed to provide uninterrupted monitoring and/or recording. This device does not off power regulation, all WiFi products marketed in the US must be fixed to US operation channels only. © Copyright 2013 TRENDnet. All Rights Reserved. TV-IP762IC 64 - TRENDnet TV-IP762IC | User Guide - Page 65
TRENDnet User's Guide Česky [Czech] Dansk [Danish] Deutsch [German] Eesti [Estonian] English Español [Spanish] Greek] Français [French] Italiano [Italian] Latviski [Latvian] TRENDnet tímto prohlašuje, že tento TV-IP762IC je ve shodě se základními požadavky a dalšími příslušnými ustanoveními smě - TRENDnet TV-IP762IC | User Guide - Page 66
TRENDnet User's Guide Limited Warranty TRENDnet warrants its products against defects in material and workmanship, under normal use and service, for the following lengths of time from the date of purchase. TV-IP762IC - 3 Years Warranty AC/DC Power Adapter, Cooling Fan, and Power Supply carry 1 year - TRENDnet TV-IP762IC | User Guide - Page 67
-
 1
1 -
 2
2 -
 3
3 -
 4
4 -
 5
5 -
 6
6 -
 7
7 -
8
-
9
-
10
-
11
-
12
-
13
-
14
-
15
-
16
-
17
-
18
-
19
-
20
-
21
-
22
-
23
-
24
-
25
-
26
-
27
-
28
-
29
-
30
-
31
-
32
-
33
-
34
-
35
-
36
-
37
-
38
-
39
-
40
-
41
-
42
-
43
-
44
-
45
-
46
-
47
-
48
-
49
-
50
-
51
-
52
-
53
-
54
-
55
-
56
-
57
-
58
-
59
-
60
-
61
-
62
-
63
-
64
-
65
-
66
-
67
 |
 |

© Copyright 2013 TRENDnet. All Rights Reserved.
TRENDnet User’s Guide
TV-IP762IC
1