TRENDnet TV-IP762IC User Guide - Page 7
Option A: Wired Connection by Network Cable - manual
 |
View all TRENDnet TV-IP762IC manuals
Add to My Manuals
Save this manual to your list of manuals |
Page 7 highlights
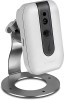
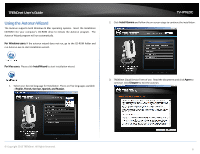
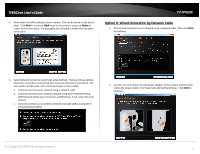
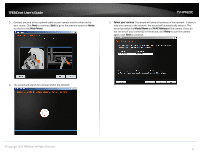
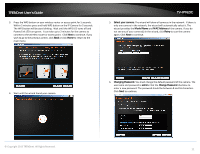
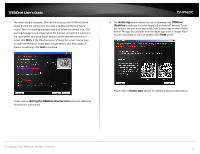
TRENDnet User's Guide 4. Write down the MAC address of your camera. This can be found on the device label. Click Next to continue, Back to go to the previous screen or Home to return to the main menu. The packaging also included a sticker with the same information. TV-IP762IC Option A: Wired Connection by Network Cable 1. Click Connect camera to your network using a network cable. Then click Next to continue. 5. Select Network connection and initial setup method. There are three options. Select the connection method that best suits your Network environment. The next section will describe each connection types in more detail. a. Connect camera to your network using a network cable b. Connect camera to your wireless network using Wi-Fi Protected Setup (WPS) button (Verify your router has a WPS button. If not, select the next option). c. Connect camera to your wireless network manually without using Wi-Fi Protected Setup (WPS) 2. Connect one end of the included power adapter to the camera and the other end to the power outlet. The Power/Link LED will be blinking. Click Next to continue. © Copyright 2013 TRENDnet. All Rights Reserved. 7
-
 1
1 -
 2
2 -
 3
3 -
 4
4 -
 5
5 -
 6
6 -
 7
7 -
 8
8 -
 9
9 -
 10
10 -
 11
11 -
 12
12 -
13
-
14
-
15
-
16
-
17
-
18
-
19
-
20
-
21
-
22
-
23
-
24
-
25
-
26
-
27
-
28
-
29
-
30
-
31
-
32
-
33
-
34
-
35
-
36
-
37
-
38
-
39
-
40
-
41
-
42
-
43
-
44
-
45
-
46
-
47
-
48
-
49
-
50
-
51
-
52
-
53
-
54
-
55
-
56
-
57
-
58
-
59
-
60
-
61
-
62
-
63
-
64
-
65
-
66
-
67
 |
 |
