TRENDnet TV-IP762IC User Guide - Page 40
Wireless Setup, Dynamic DNS
 |
View all TRENDnet TV-IP762IC manuals
Add to My Manuals
Save this manual to your list of manuals |
Page 40 highlights
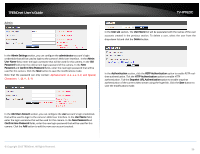
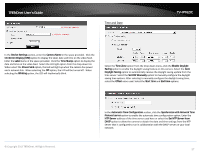
TRENDnet User's Guide Wireless Setup In the Wireless Configuration section, you can configure the following. Click the Enable Wireless button to enable the wireless feature for this camera. After clicking the Enable Wireless button, the camera will restart (80 seconds) and the following page will be available. TV-IP762IC the ad-hoc mode. After selecting the ad-hoc mode, we will be able to manually select the wireless Channel number used for the connection. Select the Security Mode for this camera. The four supported security modes for this camera are None, WEP, WPA-PSK, and WPA2-PSK. After selecting WPA-PSK or WPA2PSK as the security mode, select the Cipher Type used for this security mode. After selecting WEP, WPA-PSK, or WPA2-PSK as the security mode, enter the wireless Key used in the space provided. Tick the Show Hidden Key option to display the key entered. Click the Apply button to apply the modifications made. Dynamic DNS Dynamic DNS is a method of keeping a domain name linked to a changing public IP address as not all public IP addresses are static. Typically, when a user connects to the Internet, the user's ISP assigns an unused IP address from a pool of IP addresses and this address is used only for the duration of that specific connection. This method of dynamically assigning addresses extends the usable pool of available IP addresses. A dynamic DNS service provider uses a special program that runs on the user's computer, contacting the DNS service each time the IP address provided by the ISP changes and subsequently updating the DNS database to reflect the change in IP address. In the Dynamic DNS Settings section, you can configure the following. Unclick the Wireless option to disable the wireless functionality of this camera. Enter the wireless Network Name (SSID) in the space provide or select the wireless network name from the Site Survey drop-down list. If the wireless network exists and is not displayed in the Site Survey drop-down list, click the Rescan button to rescan for available wireless networks. Select the Wireless Mode for this camera. The two supported modes are Infrastructure and Ad-Hoc. When connecting the camera to a wireless access point or router, use the infrastructure mode. When connecting the camera to a wireless adapter directly, select © Copyright 2013 TRENDnet. All Rights Reserved. 40
-
 1
1 -
2
-
3
-
4
-
5
-
6
-
7
-
8
-
9
-
10
-
11
-
12
-
13
-
14
-
15
-
16
-
17
-
18
-
19
-
20
-
21
-
22
-
23
-
24
-
25
-
26
-
27
-
28
-
29
-
30
-
31
-
32
-
33
-
34
-
 35
35 -
 36
36 -
 37
37 -
 38
38 -
 39
39 -
 40
40 -
 41
41 -
 42
42 -
 43
43 -
 44
44 -
 45
45 -
46
-
47
-
48
-
49
-
50
-
51
-
52
-
53
-
54
-
55
-
56
-
57
-
58
-
59
-
60
-
61
-
62
-
63
-
64
-
65
-
66
-
67
 |
 |
