TRENDnet TV-IP762IC User Guide - Page 37
Time and Date
 |
View all TRENDnet TV-IP762IC manuals
Add to My Manuals
Save this manual to your list of manuals |
Page 37 highlights
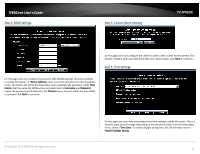
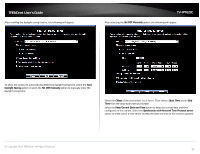
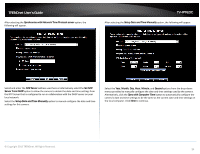
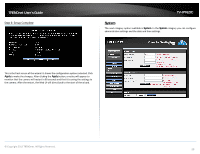
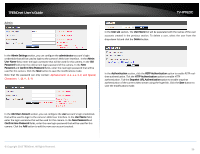
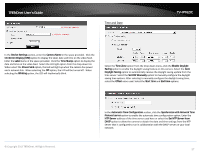
TRENDnet User's Guide Time and Date TV-IP762IC In the Device Settings section, enter the Camera Name in the space provided. Click the On-Screen Display (OSD) option to display the label, date and time on the video feed. Enter the Label name in the space provided. Click the Time Stamp option to display the data and time on the video feed. Select the LED light option from the drop-down list. When select the Power/Link option, the LED will light up when the camera has power and a network link. When selecting the Off option, the LED will be turned off. When selecting the Blinking option, the LED will rhythmically blink. Select the Time Zone option from the drop-down menu, click the Enable Daylight Saving option to enable the daylight saving feature on this camera. Select the Auto Daylight Saving option to automatically receive the daylight saving update from the time server. Select the Set DST Manually option to manually configure the daylight saving time options. After selecting to manually configure the daylight saving time, select the Offset value used. Select the Start time and End time options. © Copyright 2013 TRENDnet. All Rights Reserved. In the Automatic Time Configuration section, click the Synchronize with Network Time Protocol server option to enable the automatic time configuration option. Enter the NTP Server address of the time server used here or select the Set NTP Server from DHCP option to allow the camera to obtain the date and time settings from the NTP Server that is configured to run in collaboration with the DHCP server on your local network. 37
-
 1
1 -
2
-
3
-
4
-
5
-
6
-
7
-
8
-
9
-
10
-
11
-
12
-
13
-
14
-
15
-
16
-
17
-
18
-
19
-
20
-
21
-
22
-
23
-
24
-
25
-
26
-
27
-
28
-
29
-
30
-
31
-
 32
32 -
 33
33 -
 34
34 -
 35
35 -
 36
36 -
 37
37 -
 38
38 -
 39
39 -
 40
40 -
 41
41 -
 42
42 -
43
-
44
-
45
-
46
-
47
-
48
-
49
-
50
-
51
-
52
-
53
-
54
-
55
-
56
-
57
-
58
-
59
-
60
-
61
-
62
-
63
-
64
-
65
-
66
-
67
 |
 |
