TRENDnet TV-IP762IC User Guide - Page 39
IPv6 Address/Prefix Length
 |
View all TRENDnet TV-IP762IC manuals
Add to My Manuals
Save this manual to your list of manuals |
Page 39 highlights
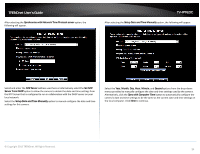
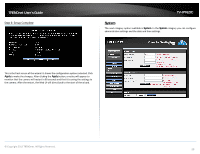
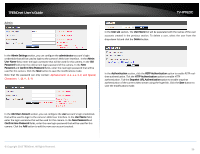
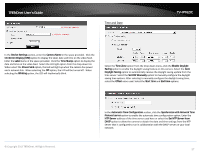
TRENDnet User's Guide Network In the LAN Settings section, you can configure the following. TV-IP762IC In the IPv6 Settings part, you can configure the IPv6 network settings used by this camera. Select the DHCP Connection option to automatically obtain the IPv6 network settings, for this camera, from a DHCP server, located on the local network. Select the Static IP Address option to manually configure the IPv6 network settings used by this camera. Enter the IPv6 Address/Prefix Length, Default Gateway (Router), Primary DNS, and Optional Secondary DNS parameters in the spaces provided. In the IPv4 Settings part, you can configure the IPv4 network settings used by this camera. Select the DHCP Connection option to automatically obtain the IPv4 network settings, for this camera, from a DHCP server, located on the local network. Select the Static IP Address option to manually configure the IPv4 network settings used by this camera. Enter the IPv4 Address, Subnet Mask, Default Gateway, Primary DNS, Optional Secondary DNS, and Optional Search Domain parameters in the spaces provided. This camera can connect to the Internet directly through the means of a PPPoE connection. Tick the PPPoE option to enable this feature. Enter the PPPoE Internet connection's User Name and Password in the spaces provided. This information can be acquired from your ISP. In the Port Settings part, enter the HTTP Port and RSTP Port numbers used. In the UPnP part, tick the UPnP option to enable the UPnP feature on this camera. Tick the UPnP Port Forward option to enable the UPnP port forwarding feature. Enter the External HTTP and External RSTP port number in the respective spaces provided. © Copyright 2013 TRENDnet. All Rights Reserved. In the Apple part, you can enable the Bonjour feature. Click the Apply button to apply the modifications made. 39
-
 1
1 -
2
-
3
-
4
-
5
-
6
-
7
-
8
-
9
-
10
-
11
-
12
-
13
-
14
-
15
-
16
-
17
-
18
-
19
-
20
-
21
-
22
-
23
-
24
-
25
-
26
-
27
-
28
-
29
-
30
-
31
-
32
-
33
-
 34
34 -
 35
35 -
 36
36 -
 37
37 -
 38
38 -
 39
39 -
 40
40 -
 41
41 -
 42
42 -
 43
43 -
 44
44 -
45
-
46
-
47
-
48
-
49
-
50
-
51
-
52
-
53
-
54
-
55
-
56
-
57
-
58
-
59
-
60
-
61
-
62
-
63
-
64
-
65
-
66
-
67
 |
 |
