TRENDnet TV-IP762IC User Guide - Page 48
Video Clip Type - test
 |
View all TRENDnet TV-IP762IC manuals
Add to My Manuals
Save this manual to your list of manuals |
Page 48 highlights
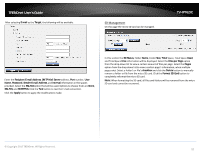
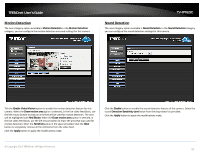
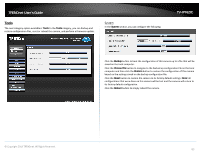
TRENDnet User's Guide Selecting Motion, will tell the camera only to record when motion is detected. Tick the Schedule option to only record motion at specific times of the week. Tick the Day and enter the Start and End times. After selecting the Schedule option as the Trigger by event, the following can be configured. Selecting Schedule, will tell the camera to record always within the scope of the schedule configured. Tick the Day and enter the Start and End times. After selecting the Always option as the Trigger by event, the following can be configured. TV-IP762IC In the Video Clip Type section, you can configure the following. Select the video profile in the Source drop-down list to use. Since profile 3 is only for JPEG, it cannot be used here. Select the File Format that the video clip will be saved as. Options to choose from are AVI and MP4. Enter the Pre-event recording time value and the Maximum duration time value in the spaces provided. In the Target section, you can configure the following. Selecting Always, will tell the camera to record always. After selecting the Sound option as the Trigger by event, the following can be configured. Selecting Sound, will tell the camera only to record when sound is detected. Tick the Schedule option to only record video when sound is detected at specific times of the week. Tick the Day and enter the Start and End times. © Copyright 2013 TRENDnet. All Rights Reserved. In this section , you can configure where the recorded video clip will be saved. Select FTP or E-mail as the target. After selecting FTP as the Target, enter the FTP Server address, Port number, User Name, Password, Path, Filename Prefix, and Interval information in the spaces provided. Tick the Passive Mode option to enable the passive mode feature. Click the Test button to test the FTP connection. 48
-
 1
1 -
2
-
3
-
4
-
5
-
6
-
7
-
8
-
9
-
10
-
11
-
12
-
13
-
14
-
15
-
16
-
17
-
18
-
19
-
20
-
21
-
22
-
23
-
24
-
25
-
26
-
27
-
28
-
29
-
30
-
31
-
32
-
33
-
34
-
35
-
36
-
37
-
38
-
39
-
40
-
41
-
42
-
 43
43 -
 44
44 -
 45
45 -
 46
46 -
 47
47 -
 48
48 -
 49
49 -
 50
50 -
 51
51 -
 52
52 -
 53
53 -
54
-
55
-
56
-
57
-
58
-
59
-
60
-
61
-
62
-
63
-
64
-
65
-
66
-
67
 |
 |
