TRENDnet TV-IP762IC User Guide - Page 34
Synchronize with Network Time Protocol server
 |
View all TRENDnet TV-IP762IC manuals
Add to My Manuals
Save this manual to your list of manuals |
Page 34 highlights
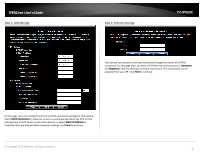
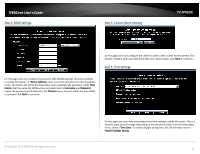
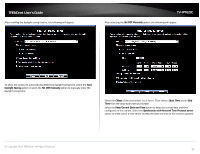
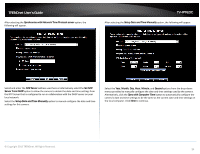
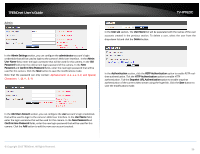
TRENDnet User's Guide After selecting the Synchronize with Network Time Protocol server option, the following will appear. TV-IP762IC After selecting the Setup Date and Time Manually option, the following will appear. Select and enter the NTP Server address used here or alternatively select the Set NTP Server from DHCP option to allow the camera to obtain the date and time settings from the NTP Server that is configured to run in collaboration with the DHCP server on your local network. Select the Setup Date and Time Manually option to manual configure the date and time settings for this camera. Select the Year, Month, Day, Hour, Minute, and Second options from the drop-down menus provided to manually configure the date and time settings used by the camera. Alternatively, click the Sync with Computer Time button to automatically configure the camera's date and time settings to be the same as the current date and time settings on the local computer. Click Next to continue. © Copyright 2013 TRENDnet. All Rights Reserved. 34
-
 1
1 -
2
-
3
-
4
-
5
-
6
-
7
-
8
-
9
-
10
-
11
-
12
-
13
-
14
-
15
-
16
-
17
-
18
-
19
-
20
-
21
-
22
-
23
-
24
-
25
-
26
-
27
-
28
-
 29
29 -
 30
30 -
 31
31 -
 32
32 -
 33
33 -
 34
34 -
 35
35 -
 36
36 -
 37
37 -
 38
38 -
 39
39 -
40
-
41
-
42
-
43
-
44
-
45
-
46
-
47
-
48
-
49
-
50
-
51
-
52
-
53
-
54
-
55
-
56
-
57
-
58
-
59
-
60
-
61
-
62
-
63
-
64
-
65
-
66
-
67
 |
 |
