Brother International BAS-411 Instruction Manual - English - Page 101
Leoot, Enter
 |
View all Brother International BAS-411 manuals
Add to My Manuals
Save this manual to your list of manuals |
Page 101 highlights
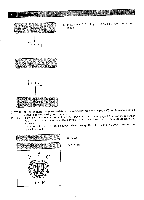
Po rit ENTER Lt (3 LEOOT 4 4-) COO 0t ENTER se ifit ;PO n ale EE EDIT tT 3. Using the jog keys T, i, >, move the hoop and the holder base to the desired position. Press the < ENTER> key to enter the first poin₹. [NOTE] Do not forget to press the key after moving the hoop_ 4. Using the jog keys , move the hoop and the holder base to the desired position. Press the key to enter the second point. Enter the third point in the same way. [NOTE] Be sure to enter only three points. If four or more points are entered, the line will not be an arc. 5. After entering all the points, press the < EDIT> key. The hoop and the holder base move to the first point and stops there. The Curve No. "2" will be indicated with a positive number, indicating that the registration is complete. [NOTE 1] [NOTE 2] If the key is pressed here, the machine will trace the arc connecting the three points. If the key is pressed here, the previously entered three points will be cancelled and the machine goes back to step 3. (Press this key when you want to re-enter the line.) Tracing C Go to step 3. -97-
-
 1
1 -
2
-
3
-
4
-
5
-
6
-
7
-
8
-
9
-
10
-
11
-
12
-
13
-
14
-
15
-
16
-
17
-
18
-
19
-
20
-
21
-
22
-
23
-
24
-
25
-
26
-
27
-
28
-
29
-
30
-
31
-
32
-
33
-
34
-
35
-
36
-
37
-
38
-
39
-
40
-
41
-
42
-
43
-
44
-
45
-
46
-
47
-
48
-
49
-
50
-
51
-
52
-
53
-
54
-
55
-
56
-
57
-
58
-
59
-
60
-
61
-
62
-
63
-
64
-
65
-
66
-
67
-
68
-
69
-
70
-
71
-
72
-
73
-
74
-
75
-
76
-
77
-
78
-
79
-
80
-
81
-
82
-
83
-
84
-
85
-
86
-
87
-
88
-
89
-
90
-
91
-
92
-
93
-
94
-
95
-
 96
96 -
 97
97 -
 98
98 -
 99
99 -
 100
100 -
 101
101 -
 102
102 -
 103
103 -
 104
104 -
 105
105 -
 106
106 -
107
-
108
-
109
-
110
-
111
-
112
-
113
-
114
-
115
-
116
-
117
-
118
-
119
-
120
-
121
-
122
-
123
-
124
-
125
-
126
-
127
-
128
-
129
-
130
-
131
-
132
-
133
-
134
-
135
-
136
-
137
-
138
-
139
-
140
-
141
-
142
-
143
-
144
-
145
-
146
-
147
-
148
-
149
-
150
-
151
-
152
-
153
-
154
-
155
-
156
-
157
-
158
-
159
-
160
-
161
-
162
-
163
-
164
-
165
-
166
-
167
-
168
-
169
-
170
-
171
-
172
-
173
-
174
-
175
-
176
-
177
-
178
-
179
-
180
-
181
 |
 |
