Brother International BAS-411 Instruction Manual - English - Page 36
Check, following, before, switching, machine
 |
View all Brother International BAS-411 manuals
Add to My Manuals
Save this manual to your list of manuals |
Page 36 highlights
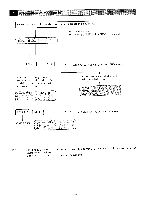
E] Check the following before switching on the machine 1. THREAD 2. EMBROIDERY HOOP 3. NEEDLE THREAD POSITION 0 Threading is proper? e The needle is threaded? © The bobbin thread is set? 0 The needle thread is set? 0 The embroidery hoop securely clamps? 0 The embroidery hoop increases the tension of the material? © 0 The needle thread take-ups form a line? The needle bar is at its highest position? When the power switch is on, the message, "CAUTION MOVINGI" is displayed and the buzzer sounds 'beep'. Then, the embroidery hoop automatically moves to the center of the X and Y carriages . At this time, check that there is nothing on the hoop which runs against the point of the needle or the presser foot. [NOTE] When the power supply cord is connected, be sure to connect the grounding wire as illustrated in the figure below. e grounging wire -32-
-
 1
1 -
2
-
3
-
4
-
5
-
6
-
7
-
8
-
9
-
10
-
11
-
12
-
13
-
14
-
15
-
16
-
17
-
18
-
19
-
20
-
21
-
22
-
23
-
24
-
25
-
26
-
27
-
28
-
29
-
30
-
 31
31 -
 32
32 -
 33
33 -
 34
34 -
 35
35 -
 36
36 -
 37
37 -
 38
38 -
 39
39 -
 40
40 -
 41
41 -
42
-
43
-
44
-
45
-
46
-
47
-
48
-
49
-
50
-
51
-
52
-
53
-
54
-
55
-
56
-
57
-
58
-
59
-
60
-
61
-
62
-
63
-
64
-
65
-
66
-
67
-
68
-
69
-
70
-
71
-
72
-
73
-
74
-
75
-
76
-
77
-
78
-
79
-
80
-
81
-
82
-
83
-
84
-
85
-
86
-
87
-
88
-
89
-
90
-
91
-
92
-
93
-
94
-
95
-
96
-
97
-
98
-
99
-
100
-
101
-
102
-
103
-
104
-
105
-
106
-
107
-
108
-
109
-
110
-
111
-
112
-
113
-
114
-
115
-
116
-
117
-
118
-
119
-
120
-
121
-
122
-
123
-
124
-
125
-
126
-
127
-
128
-
129
-
130
-
131
-
132
-
133
-
134
-
135
-
136
-
137
-
138
-
139
-
140
-
141
-
142
-
143
-
144
-
145
-
146
-
147
-
148
-
149
-
150
-
151
-
152
-
153
-
154
-
155
-
156
-
157
-
158
-
159
-
160
-
161
-
162
-
163
-
164
-
165
-
166
-
167
-
168
-
169
-
170
-
171
-
172
-
173
-
174
-
175
-
176
-
177
-
178
-
179
-
180
-
181
 |
 |
