Brother International BAS-411 Instruction Manual - English - Page 83
<END>
 |
View all Brother International BAS-411 manuals
Add to My Manuals
Save this manual to your list of manuals |
Page 83 highlights
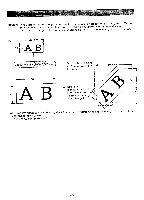
t [NOTE] The height and width of an area are displayed in three digits. 4. By using the jog keys, move the needle position towards the lower right within the embroidery hoop to determine the lower right point. ENTER D P3 While moving the needle position, the distance (height and width) of the current needle position from the upper left origin is displayed. When stopping the needle position and pressing the key, that needle position is stored as the lower right point. 5. Press the key to store the lower right point. Now the area is set. Then the editing menu is displayed. [NOTE] To cancel area setting on the way, press the key. The setting will return to the previous set value. ----__ Area Area width 400 mm Area height 200 mm [NOTE)] [NOTE2] The largest possible area is 285mm in height and 450 mm in width. Setting the area larger than the embroidery hoop causes the needle to strike the hoop during sewing. Be sure to set the enlargement and reduction ratios, and set the sewing start point to keep the monogram within the hoop. -79-
-
 1
1 -
2
-
3
-
4
-
5
-
6
-
7
-
8
-
9
-
10
-
11
-
12
-
13
-
14
-
15
-
16
-
17
-
18
-
19
-
20
-
21
-
22
-
23
-
24
-
25
-
26
-
27
-
28
-
29
-
30
-
31
-
32
-
33
-
34
-
35
-
36
-
37
-
38
-
39
-
40
-
41
-
42
-
43
-
44
-
45
-
46
-
47
-
48
-
49
-
50
-
51
-
52
-
53
-
54
-
55
-
56
-
57
-
58
-
59
-
60
-
61
-
62
-
63
-
64
-
65
-
66
-
67
-
68
-
69
-
70
-
71
-
72
-
73
-
74
-
75
-
76
-
77
-
 78
78 -
 79
79 -
 80
80 -
 81
81 -
 82
82 -
 83
83 -
 84
84 -
 85
85 -
 86
86 -
 87
87 -
 88
88 -
89
-
90
-
91
-
92
-
93
-
94
-
95
-
96
-
97
-
98
-
99
-
100
-
101
-
102
-
103
-
104
-
105
-
106
-
107
-
108
-
109
-
110
-
111
-
112
-
113
-
114
-
115
-
116
-
117
-
118
-
119
-
120
-
121
-
122
-
123
-
124
-
125
-
126
-
127
-
128
-
129
-
130
-
131
-
132
-
133
-
134
-
135
-
136
-
137
-
138
-
139
-
140
-
141
-
142
-
143
-
144
-
145
-
146
-
147
-
148
-
149
-
150
-
151
-
152
-
153
-
154
-
155
-
156
-
157
-
158
-
159
-
160
-
161
-
162
-
163
-
164
-
165
-
166
-
167
-
168
-
169
-
170
-
171
-
172
-
173
-
174
-
175
-
176
-
177
-
178
-
179
-
180
-
181
 |
 |
