Dell Precision T7400 User's Guide - Page 45
Exit Screen, Performing Configuration Tasks, Creating a RAID Level 0 Configuration
 |
View all Dell Precision T7400 manuals
Add to My Manuals
Save this manual to your list of manuals |
Page 45 highlights
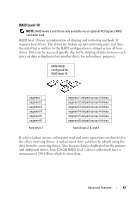
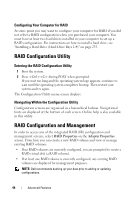
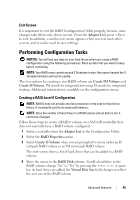
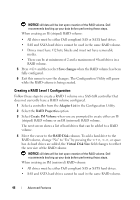
Exit Screen It is important to exit the RAID Configuration Utility properly, because some changes take effect only when you exit. From the Adapter List, press to exit. In addition, a similar exit screen appears when you exit most other screens, and it can be used to save settings. Performing Configuration Tasks NOTICE: You will lose any data on your hard drives when you create a RAID configuration using the following procedures. Back up data that you want to keep before continuing. NOTE: Your RAID array cannot exceed 2 Terabytes in size. Any space beyond the 2Terabyte limitation will not be usable. The two options for creating a new RAID volume are Create IM Volume and Create IS Volume. IM stands for integrated mirroring. IS stands for integrated striping. Additional information is available on the configuration screen. Creating a RAID Level 0 Configuration NOTE: RAID 0 does not provide any data protection in the event of hard drive failure. It is primarily used to increase performance. NOTE: Once the number of hard drives in a RAID volume (virtual disk) is set, it cannot be changed. Follow these steps to create a RAID 0 volume on a SAS 6/iR controller that does not currently have a RAID volume configured. 1 Select a controller from the Adapter List in the Configuration Utility. 2 Select the RAID Properties option. 3 Select Create IS Volume when you are prompted to create either an IS (striped) RAID volume or an IM (mirrored) RAID volume. The next screen shows a list of hard drives that can be added to a RAID volume. 4 Move the cursor to the RAID Disk column. To add a hard drive to the RAID volume, change "No" to "Yes" by pressing the , , or space bar. As hard drives are added, the Virtual Disk Size field changes to reflect the new size of the RAID volume. Advanced Features 45
-
 1
1 -
2
-
3
-
4
-
5
-
6
-
7
-
8
-
9
-
10
-
11
-
12
-
13
-
14
-
15
-
16
-
17
-
18
-
19
-
20
-
21
-
22
-
23
-
24
-
25
-
26
-
27
-
28
-
29
-
30
-
31
-
32
-
33
-
34
-
35
-
36
-
37
-
38
-
39
-
 40
40 -
 41
41 -
 42
42 -
 43
43 -
 44
44 -
 45
45 -
 46
46 -
 47
47 -
 48
48 -
 49
49 -
 50
50 -
51
-
52
-
53
-
54
-
55
-
56
-
57
-
58
-
59
-
60
-
61
-
62
-
63
-
64
-
65
-
66
-
67
-
68
-
69
-
70
-
71
-
72
-
73
-
74
-
75
-
76
-
77
-
78
-
79
-
80
-
81
-
82
-
83
-
84
-
85
-
86
-
87
-
88
-
89
-
90
-
91
-
92
-
93
-
94
-
95
-
96
-
97
-
98
-
99
-
100
-
101
-
102
-
103
-
104
-
105
-
106
-
107
-
108
-
109
-
110
-
111
-
112
-
113
-
114
-
115
-
116
-
117
-
118
-
119
-
120
-
121
-
122
-
123
-
124
-
125
-
126
-
127
-
128
-
129
-
130
-
131
-
132
-
133
-
134
-
135
-
136
-
137
-
138
-
139
-
140
-
141
-
142
-
143
-
144
-
145
-
146
-
147
-
148
-
149
-
150
-
151
-
152
-
153
-
154
-
155
-
156
-
157
-
158
-
159
-
160
-
161
-
162
-
163
-
164
-
165
-
166
-
167
-
168
-
169
-
170
-
171
-
172
-
173
-
174
-
175
-
176
-
177
-
178
-
179
-
180
-
181
-
182
-
183
-
184
-
185
-
186
-
187
-
188
-
189
-
190
-
191
-
192
-
193
-
194
-
195
-
196
-
197
-
198
-
199
-
200
-
201
-
202
-
203
-
204
-
205
-
206
-
207
-
208
-
209
-
210
-
211
-
212
-
213
-
214
-
215
-
216
-
217
-
218
-
219
-
220
-
221
-
222
-
223
-
224
-
225
-
226
-
227
-
228
-
229
-
230
-
231
-
232
-
233
-
234
-
235
-
236
-
237
-
238
-
239
-
240
-
241
-
242
-
243
-
244
-
245
-
246
-
247
-
248
-
249
-
250
-
251
-
252
-
253
-
254
-
255
-
256
-
257
-
258
-
259
-
260
-
261
-
262
-
263
-
264
-
265
-
266
-
267
-
268
-
269
-
270
-
271
-
272
-
273
-
274
-
275
-
276
-
277
-
278
-
279
-
280
-
281
-
282
-
283
-
284
-
285
-
286
-
287
-
288
-
289
-
290
-
291
-
292
-
293
-
294
-
295
-
296
-
297
-
298
-
299
-
300
-
301
-
302
-
303
-
304
-
305
-
306
-
307
 |
 |