Epson LQ-1000 User Manual - Page 25
Plug in the printer's power cord, making sure the outlet is properly, printer is reset to its - lights
 |
View all Epson LQ-1000 manuals
Add to My Manuals
Save this manual to your list of manuals |
Page 25 highlights
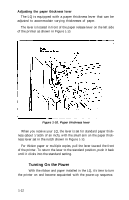
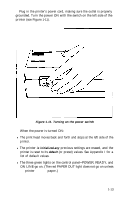
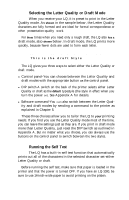
Plug in the printer's power cord, making sure the outlet is properly grounded. Turn the power ON with the switch on the left side of the printer (see Figure 1-11). Figure 1-11. Turning on the power switch When the power is turned ON: l The print head moves back and forth and stops at the left side of the printer. l The printer is initialized-any previous settings are erased, and the printer is reset to its default (or preset) values. See Appendix I for a list of default values. l The three green lights on the control panel--POWER, READY, and ON LINE-go on. (The red PAPER OUT light does not go on unless the printer is out of paper.) 1-13
-
 1
1 -
2
-
3
-
4
-
5
-
6
-
7
-
8
-
9
-
10
-
11
-
12
-
13
-
14
-
15
-
16
-
17
-
18
-
19
-
 20
20 -
 21
21 -
 22
22 -
 23
23 -
 24
24 -
 25
25 -
 26
26 -
 27
27 -
 28
28 -
 29
29 -
 30
30 -
31
-
32
-
33
-
34
-
35
-
36
-
37
-
38
-
39
-
40
-
41
-
42
-
43
-
44
-
45
-
46
-
47
-
48
-
49
-
50
-
51
-
52
-
53
-
54
-
55
-
56
-
57
-
58
-
59
-
60
-
61
-
62
-
63
-
64
-
65
-
66
-
67
-
68
-
69
-
70
-
71
-
72
-
73
-
74
-
75
-
76
-
77
-
78
-
79
-
80
-
81
-
82
-
83
-
84
-
85
-
86
-
87
-
88
-
89
-
90
-
91
-
92
-
93
-
94
-
95
-
96
-
97
-
98
-
99
-
100
-
101
-
102
-
103
-
104
-
105
-
106
-
107
-
108
-
109
-
110
-
111
-
112
-
113
-
114
-
115
-
116
-
117
-
118
-
119
-
120
-
121
-
122
-
123
-
124
-
125
-
126
-
127
-
128
-
129
-
130
-
131
-
132
-
133
-
134
-
135
-
136
-
137
-
138
-
139
-
140
-
141
-
142
-
143
-
144
-
145
-
146
-
147
-
148
-
149
-
150
-
151
-
152
-
153
-
154
-
155
-
156
-
157
-
158
-
159
-
160
-
161
-
162
-
163
-
164
-
165
-
166
-
167
-
168
-
169
-
170
-
171
-
172
-
173
-
174
-
175
-
176
-
177
-
178
-
179
-
180
-
181
-
182
-
183
-
184
-
185
 |
 |
Plug in the printer’s power cord, making sure the outlet is properly
grounded. Turn the power ON with the switch on the left side of the
printer (see Figure
1-11).
Figure 1-11. Turning on the power switch
When the power is turned ON:
l
The print head moves back and forth and stops at the left side of the
printer.
l
The printer
is initialized-any
previous settings are erased, and the
printer is reset to its
default
(or preset) values. See Appendix I for a
list of default values.
l
The three green lights on the control panel--POWER, READY, and
ON LINE-go on. (The red PAPER OUT light does not go on unless
the
printer
is out of
paper.)
1-13