Epson LQ-1000 User Manual - Page 30
The Parallel Interface, the Apple IIe
 |
View all Epson LQ-1000 manuals
Add to My Manuals
Save this manual to your list of manuals |
Page 30 highlights
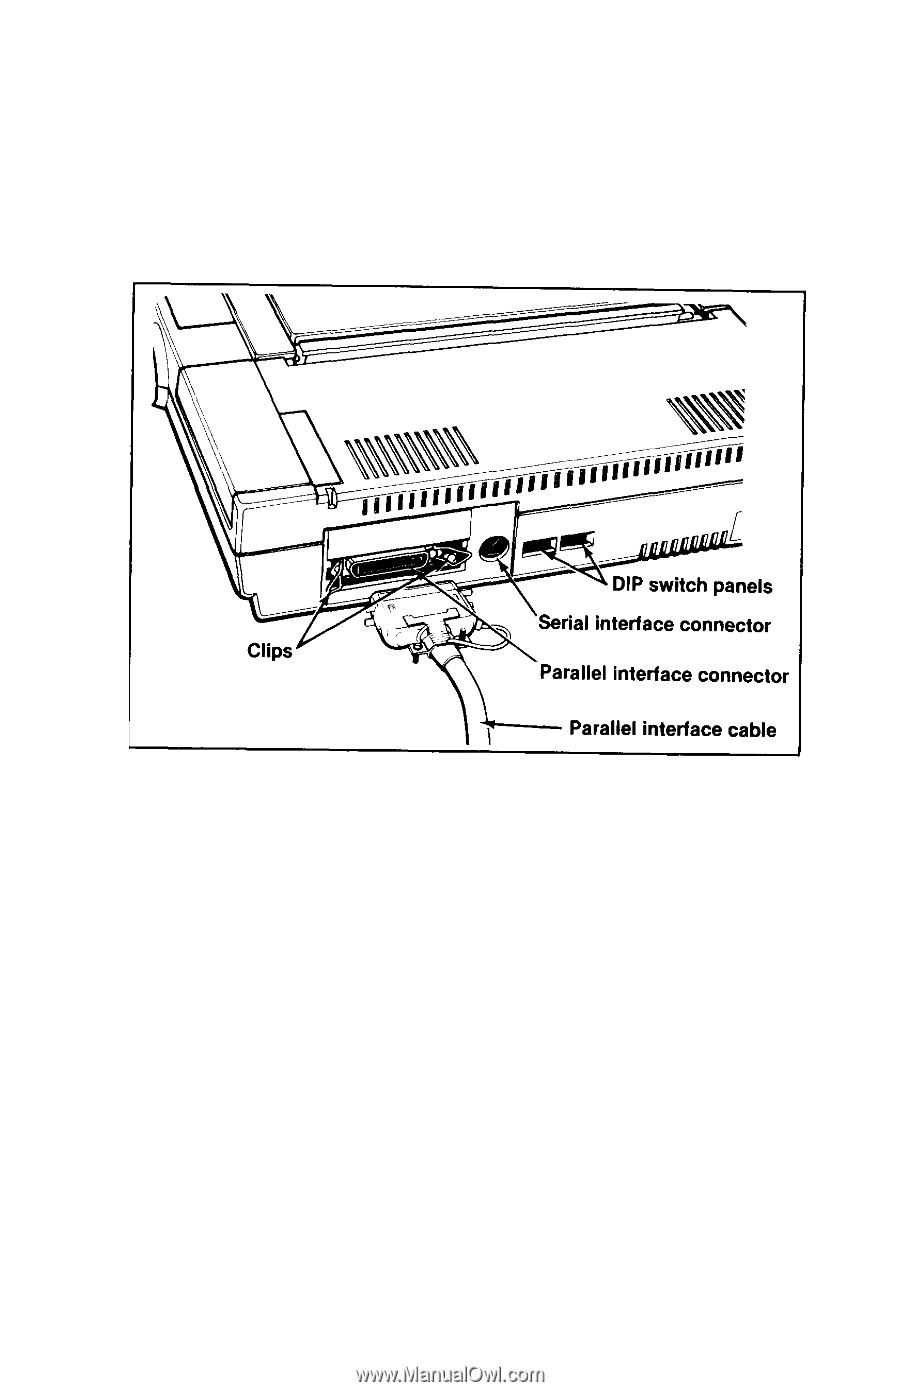
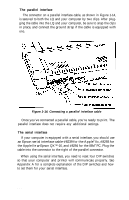
The parallel interface The connector on a parallel interface cable, as shown in Figure 1-14, is secured to both the LQ and your computer by two clips. After plugging the cable into the LQ and your computer, be sure to snap the clips in place, and connect the ground strap if the cable is equipped with one. Figure 1-14. Connecting a parallel interface cable Once you've connected a parallel cable, you're ready to print. The parallel interface does not require any additional settings. The serial interface If your computer is equipped with a serial interface, you should use an Epson serial interface cable-#8239 for the Apple® IIc, #8293 for the Apple IIe or Epson QX™-16, and #8294 for the IBM® PC. Plug the cable into the connector to the right of the parallel connector. When using the serial interface, you need to reset four DIP switches so that your computer and printer will communicate properly. See Appendix A for a complete explanation of the DIP switches and how to set them for your serial interface. 1-18
-
 1
1 -
2
-
3
-
4
-
5
-
6
-
7
-
8
-
9
-
10
-
11
-
12
-
13
-
14
-
15
-
16
-
17
-
18
-
19
-
20
-
21
-
22
-
23
-
24
-
 25
25 -
 26
26 -
 27
27 -
 28
28 -
 29
29 -
 30
30 -
 31
31 -
 32
32 -
 33
33 -
 34
34 -
 35
35 -
36
-
37
-
38
-
39
-
40
-
41
-
42
-
43
-
44
-
45
-
46
-
47
-
48
-
49
-
50
-
51
-
52
-
53
-
54
-
55
-
56
-
57
-
58
-
59
-
60
-
61
-
62
-
63
-
64
-
65
-
66
-
67
-
68
-
69
-
70
-
71
-
72
-
73
-
74
-
75
-
76
-
77
-
78
-
79
-
80
-
81
-
82
-
83
-
84
-
85
-
86
-
87
-
88
-
89
-
90
-
91
-
92
-
93
-
94
-
95
-
96
-
97
-
98
-
99
-
100
-
101
-
102
-
103
-
104
-
105
-
106
-
107
-
108
-
109
-
110
-
111
-
112
-
113
-
114
-
115
-
116
-
117
-
118
-
119
-
120
-
121
-
122
-
123
-
124
-
125
-
126
-
127
-
128
-
129
-
130
-
131
-
132
-
133
-
134
-
135
-
136
-
137
-
138
-
139
-
140
-
141
-
142
-
143
-
144
-
145
-
146
-
147
-
148
-
149
-
150
-
151
-
152
-
153
-
154
-
155
-
156
-
157
-
158
-
159
-
160
-
161
-
162
-
163
-
164
-
165
-
166
-
167
-
168
-
169
-
170
-
171
-
172
-
173
-
174
-
175
-
176
-
177
-
178
-
179
-
180
-
181
-
182
-
183
-
184
-
185
 |
 |