Epson LQ-1000 User Manual - Page 44
Maintenance, dust, grease, and any heat sources. A safe temperature range is 41° - review
 |
View all Epson LQ-1000 manuals
Add to My Manuals
Save this manual to your list of manuals |
Page 44 highlights
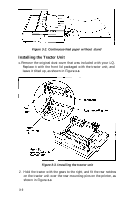
Problem Recommendation Two or more sheets of paper are loaded instead of one. Remove paper and fan it. Paper was not sufficiently loosened before being loaded into the paper bin. Make sure paper is loaded behind the metal tabs on the bottom of the left and right paper guides, Too much paper was loaded into the paper bin-remove some of the unused sheets. The weight of the paper is too light. Add paper. Printing starts too low on the page. Your word processor may not be set up properly. Review "Setting up your word processor for a cut sheet feeder . . ." Printing is too close or too far from the left side of the paper. Make sure the arrow on the left paper guide is aligned with the arrow stamped on the lip of the stacker. Paper doesn't eject evenly. Check that there's enough room in the stacker. If not, remove some of the printed sheets. More than one sheet of paper may have been loaded, which causes the paper to eject unevenly Make sure that paper was separated and loaded properly Maintenance To keep your cut sheet feeder working smoothly, keep it away from dust, grease, and any heat sources. A safe temperature range is 41° to 95°F. Use a soft, clean cloth dampened with water to clean the outside of the cut sheet feeder case. Stubborn stains can be removed with nonabrasive household cleaners. 2-13
-
 1
1 -
2
-
3
-
4
-
5
-
6
-
7
-
8
-
9
-
10
-
11
-
12
-
13
-
14
-
15
-
16
-
17
-
18
-
19
-
20
-
21
-
22
-
23
-
24
-
25
-
26
-
27
-
28
-
29
-
30
-
31
-
32
-
33
-
34
-
35
-
36
-
37
-
38
-
 39
39 -
 40
40 -
 41
41 -
 42
42 -
 43
43 -
 44
44 -
 45
45 -
 46
46 -
 47
47 -
 48
48 -
 49
49 -
50
-
51
-
52
-
53
-
54
-
55
-
56
-
57
-
58
-
59
-
60
-
61
-
62
-
63
-
64
-
65
-
66
-
67
-
68
-
69
-
70
-
71
-
72
-
73
-
74
-
75
-
76
-
77
-
78
-
79
-
80
-
81
-
82
-
83
-
84
-
85
-
86
-
87
-
88
-
89
-
90
-
91
-
92
-
93
-
94
-
95
-
96
-
97
-
98
-
99
-
100
-
101
-
102
-
103
-
104
-
105
-
106
-
107
-
108
-
109
-
110
-
111
-
112
-
113
-
114
-
115
-
116
-
117
-
118
-
119
-
120
-
121
-
122
-
123
-
124
-
125
-
126
-
127
-
128
-
129
-
130
-
131
-
132
-
133
-
134
-
135
-
136
-
137
-
138
-
139
-
140
-
141
-
142
-
143
-
144
-
145
-
146
-
147
-
148
-
149
-
150
-
151
-
152
-
153
-
154
-
155
-
156
-
157
-
158
-
159
-
160
-
161
-
162
-
163
-
164
-
165
-
166
-
167
-
168
-
169
-
170
-
171
-
172
-
173
-
174
-
175
-
176
-
177
-
178
-
179
-
180
-
181
-
182
-
183
-
184
-
185
 |
 |
