Epson LQ-1000 User Manual - Page 31
Printing Your First Document, loaded the paper correctly.
 |
View all Epson LQ-1000 manuals
Add to My Manuals
Save this manual to your list of manuals |
Page 31 highlights
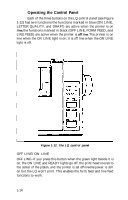
10 Printing Your First Document Now that you've completed the basic setup and operating steps, your LQ is ready to print. The following chapter explains how to set up your word processor to work with the LQ. Additional chapters and appendixes cover programming, control codes and ESCape sequences, technical specifications and maintenance . If you have any difficulty printing your first document, check the following list to make sure you've completed all the setup steps. q Did you remove the plastic tab that holds the print head in place? q Is the power source (power strip, etc.) turned ON? q Is the ribbon properly installed? Make sure the ribbon is in front of the print head, not riding above it. q Have you loaded the paper correctly? (Read Chapter 2 or 3 if you are using the optional cut sheet feeder or tractor unit.) q Are the green POWER, ON LINE, and READY lights on the con- trol panel ON? If not, press the ON LINE button to place the LQ on line. If the red PAPER OUT light is ON, check that you've loaded the paper correctly. q Were you able to successfully run the self test in Step 8? If not, check the DIP switch settings and try again. q Is your printer properly connected to your computer? Are you using the correct interface (serial or parallel)? If you're using a serial interface, have you set the DIP switches accordingly? If you're still having trouble printing, read the troubleshooting section in Appendix D. 1-19
-
 1
1 -
2
-
3
-
4
-
5
-
6
-
7
-
8
-
9
-
10
-
11
-
12
-
13
-
14
-
15
-
16
-
17
-
18
-
19
-
20
-
21
-
22
-
23
-
24
-
25
-
 26
26 -
 27
27 -
 28
28 -
 29
29 -
 30
30 -
 31
31 -
 32
32 -
 33
33 -
 34
34 -
 35
35 -
 36
36 -
37
-
38
-
39
-
40
-
41
-
42
-
43
-
44
-
45
-
46
-
47
-
48
-
49
-
50
-
51
-
52
-
53
-
54
-
55
-
56
-
57
-
58
-
59
-
60
-
61
-
62
-
63
-
64
-
65
-
66
-
67
-
68
-
69
-
70
-
71
-
72
-
73
-
74
-
75
-
76
-
77
-
78
-
79
-
80
-
81
-
82
-
83
-
84
-
85
-
86
-
87
-
88
-
89
-
90
-
91
-
92
-
93
-
94
-
95
-
96
-
97
-
98
-
99
-
100
-
101
-
102
-
103
-
104
-
105
-
106
-
107
-
108
-
109
-
110
-
111
-
112
-
113
-
114
-
115
-
116
-
117
-
118
-
119
-
120
-
121
-
122
-
123
-
124
-
125
-
126
-
127
-
128
-
129
-
130
-
131
-
132
-
133
-
134
-
135
-
136
-
137
-
138
-
139
-
140
-
141
-
142
-
143
-
144
-
145
-
146
-
147
-
148
-
149
-
150
-
151
-
152
-
153
-
154
-
155
-
156
-
157
-
158
-
159
-
160
-
161
-
162
-
163
-
164
-
165
-
166
-
167
-
168
-
169
-
170
-
171
-
172
-
173
-
174
-
175
-
176
-
177
-
178
-
179
-
180
-
181
-
182
-
183
-
184
-
185
 |
 |
