HP CB536A User Guide - Page 121
Solve fax problems
 |
View all HP CB536A manuals
Add to My Manuals
Save this manual to your list of manuals |
Page 121 highlights
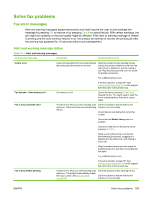
Table 10-1 Alert and warning messages (continued) Control panel message Description Recommended action Connect the product to a different phone line. If the error persists, contact HP. See www.hp.com/support/ljm1319 or the support flyer that came in the product box. Fax Send error An error occurred while trying to send a fax. Try resending the fax. Try faxing to another fax number. Check for a dial tone on the phone line by pressing Start Fax. Check that the telephone cord is securely connected by unplugging and replugging the cord. Make sure that you are using the telephone cord that came with the product. Make sure that the phone is working by disconnecting the product, plugging in a telephone to the phone line, and making a voice call. Connect the product to a different phone line. Set the fax resolution to Standard instead of the default of Fine. See Set resolution settings on page 89. If the error persists, contact HP. See www.hp.com/support/ljm1319 or the support flyer that came in the product box. Group dial not allowed in group The speed-dial code that you typed is Add one-touch buttons (programmed as an programmed for a group. Adding a group-dial individual speed dial) or speed-dial codes to to another group-dial is not allowed. a group-dial. Invalid entry Invalid data or response. Correct the entry. No Dial Tone The product could not detect a dial tone. Check for a dial tone on the phone line by pressing Start Fax. Unplug the telephone cord from both the product and the wall and replug the cord. Make sure that you are using the telephone cord that came with the product. Unplug the product telephone cord from the wall, plug in a telephone, and try making a voice call. Make sure that the phone cord from the wall telephone jack is plugged into the line out ( ) port. Plug the product phone cord into a jack for another phone line. See Connect to a telephone line on page 77. ENWW Solve fax problems 111
-
 1
1 -
2
-
3
-
4
-
5
-
6
-
7
-
8
-
9
-
10
-
11
-
12
-
13
-
14
-
15
-
16
-
17
-
18
-
19
-
20
-
21
-
22
-
23
-
24
-
25
-
26
-
27
-
28
-
29
-
30
-
31
-
32
-
33
-
34
-
35
-
36
-
37
-
38
-
39
-
40
-
41
-
42
-
43
-
44
-
45
-
46
-
47
-
48
-
49
-
50
-
51
-
52
-
53
-
54
-
55
-
56
-
57
-
58
-
59
-
60
-
61
-
62
-
63
-
64
-
65
-
66
-
67
-
68
-
69
-
70
-
71
-
72
-
73
-
74
-
75
-
76
-
77
-
78
-
79
-
80
-
81
-
82
-
83
-
84
-
85
-
86
-
87
-
88
-
89
-
90
-
91
-
92
-
93
-
94
-
95
-
96
-
97
-
98
-
99
-
100
-
101
-
102
-
103
-
104
-
105
-
106
-
107
-
108
-
109
-
110
-
111
-
112
-
113
-
114
-
115
-
 116
116 -
 117
117 -
 118
118 -
 119
119 -
 120
120 -
 121
121 -
 122
122 -
 123
123 -
 124
124 -
 125
125 -
 126
126 -
127
-
128
-
129
-
130
-
131
-
132
-
133
-
134
-
135
-
136
-
137
-
138
-
139
-
140
-
141
-
142
-
143
-
144
-
145
-
146
-
147
-
148
-
149
-
150
-
151
-
152
-
153
-
154
-
155
-
156
-
157
-
158
-
159
-
160
-
161
-
162
-
163
-
164
-
165
-
166
-
167
-
168
-
169
-
170
-
171
-
172
-
173
-
174
-
175
-
176
-
177
-
178
-
179
-
180
-
181
-
182
-
183
-
184
-
185
-
186
-
187
-
188
-
189
-
190
-
191
-
192
-
193
-
194
-
195
-
196
-
197
-
198
-
199
-
200
-
201
-
202
-
203
-
204
-
205
-
206
-
207
-
208
-
209
-
210
-
211
-
212
 |
 |