HP CB536A User Guide - Page 152
Where to look for jams, Clear jams from the ADF, correction fluid, paper clips, or staples. Also
 |
View all HP CB536A manuals
Add to My Manuals
Save this manual to your list of manuals |
Page 152 highlights
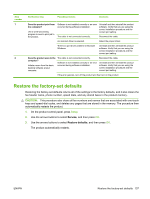
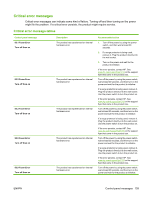
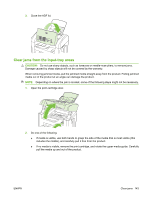
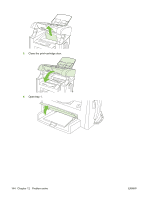
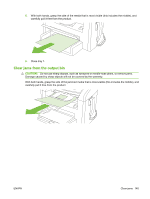
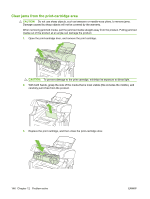
Where to look for jams Jams can occur in these locations: ● In the automatic document feeder (ADF) ● In input areas ● In output areas ● Inside the product Find and remove the jam by using the instructions on the following pages. If the location of the jam is not obvious, first look inside the product. Loose toner might remain in the product after a jam. This problem typically resolves itself after a few sheets have been printed. Clear jams from the ADF Occasionally, media becomes jammed during a fax, copy, or scan job. CAUTION: To prevent damage to the product, do not use an original that contains correction tape, correction fluid, paper clips, or staples. Also, do not load photographs, small originals, or fragile originals into the ADF. 1. Open the ADF lid. 2. Carefully remove jammed media. Gently try to remove the page without tearing it. 142 Chapter 12 Problem solve ENWW
-
 1
1 -
2
-
3
-
4
-
5
-
6
-
7
-
8
-
9
-
10
-
11
-
12
-
13
-
14
-
15
-
16
-
17
-
18
-
19
-
20
-
21
-
22
-
23
-
24
-
25
-
26
-
27
-
28
-
29
-
30
-
31
-
32
-
33
-
34
-
35
-
36
-
37
-
38
-
39
-
40
-
41
-
42
-
43
-
44
-
45
-
46
-
47
-
48
-
49
-
50
-
51
-
52
-
53
-
54
-
55
-
56
-
57
-
58
-
59
-
60
-
61
-
62
-
63
-
64
-
65
-
66
-
67
-
68
-
69
-
70
-
71
-
72
-
73
-
74
-
75
-
76
-
77
-
78
-
79
-
80
-
81
-
82
-
83
-
84
-
85
-
86
-
87
-
88
-
89
-
90
-
91
-
92
-
93
-
94
-
95
-
96
-
97
-
98
-
99
-
100
-
101
-
102
-
103
-
104
-
105
-
106
-
107
-
108
-
109
-
110
-
111
-
112
-
113
-
114
-
115
-
116
-
117
-
118
-
119
-
120
-
121
-
122
-
123
-
124
-
125
-
126
-
127
-
128
-
129
-
130
-
131
-
132
-
133
-
134
-
135
-
136
-
137
-
138
-
139
-
140
-
141
-
142
-
143
-
144
-
145
-
146
-
 147
147 -
 148
148 -
 149
149 -
 150
150 -
 151
151 -
 152
152 -
 153
153 -
 154
154 -
 155
155 -
 156
156 -
 157
157 -
158
-
159
-
160
-
161
-
162
-
163
-
164
-
165
-
166
-
167
-
168
-
169
-
170
-
171
-
172
-
173
-
174
-
175
-
176
-
177
-
178
-
179
-
180
-
181
-
182
-
183
-
184
-
185
-
186
-
187
-
188
-
189
-
190
-
191
-
192
-
193
-
194
-
195
-
196
-
197
-
198
-
199
-
200
-
201
-
202
-
203
-
204
-
205
-
206
-
207
-
208
-
209
-
210
-
211
-
212
 |
 |