HP CB536A User Guide - Page 99
Set resolution settings, Set the default resolution setting
 |
View all HP CB536A manuals
Add to My Manuals
Save this manual to your list of manuals |
Page 99 highlights
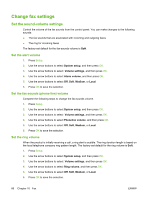
The default light/dark setting is the contrast that is normally applied to items that are being faxed. The slider is set to the middle as the default setting. 1. On the control panel, press Setup. 2. Use the arrow buttons to select Fax setup, and then press OK. 3. Use the arrow buttons to select Fax Send setup, and then press OK. 4. Use the arrow buttons to select Def. Light/dark, and then press OK. 5. Use the < button to move the slider to the left to make the fax lighter than the original, or use the > button to move the slider to the right to make the fax darker than the original. 6. Press OK to save the selection. Set resolution settings NOTE: Increasing the resolution increases the fax size. Larger faxes increase the send time and could exceed the available memory in the product. The factory-set default resolution setting is Fine. Use this procedure to change the default resolution for all fax jobs to one of the following settings: ● Standard: This setting provides the lowest quality and the fastest transmission time. ● Fine: This setting provides a higher resolution quality than Standard that is usually appropriate for text documents. ● Superfine: This setting is best used for documents that mix text and images. The transmission time is slower than Fine but faster than Photo. ● Photo: This setting produces the best images, but greatly increases the transmission time. Set the default resolution setting 1. On the control panel, press Setup. 2. Use the arrow buttons to select Fax setup, and then press OK. 3. Use the arrow buttons to select Fax Send setup, and then press OK. 4. Use the arrow buttons to select Def. Resolution, and then press OK. 5. Use the arrow buttons to change the resolution setting. 6. Press OK to save the selection. Set the resolution for the current fax job 1. On the control panel, press Resolution to show the current resolution setting. 2. Use the arrow buttons to select the appropriate resolution setting. 3. Press OK to save the selection. ENWW Change fax settings 89
-
 1
1 -
2
-
3
-
4
-
5
-
6
-
7
-
8
-
9
-
10
-
11
-
12
-
13
-
14
-
15
-
16
-
17
-
18
-
19
-
20
-
21
-
22
-
23
-
24
-
25
-
26
-
27
-
28
-
29
-
30
-
31
-
32
-
33
-
34
-
35
-
36
-
37
-
38
-
39
-
40
-
41
-
42
-
43
-
44
-
45
-
46
-
47
-
48
-
49
-
50
-
51
-
52
-
53
-
54
-
55
-
56
-
57
-
58
-
59
-
60
-
61
-
62
-
63
-
64
-
65
-
66
-
67
-
68
-
69
-
70
-
71
-
72
-
73
-
74
-
75
-
76
-
77
-
78
-
79
-
80
-
81
-
82
-
83
-
84
-
85
-
86
-
87
-
88
-
89
-
90
-
91
-
92
-
93
-
 94
94 -
 95
95 -
 96
96 -
 97
97 -
 98
98 -
 99
99 -
 100
100 -
 101
101 -
 102
102 -
 103
103 -
 104
104 -
105
-
106
-
107
-
108
-
109
-
110
-
111
-
112
-
113
-
114
-
115
-
116
-
117
-
118
-
119
-
120
-
121
-
122
-
123
-
124
-
125
-
126
-
127
-
128
-
129
-
130
-
131
-
132
-
133
-
134
-
135
-
136
-
137
-
138
-
139
-
140
-
141
-
142
-
143
-
144
-
145
-
146
-
147
-
148
-
149
-
150
-
151
-
152
-
153
-
154
-
155
-
156
-
157
-
158
-
159
-
160
-
161
-
162
-
163
-
164
-
165
-
166
-
167
-
168
-
169
-
170
-
171
-
172
-
173
-
174
-
175
-
176
-
177
-
178
-
179
-
180
-
181
-
182
-
183
-
184
-
185
-
186
-
187
-
188
-
189
-
190
-
191
-
192
-
193
-
194
-
195
-
196
-
197
-
198
-
199
-
200
-
201
-
202
-
203
-
204
-
205
-
206
-
207
-
208
-
209
-
210
-
211
-
212
 |
 |