HP CB536A User Guide - Page 90
Use the control panel to set the fax time, date, and header
 |
View all HP CB536A manuals
Add to My Manuals
Save this manual to your list of manuals |
Page 90 highlights
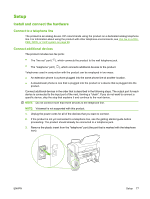
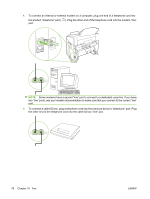
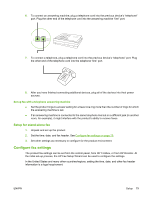
Use the control panel to set the fax time, date, and header To use the control panel to set the date, time, and header, complete the following steps: 1. At the control panel, press Setup. 2. Use the arrow buttons to select System setup, and then press OK. 3. Use the arrow buttons to select Time/Date. Press OK. 4. Use the arrow buttons to select the 12-hour clock or 24-hour clock, and then press OK. 5. Use the alphanumeric buttons to enter the current time. 6. Complete one of the following: ● For the 12-hour clock, use the arrow buttons to move past the fourth character. Select 1 for a.m. or 2 for p.m. Press OK. ● For the 24-hour clock, press OK. 7. Use the alphanumeric buttons to enter the current date. Use two digits to specify the month, day, and year. Press OK. 8. Use the arrow buttons to select Fax setup, then press OK. 9. Use the arrow buttons to select Fax Header, then press OK. 10. Use the alphanumeric buttons to enter your fax number and your company name or header, and then press OK. NOTE: The maximum number of characters for the fax number is 20; use up to 25 characters for the company name. Use HP Fax Setup Wizard to set the fax time, date, and header If you completed the software installation, you are ready to send faxes from your computer. If you did not complete the fax setup process at the time you installed the software, you can complete it at any time by using the Fax Setup Wizard. 1. Click Start, and then click Programs. 2. Click HP, click the name of the product, and then click HP Fax Setup Wizard. 3. Follow the onscreen instructions in the HP Fax Setup Wizard to set the time, date, and fax header, as well as several other settings. Use of common localized letters in fax headers When using the control panel to enter your name in the header or to enter a name for a one-touch key, speed-dial entry, or group-dial entry, press the appropriate alphanumeric button repeatedly until the letter that you need appears. Then, press the > button to select that letter and move to the next space. The following table shows which letters and numbers appear on each alphanumeric button. 80 Chapter 10 Fax ENWW
-
 1
1 -
2
-
3
-
4
-
5
-
6
-
7
-
8
-
9
-
10
-
11
-
12
-
13
-
14
-
15
-
16
-
17
-
18
-
19
-
20
-
21
-
22
-
23
-
24
-
25
-
26
-
27
-
28
-
29
-
30
-
31
-
32
-
33
-
34
-
35
-
36
-
37
-
38
-
39
-
40
-
41
-
42
-
43
-
44
-
45
-
46
-
47
-
48
-
49
-
50
-
51
-
52
-
53
-
54
-
55
-
56
-
57
-
58
-
59
-
60
-
61
-
62
-
63
-
64
-
65
-
66
-
67
-
68
-
69
-
70
-
71
-
72
-
73
-
74
-
75
-
76
-
77
-
78
-
79
-
80
-
81
-
82
-
83
-
84
-
 85
85 -
 86
86 -
 87
87 -
 88
88 -
 89
89 -
 90
90 -
 91
91 -
 92
92 -
 93
93 -
 94
94 -
 95
95 -
96
-
97
-
98
-
99
-
100
-
101
-
102
-
103
-
104
-
105
-
106
-
107
-
108
-
109
-
110
-
111
-
112
-
113
-
114
-
115
-
116
-
117
-
118
-
119
-
120
-
121
-
122
-
123
-
124
-
125
-
126
-
127
-
128
-
129
-
130
-
131
-
132
-
133
-
134
-
135
-
136
-
137
-
138
-
139
-
140
-
141
-
142
-
143
-
144
-
145
-
146
-
147
-
148
-
149
-
150
-
151
-
152
-
153
-
154
-
155
-
156
-
157
-
158
-
159
-
160
-
161
-
162
-
163
-
164
-
165
-
166
-
167
-
168
-
169
-
170
-
171
-
172
-
173
-
174
-
175
-
176
-
177
-
178
-
179
-
180
-
181
-
182
-
183
-
184
-
185
-
186
-
187
-
188
-
189
-
190
-
191
-
192
-
193
-
194
-
195
-
196
-
197
-
198
-
199
-
200
-
201
-
202
-
203
-
204
-
205
-
206
-
207
-
208
-
209
-
210
-
211
-
212
 |
 |
