HP Designjet L26100 HP Designjet L26500 / L26100 Printer Series - Printer asse - Page 23
Entriegeln Sie die Aufwickelvorrichtung, indem Sie den
 |
View all HP Designjet L26100 manuals
Add to My Manuals
Save this manual to your list of manuals |
Page 23 highlights
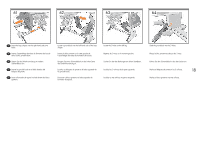
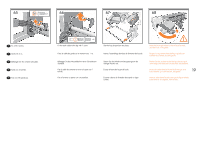
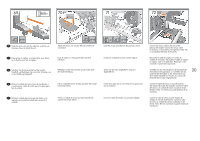
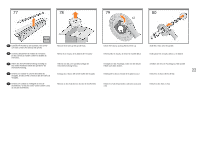
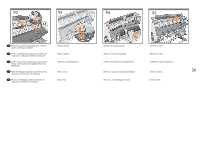
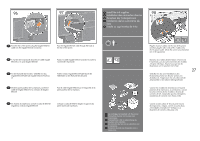
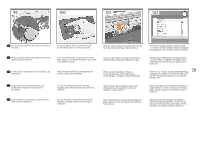
81 x2 82 83 84 EN Lock the hubs. Note: you can adjust the hub when loading media. FR Faites glisser les 2 moyeux bleus sur la bobine. DE Schieben Sie die zwei Anschläge auf die Spindel. ES Deslice los 2 discos dentro del eje. PT Deslize os dois hubs no eixo. Raise the loading table to its upright position. Relevez la table de chargement en position verticale. Bringen Sie den Ladetisch in die aufrechte Position. Lleve la mesa de carga hasta su posición vertical. Levante a mesa de carregamento para a posição vertical. Unlock the take-up reel by pushing the spindle lever to its upper most position. Débloquez l'enrouleur en poussant la manette de la bobine en position haute. Entriegeln Sie die Aufwickelvorrichtung, indem Sie den Spindelhebel in die oberste Stellung bringen. Desbloquee el rodillo de recogida colocando la palanca del eje hacia arriba. Destrave o rolo de recolhimento empurrando a alavanca do eixo para sua posição mais alta. Load the take-up reel spindle into the printer by pushing firmly on each end of the spindle. Note: the part marked A should go to the right hand side. Chargez la bobine de l'enrouleur dans l'imprimante en appuyant fermement sur chaque extrémité de la bobine. Remarque : La partie marquée A s'assemble sur le côté droit. Setzen Sie die Spindel der Aufwickelvorrichtung in den Drucker ein, indem Sie beide Enden fest in die Halterungen drücken. Hinweis: Das mit „A" gekennzeichnete Teil muss sich auf der rechten Seite befinden. 23 Introduzca el eje del rodillo de recogida en la impresora presionando firmemente en ambos extremos del eje. Nota: la parte marcada con la letra A debe ir hacia la derecha. Coloque o eixo do rolo de recolhimento na impressora empurrando firmemente em direção às extremidades do eixo. Nota: a parte marcada com A deve estar na lateral direita.
-
 1
1 -
2
-
3
-
4
-
5
-
6
-
7
-
8
-
9
-
10
-
11
-
12
-
13
-
14
-
15
-
16
-
17
-
 18
18 -
 19
19 -
 20
20 -
 21
21 -
 22
22 -
 23
23 -
 24
24 -
 25
25 -
 26
26 -
 27
27 -
 28
28 -
29
-
30
-
31
-
32
-
33
-
34
-
35
-
36
-
37
-
38
-
39
-
40
-
41
-
42
-
43
-
44
-
45
-
46
-
47
-
48
 |
 |
