HP Designjet L26100 HP Designjet L26500 / L26100 Printer Series - Printer asse - Page 6
rutschhemmendes Material. Entfernen Sie dieses
 |
View all HP Designjet L26100 manuals
Add to My Manuals
Save this manual to your list of manuals |
Page 6 highlights
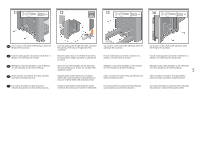
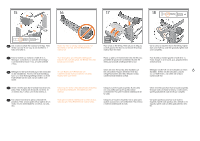
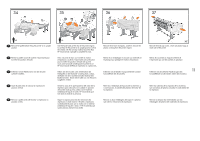
15 16 17 18 x4 x3 EN Use 3 screws to attach the cross-bar to the legs. Note: the bar can only fit one way; at one end there is 1 hole, at the other 2. Notice that there is anti-slip material around 2 of the wheels on the feet. DO NOT REMOVE this material yet. FR Fixez la traverse aux montants à l'aide de 3 vis. Remarque : La traverse a un seul sens de montage ; à une extrémité se trouve 1 trou, à l'autre extrémité 2 trous. Vous remarquerez qu'une bande antidérapante entoure 2 des roues des pieds. NE RETIREZ PAS cette bande pour le moment. DE Befestigen Sie die Querverstrebung mit drei Schrauben an den Standbeinen. Hinweis: Die Querverstrebung kann nur in einer Richtung befestigt werden: an einem Ende befindet sich ein Loch und am anderen zwei Löcher. An zwei Rädern der Füße befindet sich rutschhemmendes Material. Entfernen Sie dieses Material jetzt noch NICHT. ES Utilice 3 tornillos para fijar el anclaje transversal a las patas. Nota: la barra sólo encaja de una forma: en un extremo hay 1 orificio y en el otro extremo, 2. Observe que 2 de las ruedas del pie están recubiertas de material antideslizante. NO QUITE aún este material. PT Fixe a barra transversal às pernas utilizando três parafusos. Nota: a barra pode se fixar apenas de um modo; em uma extremidade há um orifício, na outra, dois. Note que há material antideslizante ao redor de duas rodas dos pés. NÃO REMOVA este material ainda. Place a foot on the left leg. There are pins to help you correctly position the foot. Do not remove the anti-slip material from the wheel. Placez un pied sur le montant droit. Des chevilles vous permettent de positionner correctement le pied. Ne retirez pas la bande antidérapante de la roue. Setzen Sie einen Fuß auf das linke Standbein auf. Die vorhandenen Noppen erleichtern Ihnen das richtige Positionieren des Fußes. Belassen Sie das rutschhemmende Material am Rad. Coloque un pie en la pata izquierda. El pie cuenta con unas patillas para que lo pueda colocar correctamente. No quite el material antideslizante de la rueda. Coloque o pé na perna esquerda. Use os pinos para ajudá-lo a posicionar o pé corretamente. Não remova o material antideslizante da roda. Use 4 screws to attach the foot to the left leg. Tighten each screw half-way, and then gradually tighten each screw completely. Fixez le pied au montant gauche à l'aide de 4 vis. Vissez chaque vis à mi-course, puis, progressivement, serrez-la à fond. Befestigen Sie den Fuß mit vier Schrauben am linken Standbein. Drehen Sie alle Schrauben zunächst 6 nur zur Hälfte hinein, und ziehen Sie sie dann nacheinander fest. Utilice 4 tornillos para fijar el pie a la pata izquierda. Enrosque cada uno hasta la mitad y, a continuación, apriete gradualmente cada tornillo por completo. Use quatro parafusos para fixar o pé à perna esquerda. Aperte cada parafuso até a metade e, em seguida, aperte cada um deles gradualmente, até o fim.
-
 1
1 -
 2
2 -
 3
3 -
 4
4 -
 5
5 -
 6
6 -
 7
7 -
 8
8 -
 9
9 -
 10
10 -
 11
11 -
 12
12 -
13
-
14
-
15
-
16
-
17
-
18
-
19
-
20
-
21
-
22
-
23
-
24
-
25
-
26
-
27
-
28
-
29
-
30
-
31
-
32
-
33
-
34
-
35
-
36
-
37
-
38
-
39
-
40
-
41
-
42
-
43
-
44
-
45
-
46
-
47
-
48
 |
 |
