HP GbE2c HP GbE2c Ethernet Blade Switch for c-Class BladeSystem Application Gu - Page 111
Assigning the area index, Using the area ID to assign the OSPF area number
 |
UPC - 808736802215
View all HP GbE2c manuals
Add to My Manuals
Save this manual to your list of manuals |
Page 111 highlights
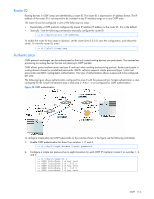
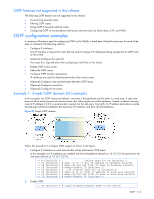
Assigning the area index The aindex option is actually just an arbitrary index (0-2) used only by the switch. This index does not necessarily represent the OSPF area number, though for configuration simplicity, it should where possible. For example, both of the following sets of commands define OSPF area 0 (the backbone) and area 1 because that information is held in the area ID portion of the command. However, the first set of commands is easier to maintain because the arbitrary area indexes agree with the area IDs: • Area index and area ID agree /cfg/l3/ospf/aindex 0/areaid 0.0.0.0 (Use index 0 to set area 0 in ID octet format) /cfg/l3/ospf/aindex 1/areaid 0.0.0.1 (Use index 1 to set area 1 in ID octet format) • Area index set to an arbitrary value /cfg/l3/ospf/aindex 1/areaid 0.0.0.0 (Use index 1 to set area 0 in ID octet format) /cfg/l3/ospf/aindex 2/areaid 0.0.0.1 (Use index 2 to set area 1 in ID octet format) Using the area ID to assign the OSPF area number The OSPF area number is defined in the areaid option. The octet format is used in order to be compatible with two different systems of notation used by other OSPF network vendors. There are two valid ways to designate an area ID: • Placing the area number in the last octet (0.0.0.n) Most common OSPF vendors express the area ID number as a single number. For example, the Cisco IOSbased router command "network 1.1.1.0 0.0.0.255 area 1" defines the area number simply as "area 1". On the GbE2c, using the last octet in the area ID, "area 1" is equivalent to "areaid 0.0.0.1". • Multi-octet (IP address) Some OSPF vendors express the area ID number in multi-octet format. For example, "area 2.2.2.2" represents OSPF area 2 and can be specified directly on the GbE2c as "areaid 2.2.2.2". NOTE: Although both types of area ID formats are supported, be sure that the area IDs are in the same format throughout an area. Attaching an area to a network Once an OSPF area has been defined, it must be associated with a network. To attach the area to a network, you must assign the OSPF area index to an IP interface that participates in the area. The format for the command is as follows: >> # /cfg/l3/ospf/if /aindex For example, the following commands could be used to configure IP interface 14 for a presence on the 10.10.10.1/24 network, to define OSPF area 1, and to attach the area to the network: >> # /cfg/l3/if 14 (Select menu for IP interface 14) >> IP Interface 14# addr 10.10.10.1(Define IP address on backbone network) >> IP Interface 14# mask 255.255.255.0(Define IP mask on backbone) >> IP Interface 14# ena (Enable IP interface 14) >> IP Interface 14# ../ospf/aindex 1(Select menu for area index 1) >> OSPF Area (index) 1 # areaid 0.0.0.1(Define area ID as OSPF area 1) >> OSPF Area (index) 1 # ena (Enable area index 1) >> OSPF Area (index) 1 # ../if 14 (Select OSPF menu for interface 14) >> OSPF Interface 14# aindex 1 (Attach area to network on interface 14) >> OSPF Interface 14# enable (Enable interface 14 for area index 1) OSPF 111
-
 1
1 -
2
-
3
-
4
-
5
-
6
-
7
-
8
-
9
-
10
-
11
-
12
-
13
-
14
-
15
-
16
-
17
-
18
-
19
-
20
-
21
-
22
-
23
-
24
-
25
-
26
-
27
-
28
-
29
-
30
-
31
-
32
-
33
-
34
-
35
-
36
-
37
-
38
-
39
-
40
-
41
-
42
-
43
-
44
-
45
-
46
-
47
-
48
-
49
-
50
-
51
-
52
-
53
-
54
-
55
-
56
-
57
-
58
-
59
-
60
-
61
-
62
-
63
-
64
-
65
-
66
-
67
-
68
-
69
-
70
-
71
-
72
-
73
-
74
-
75
-
76
-
77
-
78
-
79
-
80
-
81
-
82
-
83
-
84
-
85
-
86
-
87
-
88
-
89
-
90
-
91
-
92
-
93
-
94
-
95
-
96
-
97
-
98
-
99
-
100
-
101
-
102
-
103
-
104
-
105
-
 106
106 -
 107
107 -
 108
108 -
 109
109 -
 110
110 -
 111
111 -
 112
112 -
 113
113 -
 114
114 -
 115
115 -
 116
116 -
117
-
118
-
119
-
120
-
121
-
122
-
123
-
124
-
125
-
126
-
127
-
128
-
129
-
130
-
131
-
132
-
133
-
134
-
135
-
136
-
137
-
138
-
139
-
140
-
141
-
142
-
143
-
144
-
145
-
146
-
147
-
148
-
149
-
150
-
151
-
152
-
153
-
154
-
155
-
156
-
157
-
158
-
159
-
160
-
161
-
162
-
163
-
164
-
165
 |
 |