HP GbE2c HP GbE2c Ethernet Blade Switch for c-Class BladeSystem Application Gu - Page 90
Select the IP Forwarding Menu, Select IP interface 2
 |
UPC - 808736802215
View all HP GbE2c manuals
Add to My Manuals
Save this manual to your list of manuals |
Page 90 highlights
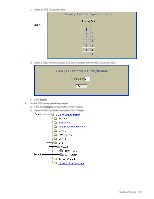
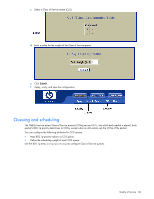
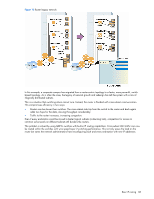
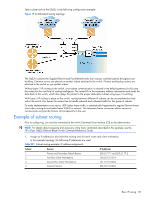
2. Assign an IP interface for each subnet attached to the switch. Since there are four IP subnets connected to the switch, four IP interfaces are needed Table 022 Subnet routing example: IP interface assignments Interface Devices IP Interface Address IF 1 Primary and Secondary Default Routers 205.21.17.3 IF 2 First Floor Client Workstations 100.20.10.1 IF 3 Second Floor Client Workstations 131.15.15.1 IF 4 Common Servers 206.30.15.1 IP interfaces are configured using the following commands at the CLI: >> # /cfg/l3/if 1 (Select IP interface 1) >> IP Interface 1# addr 205.21.17.3 (Assign IP address) >> IP Interface 1# ena (Enable IP interface 1) >> IP Interface 1# ../if 2 (Select IP interface 2) >> IP Interface 2# addr 100.20.10.1 (Assign IP address) >> IP Interface 2# ena (Enable IP interface 2) >> IP Interface 2# ../if 3 (Select IP interface 3) >> IP Interface 3# addr 131.15.15.1 (Assign IP address) >> IP Interface 3# ena (Enable IP interface 3) >> IP Interface 3# ../if 4 (Select IP interface 4) >> IP Interface 4# addr 206.30.15.1 (Assign IP address) >> IP Interface 4# ena (Enable IP interface 5) 3. Set each server and workstation's default gateway to the appropriate switch IP interface (the one in the same subnet as the server or workstation). 4. Configure the default gateways to the routers' addresses. Configuring the default gateways allows the switch to send outbound traffic to the routers: >> IP Interface 5# ../gw 1 (Select primary default gateway) >> Default gateway 1# addr 205.21.17.1(Assign IP address) >> Default gateway 1# ena (Enable primary default gateway) >> Default gateway 1# ../gw 2 (Select secondary default gateway) >> Default gateway 2# addr 205.21.17.2 (Assign address) >> Default gateway 2# ena (Enable secondary default gateway) 5. Enable, apply, and verify the configuration. >> Default gateway 2# ../fwrd >> IP Forwarding# on >> IP Forwarding# apply >> IP Forwarding# /cfg/l3/cur (Select the IP Forwarding Menu) (Turn IP forwarding on) (Make your changes active) (View current IP settings) Examine the resulting information. If any settings are incorrect, make the appropriate changes. 6. Save your new configuration changes. >> IP# save(Save for restore after reboot) Basic IP routing 90
-
 1
1 -
2
-
3
-
4
-
5
-
6
-
7
-
8
-
9
-
10
-
11
-
12
-
13
-
14
-
15
-
16
-
17
-
18
-
19
-
20
-
21
-
22
-
23
-
24
-
25
-
26
-
27
-
28
-
29
-
30
-
31
-
32
-
33
-
34
-
35
-
36
-
37
-
38
-
39
-
40
-
41
-
42
-
43
-
44
-
45
-
46
-
47
-
48
-
49
-
50
-
51
-
52
-
53
-
54
-
55
-
56
-
57
-
58
-
59
-
60
-
61
-
62
-
63
-
64
-
65
-
66
-
67
-
68
-
69
-
70
-
71
-
72
-
73
-
74
-
75
-
76
-
77
-
78
-
79
-
80
-
81
-
82
-
83
-
84
-
 85
85 -
 86
86 -
 87
87 -
 88
88 -
 89
89 -
 90
90 -
 91
91 -
 92
92 -
 93
93 -
 94
94 -
 95
95 -
96
-
97
-
98
-
99
-
100
-
101
-
102
-
103
-
104
-
105
-
106
-
107
-
108
-
109
-
110
-
111
-
112
-
113
-
114
-
115
-
116
-
117
-
118
-
119
-
120
-
121
-
122
-
123
-
124
-
125
-
126
-
127
-
128
-
129
-
130
-
131
-
132
-
133
-
134
-
135
-
136
-
137
-
138
-
139
-
140
-
141
-
142
-
143
-
144
-
145
-
146
-
147
-
148
-
149
-
150
-
151
-
152
-
153
-
154
-
155
-
156
-
157
-
158
-
159
-
160
-
161
-
162
-
163
-
164
-
165
 |
 |