HP Officejet Pro 8500A User Guide - Page 127
Error Correction Mode, noise can cause faxing problems. Check the sound quality of the phone line
 |
View all HP Officejet Pro 8500A manuals
Add to My Manuals
Save this manual to your list of manuals |
Page 127 highlights
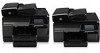
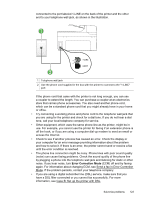
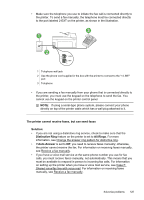
connected to the port labeled 1-LINE on the back of the printer and the other end to your telephone wall jack, as shown in the illustration. 1 2 1 Telephone wall jack 2 Use the phone cord supplied in the box with the printer to connect to the "1-LINE" port If the phone cord that came with the printer is not long enough, you can use a coupler to extend the length. You can purchase a coupler at an electronics store that carries phone accessories. You also need another phone cord, which can be a standard phone cord that you might already have in your home or office. • Try connecting a working phone and phone cord to the telephone wall jack that you are using for the printer and check for a dial tone. If you do not hear a dial tone, call your local telephone company for service. • Other equipment, which uses the same phone line as the printer, might be in use. For example, you cannot use the printer for faxing if an extension phone is off the hook, or if you are using a computer dial-up modem to send an email or access the Internet. • Check to see if another process has caused an error. Check the display or your computer for an error message providing information about the problem and how to solve it. If there is an error, the printer cannot send or receive a fax until the error condition is resolved. • The phone line connection might be noisy. Phone lines with poor sound quality (noise) can cause faxing problems. Check the sound quality of the phone line by plugging a phone into the telephone wall jack and listening for static or other noise. If you hear noise, turn Error Correction Mode (ECM) off and try faxing again. For information about changing ECM, see Send a fax in Error Correction Mode. If the problem persists, contact your telephone company. • If you are using a digital subscriber line (DSL) service, make sure that you have a DSL filter connected or you cannot fax successfully. For more information, see Case B: Set up the printer with DSL. Solve fax problems 123
-
 1
1 -
2
-
3
-
4
-
5
-
6
-
7
-
8
-
9
-
10
-
11
-
12
-
13
-
14
-
15
-
16
-
17
-
18
-
19
-
20
-
21
-
22
-
23
-
24
-
25
-
26
-
27
-
28
-
29
-
30
-
31
-
32
-
33
-
34
-
35
-
36
-
37
-
38
-
39
-
40
-
41
-
42
-
43
-
44
-
45
-
46
-
47
-
48
-
49
-
50
-
51
-
52
-
53
-
54
-
55
-
56
-
57
-
58
-
59
-
60
-
61
-
62
-
63
-
64
-
65
-
66
-
67
-
68
-
69
-
70
-
71
-
72
-
73
-
74
-
75
-
76
-
77
-
78
-
79
-
80
-
81
-
82
-
83
-
84
-
85
-
86
-
87
-
88
-
89
-
90
-
91
-
92
-
93
-
94
-
95
-
96
-
97
-
98
-
99
-
100
-
101
-
102
-
103
-
104
-
105
-
106
-
107
-
108
-
109
-
110
-
111
-
112
-
113
-
114
-
115
-
116
-
117
-
118
-
119
-
120
-
121
-
 122
122 -
 123
123 -
 124
124 -
 125
125 -
 126
126 -
 127
127 -
 128
128 -
 129
129 -
 130
130 -
 131
131 -
 132
132 -
133
-
134
-
135
-
136
-
137
-
138
-
139
-
140
-
141
-
142
-
143
-
144
-
145
-
146
-
147
-
148
-
149
-
150
-
151
-
152
-
153
-
154
-
155
-
156
-
157
-
158
-
159
-
160
-
161
-
162
-
163
-
164
-
165
-
166
-
167
-
168
-
169
-
170
-
171
-
172
-
173
-
174
-
175
-
176
-
177
-
178
-
179
-
180
-
181
-
182
-
183
-
184
-
185
-
186
-
187
-
188
-
189
-
190
-
191
-
192
-
193
-
194
-
195
-
196
-
197
-
198
-
199
-
200
-
201
-
202
-
203
-
204
-
205
-
206
-
207
-
208
-
209
-
210
-
211
-
212
-
213
-
214
-
215
-
216
-
217
-
218
-
219
-
220
-
221
-
222
-
223
-
224
-
225
-
226
-
227
-
228
-
229
-
230
-
231
-
232
-
233
-
234
-
235
-
236
-
237
-
238
-
239
-
240
-
241
-
242
-
243
-
244
-
245
-
246
 |
 |
