HP P2055d HP LaserJet P2050 Series - Software Technical Reference - Page 129
Advanced tab features
 |
UPC - 884962230343
View all HP P2055d manuals
Add to My Manuals
Save this manual to your list of manuals |
Page 129 highlights
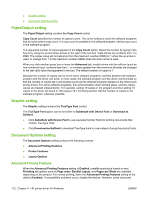
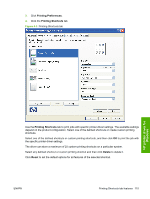
Whenever a constraint message appears with Resolve all conflicts for me automatically or I will resolve the conflict myself buttons, the action of the buttons is as follows: ● To reject the change that was just made, returning the control to its previous value, click Resolve all conflicts for me automatically and then click OK. ● To accept the change that was just made and return to the driver settings to resolve the conflict, click I will resolve the conflict myself and then click OK. Advanced tab features To gain access to the Advanced tab, follow these steps: 1. For Windows XP and Windows Server 2003 (using the default Start menu view), click Start, click Settings (Windows XP), and then click Printers and Faxes. For Windows Vista, click Start, click Control Panel, and then under Hardware and Sound click Printer. 2. Right-click the product name. 3. Click Printing Preferences. 4. Click the Advanced tab. Use the Advanced tab to change the layout of printed pages and to configure special controls that are not commonly used. Also use this tab to control features such as media size and copies in the driver (although most current software programs support these features in the print dialog box or through the page settings in the software program). The following figure shows the Advanced tab. Figure 4-2 The default appearance of the Advanced tab HP printer driver for Windows The Advanced tab contains the following controls: ● Paper/Output setting ENWW Advanced tab features 111
-
 1
1 -
2
-
3
-
4
-
5
-
6
-
7
-
8
-
9
-
10
-
11
-
12
-
13
-
14
-
15
-
16
-
17
-
18
-
19
-
20
-
21
-
22
-
23
-
24
-
25
-
26
-
27
-
28
-
29
-
30
-
31
-
32
-
33
-
34
-
35
-
36
-
37
-
38
-
39
-
40
-
41
-
42
-
43
-
44
-
45
-
46
-
47
-
48
-
49
-
50
-
51
-
52
-
53
-
54
-
55
-
56
-
57
-
58
-
59
-
60
-
61
-
62
-
63
-
64
-
65
-
66
-
67
-
68
-
69
-
70
-
71
-
72
-
73
-
74
-
75
-
76
-
77
-
78
-
79
-
80
-
81
-
82
-
83
-
84
-
85
-
86
-
87
-
88
-
89
-
90
-
91
-
92
-
93
-
94
-
95
-
96
-
97
-
98
-
99
-
100
-
101
-
102
-
103
-
104
-
105
-
106
-
107
-
108
-
109
-
110
-
111
-
112
-
113
-
114
-
115
-
116
-
117
-
118
-
119
-
120
-
121
-
122
-
123
-
 124
124 -
 125
125 -
 126
126 -
 127
127 -
 128
128 -
 129
129 -
 130
130 -
 131
131 -
 132
132 -
 133
133 -
 134
134 -
135
-
136
-
137
-
138
-
139
-
140
-
141
-
142
-
143
-
144
-
145
-
146
-
147
-
148
-
149
-
150
-
151
-
152
-
153
-
154
-
155
-
156
-
157
-
158
-
159
-
160
-
161
-
162
-
163
-
164
-
165
-
166
-
167
-
168
-
169
-
170
-
171
-
172
-
173
-
174
-
175
-
176
-
177
-
178
-
179
-
180
-
181
-
182
-
183
-
184
-
185
-
186
-
187
-
188
-
189
-
190
-
191
-
192
-
193
-
194
-
195
-
196
-
197
-
198
-
199
-
200
-
201
-
202
-
203
-
204
-
205
-
206
-
207
-
208
-
209
-
210
-
211
-
212
-
213
-
214
-
215
-
216
-
217
-
218
-
219
-
220
-
221
-
222
-
223
-
224
-
225
-
226
-
227
-
228
-
229
-
230
 |
 |
