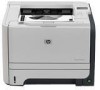
HP P2055d HP LaserJet P2050 Series - Software Technical Reference - Page 179
Set up a product with Mac OS X v10.3, Socket/HP Jet Direct
 |
UPC - 884962230343
View all HP P2055d manuals
Add to My Manuals
Save this manual to your list of manuals |
Page 179 highlights
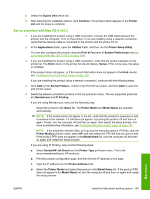
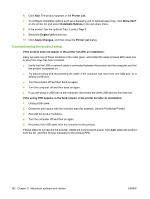
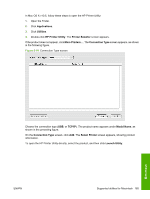
8. Select the Duplex Unit check box. 9. After selecting the installable options, click Continue. The product name appears in the Printer List and the setup is complete. Set up a product with Mac OS X v10.3 1. If you are installing the product using a USB connection, connect the USB cable between the product and the computer. Turn on the product. If you are installing using a network connection, verify that the network cable is connected to the product and the product is on. 2. In the Applications folder, open the Utilities folder, and then run the Printer Setup Utility. You can also configure the product using the Print & Fax pane of System Preferences (see Set up a product with Mac OS X v10.5 on page 158). 3. If you are installing the product using a USB connection, verify that the product appears on the printer list. The Kind column in the printer list should display Series. If this is the case, the setup is complete. If the product does not appear, or if the correct information does not appear in the Kind column, see Troubleshooting the product setup on page 162. If you are installing the product using a network connection, continue with the following steps. 4. Click Add (or the Set Up Printers... button in the Print & Fax screen, and then Add) to open the add printer screen. 5. Select the network connection protocol in the top pull-down menu. The two supported protocols are Rendezvous and IP Printing. If you are using Rendezvous, carry out the following step: Select the product in the Name list. The Printer Model and Model Name are selected automatically. NOTE: If the product does not appear in the list, verify that the product is powered on and connected to the network. If it still does not appear, try turning the product off and then on again. Finally, turn the computer off and then on again, then restart the setup process. For more troubleshooting information, see Troubleshooting the product setup on page 162. NOTE: If the automatic selection fails, or if you want to manually select a .PPD file, click the Printer Model pull-down menu, select HP, and then select the .PPD file that you want to add. If the product PPD does not appear in the Model Name list, turn the computer off and then on again and restart the setup process. If you are using IP Printing, carry out the following steps: a. Select Socket/HP Jet Direct from the Printer Type pull-down menu. This is the recommended setting for HP products. b. Print the product configuration page, and then find the IP address on the page. c. Type the IP address into the Printer Address field. d. Select the Printer Model and select the product in the Model Name list. If the product PPD does not appear in the Model Name list, turn the computer off and then on again and restart the setup process. Macintosh ENWW Install the Macintosh printing system 161
-
 1
1 -
2
-
3
-
4
-
5
-
6
-
7
-
8
-
9
-
10
-
11
-
12
-
13
-
14
-
15
-
16
-
17
-
18
-
19
-
20
-
21
-
22
-
23
-
24
-
25
-
26
-
27
-
28
-
29
-
30
-
31
-
32
-
33
-
34
-
35
-
36
-
37
-
38
-
39
-
40
-
41
-
42
-
43
-
44
-
45
-
46
-
47
-
48
-
49
-
50
-
51
-
52
-
53
-
54
-
55
-
56
-
57
-
58
-
59
-
60
-
61
-
62
-
63
-
64
-
65
-
66
-
67
-
68
-
69
-
70
-
71
-
72
-
73
-
74
-
75
-
76
-
77
-
78
-
79
-
80
-
81
-
82
-
83
-
84
-
85
-
86
-
87
-
88
-
89
-
90
-
91
-
92
-
93
-
94
-
95
-
96
-
97
-
98
-
99
-
100
-
101
-
102
-
103
-
104
-
105
-
106
-
107
-
108
-
109
-
110
-
111
-
112
-
113
-
114
-
115
-
116
-
117
-
118
-
119
-
120
-
121
-
122
-
123
-
124
-
125
-
126
-
127
-
128
-
129
-
130
-
131
-
132
-
133
-
134
-
135
-
136
-
137
-
138
-
139
-
140
-
141
-
142
-
143
-
144
-
145
-
146
-
147
-
148
-
149
-
150
-
151
-
152
-
153
-
154
-
155
-
156
-
157
-
158
-
159
-
160
-
161
-
162
-
163
-
164
-
165
-
166
-
167
-
168
-
169
-
170
-
171
-
172
-
173
-
 174
174 -
 175
175 -
 176
176 -
 177
177 -
 178
178 -
 179
179 -
 180
180 -
 181
181 -
 182
182 -
 183
183 -
 184
184 -
185
-
186
-
187
-
188
-
189
-
190
-
191
-
192
-
193
-
194
-
195
-
196
-
197
-
198
-
199
-
200
-
201
-
202
-
203
-
204
-
205
-
206
-
207
-
208
-
209
-
210
-
211
-
212
-
213
-
214
-
215
-
216
-
217
-
218
-
219
-
220
-
221
-
222
-
223
-
224
-
225
-
226
-
227
-
228
-
229
-
230
 |
 |
