HP P2055d HP LaserJet P2050 Series - Software Technical Reference - Page 199
Stored Jobs, Releasing a job-storage print job, Enable Job Storing, Enter Secure Job PIN
 |
UPC - 884962230343
View all HP P2055d manuals
Add to My Manuals
Save this manual to your list of manuals |
Page 199 highlights
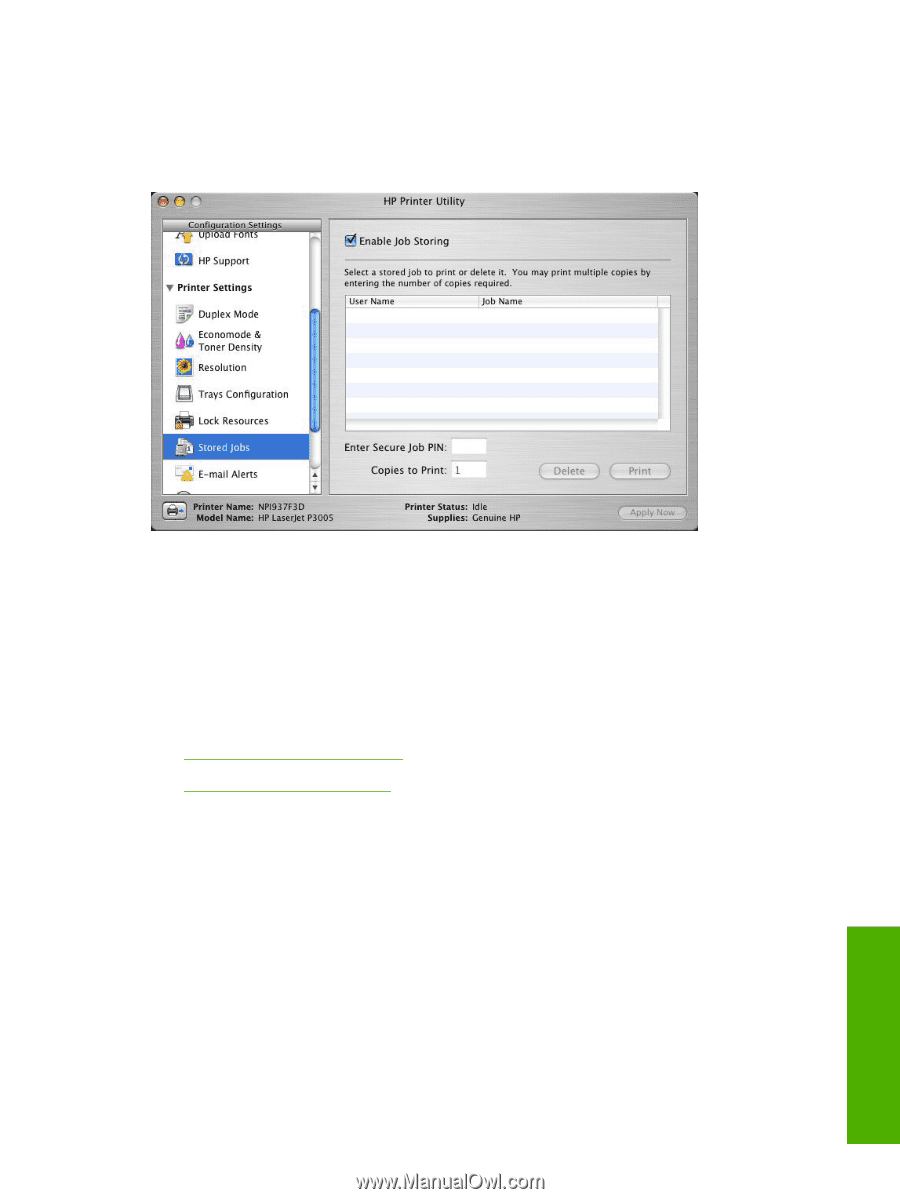
Stored Jobs Choose Stored Jobs to change the Enable Job Storing setting. This setting is selected by default. Click to clear the check box to disable the job-storing feature. Figure 5-33 Enable Job Storing screen You can type a PIN for your job in the Enter Secure Job PIN field. Select the number of copies in the Copies to Print field. Select a stored job and click Print to print the job. Select a stored job and click Delete to delete the job. Job-storage print jobs can also be released or deleted at the product control panel. Topics: ● Releasing a job-storage print job ● Deleting a job-storage print job Releasing a job-storage print job After you send a print job that uses the job-storage feature, you can release the job to print from the product control panel. 1. Press theMenu button to open the menus. 2. Use the arrow buttons to select RETRIEVE JOB, and then press OK. 3. Use the arrow buttons to select your user name, and then press OK. 4. Use the arrow buttons to select the job name, and then press OK. 5. Use the arrow buttons to select PRINT, and then press OK. 6. Press OK. ENWW Supported utilities for Macintosh 181 Macintosh
-
 1
1 -
2
-
3
-
4
-
5
-
6
-
7
-
8
-
9
-
10
-
11
-
12
-
13
-
14
-
15
-
16
-
17
-
18
-
19
-
20
-
21
-
22
-
23
-
24
-
25
-
26
-
27
-
28
-
29
-
30
-
31
-
32
-
33
-
34
-
35
-
36
-
37
-
38
-
39
-
40
-
41
-
42
-
43
-
44
-
45
-
46
-
47
-
48
-
49
-
50
-
51
-
52
-
53
-
54
-
55
-
56
-
57
-
58
-
59
-
60
-
61
-
62
-
63
-
64
-
65
-
66
-
67
-
68
-
69
-
70
-
71
-
72
-
73
-
74
-
75
-
76
-
77
-
78
-
79
-
80
-
81
-
82
-
83
-
84
-
85
-
86
-
87
-
88
-
89
-
90
-
91
-
92
-
93
-
94
-
95
-
96
-
97
-
98
-
99
-
100
-
101
-
102
-
103
-
104
-
105
-
106
-
107
-
108
-
109
-
110
-
111
-
112
-
113
-
114
-
115
-
116
-
117
-
118
-
119
-
120
-
121
-
122
-
123
-
124
-
125
-
126
-
127
-
128
-
129
-
130
-
131
-
132
-
133
-
134
-
135
-
136
-
137
-
138
-
139
-
140
-
141
-
142
-
143
-
144
-
145
-
146
-
147
-
148
-
149
-
150
-
151
-
152
-
153
-
154
-
155
-
156
-
157
-
158
-
159
-
160
-
161
-
162
-
163
-
164
-
165
-
166
-
167
-
168
-
169
-
170
-
171
-
172
-
173
-
174
-
175
-
176
-
177
-
178
-
179
-
180
-
181
-
182
-
183
-
184
-
185
-
186
-
187
-
188
-
189
-
190
-
191
-
192
-
193
-
 194
194 -
 195
195 -
 196
196 -
 197
197 -
 198
198 -
 199
199 -
 200
200 -
 201
201 -
 202
202 -
 203
203 -
 204
204 -
205
-
206
-
207
-
208
-
209
-
210
-
211
-
212
-
213
-
214
-
215
-
216
-
217
-
218
-
219
-
220
-
221
-
222
-
223
-
224
-
225
-
226
-
227
-
228
-
229
-
230
 |
 |