HP Surestore Disk Array FC60 HP SureStore E Disk Array FC60 Service Manual (A5 - Page 337
Identifying When ACS is Being Performed, the Controller Power LED on, Controller Fault LED off
 |
View all HP Surestore Disk Array FC60 manuals
Add to My Manuals
Save this manual to your list of manuals |
Page 337 highlights
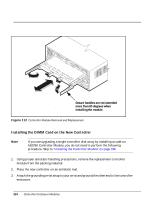
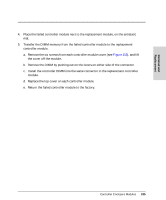
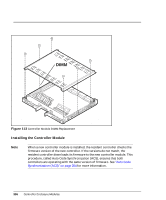
Removal and Replacement CAUTION If Auto Code Synchronization (ACS) occurs when the new controller module is installed. DO NOT turn array power off, reset the controller modules, or reseat the controller module for approximately 15 minutes after initial insertion. Performing any of these actions during ACS may damage the controller and it will have to be replaced. See "Identifying When ACS is Being Performed" on page 337 to determine if ACS has been initiated. 1. Align the latch handles on the controller module so they form a 90 degree angle with the module. Attempting to install the module with the handles extended beyond this point may cause damage to the handles. 2. Slide the controller module into the slot until the back edge of the handles latch into the frame. See Figure 112 3. Swing the handles inward until the front edge of the handles snap into the tabs. 4. Observe the LEDs to determine the status of the controller modules. If ACS occurs, the fault LEDs may remain on until it completes. For more information on ACS, see "Identifying When ACS is Being Performed" at the end of this procedure. 5. Install the enclosure front cover by sliding the top edge of the cover up under the lip of the chassis, then pushing the bottom in until the pins snap into the mounting holes. Identifying When ACS is Being Performed To determine if ACS has been initiated, observe the controller module's LEDs. The controller module will go through a power-up sequence before starting ACS. ACS will begin within 1 minute after inserting the controller module. During ACS, both the controller enclosure's System Fault LED, located on the front of the controller fan module, and the controller module's Fault LED (see Figure 114) will be on. The 8 status LEDs on the controller module will go on one at a time, from right to left, until all 8 LEDs are on. All 8 LEDs will then turn off, one at a time, from left to right. This sequence will repeat until the ACS has completed. When the ACS has completed, the LEDs will return their normal operational state. Normal controller module operation is indicated by the controller module LEDs (see Figure 114): the Controller Power LED on, Controller Fault LED off, Heartbeat LED flashing, and all remaining status LEDs off. If the Power LED remains off or the Fault LED comes on after a few seconds, make sure that the controller module is locked in place. If Controller Enclosure Modules 337
-
 1
1 -
2
-
3
-
4
-
5
-
6
-
7
-
8
-
9
-
10
-
11
-
12
-
13
-
14
-
15
-
16
-
17
-
18
-
19
-
20
-
21
-
22
-
23
-
24
-
25
-
26
-
27
-
28
-
29
-
30
-
31
-
32
-
33
-
34
-
35
-
36
-
37
-
38
-
39
-
40
-
41
-
42
-
43
-
44
-
45
-
46
-
47
-
48
-
49
-
50
-
51
-
52
-
53
-
54
-
55
-
56
-
57
-
58
-
59
-
60
-
61
-
62
-
63
-
64
-
65
-
66
-
67
-
68
-
69
-
70
-
71
-
72
-
73
-
74
-
75
-
76
-
77
-
78
-
79
-
80
-
81
-
82
-
83
-
84
-
85
-
86
-
87
-
88
-
89
-
90
-
91
-
92
-
93
-
94
-
95
-
96
-
97
-
98
-
99
-
100
-
101
-
102
-
103
-
104
-
105
-
106
-
107
-
108
-
109
-
110
-
111
-
112
-
113
-
114
-
115
-
116
-
117
-
118
-
119
-
120
-
121
-
122
-
123
-
124
-
125
-
126
-
127
-
128
-
129
-
130
-
131
-
132
-
133
-
134
-
135
-
136
-
137
-
138
-
139
-
140
-
141
-
142
-
143
-
144
-
145
-
146
-
147
-
148
-
149
-
150
-
151
-
152
-
153
-
154
-
155
-
156
-
157
-
158
-
159
-
160
-
161
-
162
-
163
-
164
-
165
-
166
-
167
-
168
-
169
-
170
-
171
-
172
-
173
-
174
-
175
-
176
-
177
-
178
-
179
-
180
-
181
-
182
-
183
-
184
-
185
-
186
-
187
-
188
-
189
-
190
-
191
-
192
-
193
-
194
-
195
-
196
-
197
-
198
-
199
-
200
-
201
-
202
-
203
-
204
-
205
-
206
-
207
-
208
-
209
-
210
-
211
-
212
-
213
-
214
-
215
-
216
-
217
-
218
-
219
-
220
-
221
-
222
-
223
-
224
-
225
-
226
-
227
-
228
-
229
-
230
-
231
-
232
-
233
-
234
-
235
-
236
-
237
-
238
-
239
-
240
-
241
-
242
-
243
-
244
-
245
-
246
-
247
-
248
-
249
-
250
-
251
-
252
-
253
-
254
-
255
-
256
-
257
-
258
-
259
-
260
-
261
-
262
-
263
-
264
-
265
-
266
-
267
-
268
-
269
-
270
-
271
-
272
-
273
-
274
-
275
-
276
-
277
-
278
-
279
-
280
-
281
-
282
-
283
-
284
-
285
-
286
-
287
-
288
-
289
-
290
-
291
-
292
-
293
-
294
-
295
-
296
-
297
-
298
-
299
-
300
-
301
-
302
-
303
-
304
-
305
-
306
-
307
-
308
-
309
-
310
-
311
-
312
-
313
-
314
-
315
-
316
-
317
-
318
-
319
-
320
-
321
-
322
-
323
-
324
-
325
-
326
-
327
-
328
-
329
-
330
-
331
-
 332
332 -
 333
333 -
 334
334 -
 335
335 -
 336
336 -
 337
337 -
 338
338 -
 339
339 -
 340
340 -
 341
341 -
 342
342 -
343
-
344
-
345
-
346
-
347
-
348
-
349
-
350
-
351
-
352
-
353
-
354
-
355
-
356
-
357
-
358
-
359
-
360
-
361
-
362
-
363
-
364
-
365
-
366
-
367
-
368
-
369
-
370
-
371
-
372
-
373
-
374
-
375
-
376
-
377
-
378
-
379
-
380
-
381
-
382
-
383
-
384
-
385
-
386
-
387
-
388
-
389
-
390
-
391
-
392
-
393
-
394
-
395
-
396
-
397
-
398
-
399
-
400
-
401
-
402
-
403
-
404
-
405
-
406
-
407
-
408
-
409
-
410
-
411
-
412
-
413
-
414
-
415
-
416
 |
 |
