Kyocera KM-3035 DF-35/70/71 Operation Guide - Page 65
Heben Sie die Heftungs-Einheit leicht
 |
View all Kyocera KM-3035 manuals
Add to My Manuals
Save this manual to your list of manuals |
Page 65 highlights
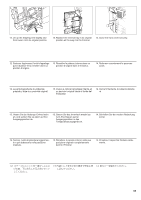
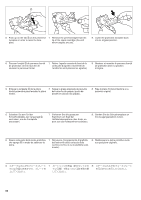
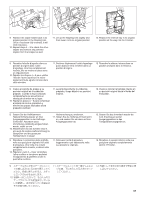
12. Lift up the Stapling Unit slightly and then lower it into its original position. 13. Replace the internal tray in its original 14. Close the front cover securely. position all the way into the Finisher. 12. Soulever légèrement l'unité d'agrafage puis l'abaisser et la remettre dans sa position d'origine. 13. Remettre le plateau interne dans sa position d'origine dans le finisseur. 14. Refermer correctement le panneau avant. 12. Levante ligeramente la unidad de grapado y baje a su posición original. 13. Vuelva a colocar la bandeja interna en su posición original hasta el fondo del finalizador. 14. Cierre firmemente la cubierta delantera. 12. Heben Sie die Heftungs-Einheit leicht an, und senken Sie sie dann auf ihre Ausgangsposition ab. 13. Setzen Sie das Innenfach wieder bis zum Anschlag an seiner Ausgangsposition in das Fertigbearbeitungsgerät ein. 14. Schließen Sie die vordere Abdeckung sicher. 12. Serrare l'unità di pinzatura leggermente e poi abbassarlo nella posizione originale. 13. Rimettere il vassoio interno nella sua posizione originale completamente dentro il Finisher. 14. Chiudere il coperchio frontale saldamente. 63
-
 1
1 -
2
-
3
-
4
-
5
-
6
-
7
-
8
-
9
-
10
-
11
-
12
-
13
-
14
-
15
-
16
-
17
-
18
-
19
-
20
-
21
-
22
-
23
-
24
-
25
-
26
-
27
-
28
-
29
-
30
-
31
-
32
-
33
-
34
-
35
-
36
-
37
-
38
-
39
-
40
-
41
-
42
-
43
-
44
-
45
-
46
-
47
-
48
-
49
-
50
-
51
-
52
-
53
-
54
-
55
-
56
-
57
-
58
-
59
-
 60
60 -
 61
61 -
 62
62 -
 63
63 -
 64
64 -
 65
65 -
 66
66 -
 67
67 -
 68
68 -
 69
69 -
 70
70 -
71
-
72
-
73
-
74
-
75
-
76
-
77
-
78
-
79
-
80
-
81
-
82
-
83
-
84
-
85
-
86
-
87
-
88
-
89
-
90
-
91
-
92
-
93
-
94
-
95
-
96
-
97
-
98
-
99
-
100
 |
 |
