Kyocera KM-3035 DF-35/70/71 Operation Guide - Page 67
werden. Das Verfahren zur Behebung
 |
View all Kyocera KM-3035 manuals
Add to My Manuals
Save this manual to your list of manuals |
Page 67 highlights
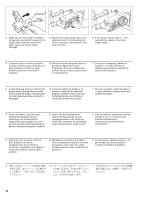
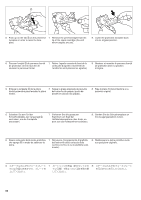
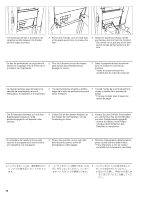
* There is one stapler located toward the front of the machine and one located towards the rear. Staple jams need to be cleared from each stapler separately. The procedure for clearing staple jams is the same for both staplers. 4. Pinch the staple holder release lever as shown in the illustration and lower it to release the lock. 5. Pull out the staple holder. * L'une des agrafeuses est située vers l'avant de l'appareil tandis que l'autre est située vers l'arrière. Les bourrages d'agrafes doivent être retirés séparément de chaque agrafeuse. La procédure pour retirer les bourrages d'agrafes est la même pour les deux agrafeuses. 4. Pincer le levier de libération de la boîte d'agrafes comme indiqué sur l'illustration et l'abaisser pour ouvrir le verrou. 5. Extraire la boîte d'agrafes. * Hay una grapadora ubicada hacia el lado delantero de la máquina y otra hacia el lado trasero. Los atascos de grapas deben limpiarse para cada grapadora por separado. El procedimiento para eliminar los atascos de grapas es el mismo para ambas grapadoras. 4. Apriete la palanca para soltar el soporte de grapas como en la figura y abra el seguro. 5. Saque el soporte de grapas. * Eine Heftvorrichtung befindet sich neben der Vorderseite des Gerätes und eine neben der Rückseite. Die Heftklammernstaus müssen in jeder Heftvorrichtung getrennt behoben werden. Das Verfahren zur Behebung eines Heftklammernstaus ist für beide Heftvorrichtungen gleich. 4. Drücken Sie den Freigabehebel der Heftklammern-Haltevorrichtung an, wie in der Abbildung gezeigt, und senken Sie ihn ab, um die Arretierung freizugeben. 5. Ziehen Sie die HeftklammernHaltevorrichtung heraus. * C'è una cucitrice posta verso la parte anteriore della macchina ed una locata verso la parte posteriore. L'inceppamento di graffette necessita di essere pulito per ogni cucitrice separatamente. La procedura per pulire un'inceppamento di graffette è la stessa per entrambe le cucitrici. 4. Serrare la leva di rilascio del contenitore di graffette come mostrato nella figura e abbassarlo per sganciare il bloccaggio. 5. Tirare fuori il contenitore di graffette. 65
-
 1
1 -
2
-
3
-
4
-
5
-
6
-
7
-
8
-
9
-
10
-
11
-
12
-
13
-
14
-
15
-
16
-
17
-
18
-
19
-
20
-
21
-
22
-
23
-
24
-
25
-
26
-
27
-
28
-
29
-
30
-
31
-
32
-
33
-
34
-
35
-
36
-
37
-
38
-
39
-
40
-
41
-
42
-
43
-
44
-
45
-
46
-
47
-
48
-
49
-
50
-
51
-
52
-
53
-
54
-
55
-
56
-
57
-
58
-
59
-
60
-
61
-
 62
62 -
 63
63 -
 64
64 -
 65
65 -
 66
66 -
 67
67 -
 68
68 -
 69
69 -
 70
70 -
 71
71 -
 72
72 -
73
-
74
-
75
-
76
-
77
-
78
-
79
-
80
-
81
-
82
-
83
-
84
-
85
-
86
-
87
-
88
-
89
-
90
-
91
-
92
-
93
-
94
-
95
-
96
-
97
-
98
-
99
-
100
 |
 |
