Kyocera KM-3035 DF-35/70/71 Operation Guide - Page 69
Wiederholen Sie die Schritte 4 bis 9
 |
View all Kyocera KM-3035 manuals
Add to My Manuals
Save this manual to your list of manuals |
Page 69 highlights
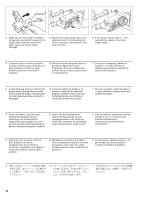
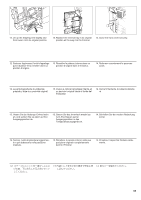
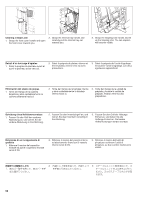
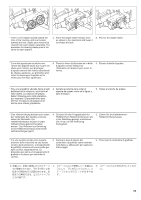
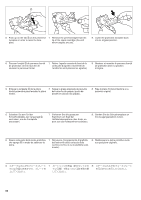
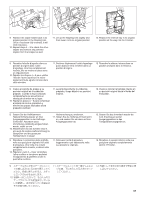
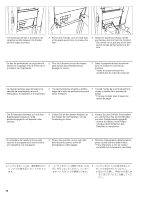
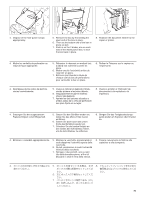
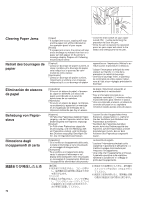
9. Replace the staple holder back in its original position in the Stapling Unit. Once it has been fully inserted, it will click into place. 10. Repeat steps 4 - 9 to check the other stapler and remove any jammed staples from that stapler as well. 11. Lift up the Stapling Unit slightly and then lower it into its original position. 12. Replace the internal tray in its original position all the way into the Finisher. 9. Remettre la boîte d'agrafes dans sa position d'origine dans l'unité d'agrafage. Une fois complètement insérée, elle se mettra en place avec un cliquettement. 10. Répéter les étapes 4 - 9 pour vérifier l'état de l'autre agrafeuse et retirer également toute agrafe coincée dans cette dernière. 11. Soulever légèrement l'unité d'agrafage puis l'abaisser et la remettre dans sa position d'origine. 12. Remettre le plateau interne dans sa position d'origine dans le finisseur. 9. Vuelva el soporte de grapas a su posición original en la unidad de grapado. Cuando lo haya colocado completamente se escuchará un chasquido al entrar en su lugar. 10. Repita los pasos 4 - 9 para comprobar el estado de la otra grapadora y elimine las grapas atascadas dicha grapadora también. 11. Levante ligeramente la unidad de grapado y luego bájela a su posición original. 12. Vuelva a colocar la bandeja interna en su posición original hasta el fondo del finalizador. 9. Setzen Sie die HeftklammernHaltevorrichtung wieder an ihrer Ausgangsposition in der HeftungsEinheit ein. Nachdem diese Vorrichtung vollständig eingeschoben wurde, rastet sie ein. 10. Wiederholen Sie die Schritte 4 bis 9, um auch die andere Heftvorrichtung zu überprüfen und die gestauten Heftklammern in dieser 9. Rimettere il contenitore delle graffette nella sua posizione originale nell'unità di pinzatura. Una volta che é stato completamente inserito, scatterà nella posizione. 10. Ripetere i punti 4 - 9 per controllare l'altra cucitrice e rimuovere qualsiasi inceppamento di graffette anche in quell'altra cucitrice. Heftvorrichtung zu entfernen. 11. Heben Sie die Heftungs-Einheit leicht an, und senken Sie sie dann auf ihre Ausgangsposition ab. 11. Sollevare l'unità di pinzatura leggermente e poi abbassarla nella sua posizione originale. 12. Setzen Sie das Innenfach wieder bis zum Anschlag an seiner Ausgangsposition in das Fertigbearbeitungsgerät ein. 12. Rimettere il vassoio interno nella sua posizione originale completamente dentro il Finisher. 67
-
 1
1 -
2
-
3
-
4
-
5
-
6
-
7
-
8
-
9
-
10
-
11
-
12
-
13
-
14
-
15
-
16
-
17
-
18
-
19
-
20
-
21
-
22
-
23
-
24
-
25
-
26
-
27
-
28
-
29
-
30
-
31
-
32
-
33
-
34
-
35
-
36
-
37
-
38
-
39
-
40
-
41
-
42
-
43
-
44
-
45
-
46
-
47
-
48
-
49
-
50
-
51
-
52
-
53
-
54
-
55
-
56
-
57
-
58
-
59
-
60
-
61
-
62
-
63
-
 64
64 -
 65
65 -
 66
66 -
 67
67 -
 68
68 -
 69
69 -
 70
70 -
 71
71 -
 72
72 -
 73
73 -
 74
74 -
75
-
76
-
77
-
78
-
79
-
80
-
81
-
82
-
83
-
84
-
85
-
86
-
87
-
88
-
89
-
90
-
91
-
92
-
93
-
94
-
95
-
96
-
97
-
98
-
99
-
100
 |
 |
