Panasonic KX-TGA4500B Telephone Equipment - Page 16
Installing the battery in the cordless handset, Battery charge, Charging, Charge completed
 |
View all Panasonic KX-TGA4500B manuals
Add to My Manuals
Save this manual to your list of manuals |
Page 16 highlights
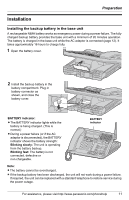
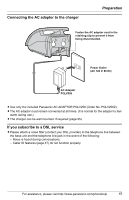
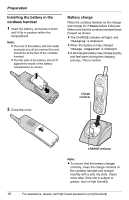
Preparation Installing the battery in the cordless handset 1 Insert the battery, and press it down until it fits in position within the compartment. Note: L The end of the battery with the metal terminals should be inserted first and should be at the foot of the cordless handset. L The flat side of the battery should fit against the inside of the battery compartment as shown. Battery charge Place the cordless handset on the charger and charge for 7 hours before initial use. Make sure that the cordless handset faces forward as shown. L The CHARGE indicator will light, and "Charging" is displayed. L When the battery is fully charged, "Charge completed" is displayed. L A discharged battery may charge quickly and feel warm during the charging process. This is normal. 2 Close the cover. Charge contacts CHARGE indicator Note: L To ensure that the battery charges correctly, clean the charge contacts of the cordless handset and charger monthly with a soft, dry cloth. Clean more often if the unit is subject to grease, dust or high humidity. 16 For assistance, please visit http://www.panasonic.com/phonehelp
-
 1
1 -
2
-
3
-
4
-
5
-
6
-
7
-
8
-
9
-
10
-
 11
11 -
 12
12 -
 13
13 -
 14
14 -
 15
15 -
 16
16 -
 17
17 -
 18
18 -
 19
19 -
 20
20 -
 21
21 -
22
-
23
-
24
-
25
-
26
-
27
-
28
-
29
-
30
-
31
-
32
-
33
-
34
-
35
-
36
-
37
-
38
-
39
-
40
-
41
-
42
-
43
-
44
-
45
-
46
-
47
-
48
-
49
-
50
-
51
-
52
-
53
-
54
-
55
-
56
-
57
-
58
-
59
-
60
-
61
-
62
-
63
-
64
-
65
-
66
-
67
-
68
-
69
-
70
-
71
-
72
-
73
-
74
-
75
-
76
-
77
-
78
-
79
-
80
-
81
-
82
-
83
-
84
-
85
-
86
-
87
-
88
-
89
-
90
-
91
-
92
-
93
-
94
-
95
-
96
-
97
-
98
-
99
-
100
-
101
-
102
-
103
-
104
-
105
-
106
-
107
-
108
-
109
-
110
-
111
-
112
-
113
-
114
-
115
-
116
-
117
-
118
-
119
-
120
-
121
-
122
-
123
-
124
 |
 |
