Panasonic KX-TGA4500B Telephone Equipment - Page 89
Erasing the current music on hold, Other options, Selecting key tone, Adjusting the time automatically
 |
View all Panasonic KX-TGA4500B manuals
Add to My Manuals
Save this manual to your list of manuals |
Page 89 highlights
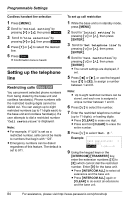
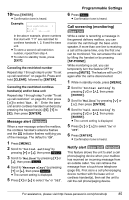
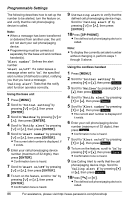
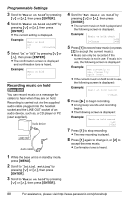
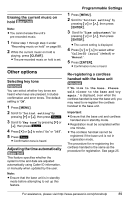
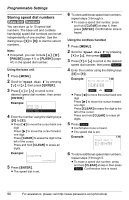
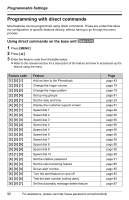
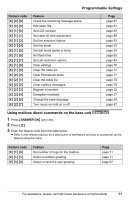
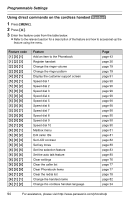
Erasing the current music on hold Base Unit Note: L You cannot erase the unit's pre-recorded music. 1 Follow step 1 through step 4 under "Recording music on hold" on page 88. 2 While the current music on hold is playing, press {CLEAR}. L The pre-recorded music on hold is set. Other options Selecting key tone Handset You can select whether key tones are heard when keys are pressed. Includes confirmation and error tones. The default setting is "ON". 1 Press {MENU}. 2 Scroll to "Initial setting" by pressing {V} or {^}, then press Select . 3 Scroll to "Key tone" by pressing {V} or {^}, then press Select . 4 Press {V} or {^} to select "On" or "Off". 5 Press Save . L Confirmation tone is heard. Adjusting the time automatically Base Unit This feature specifies whether the system's time and date are adjusted automatically using Caller ID information, or manually when updated by the user. Note: L Ensure that the base unit is in standby mode before attempting to set up this feature. Programmable Settings 1 Press {MENU}. 2 Scroll to "Initial setting" by pressing {}, then press {ENTER}. 3 Scroll to "Time adjustment" by pressing {}, then press {ENTER}. L The current setting is displayed. 4 Press {} to select either "CallerID [auto]" (default) or "Manual". 5 Press {ENTER}. L Confirmation tone is heard. Re-registering a cordless handset with the base unit Handset If "No link to the base. Please walk closer to the base and try again." is displayed, even when the cordless handset is near the base unit, you may need to re-register the cordless handset to the base unit. Important: L Ensure that the base unit and cordless handset are in standby mode. L Registration must be completed within one minute. L The cordless handset cannot be registered if the base unit is not in registration mode. The procedure for re-registering the cordless handset is the same as the procedure for registration. See page 25. For assistance, please visit http://www.panasonic.com/phonehelp 89
-
 1
1 -
2
-
3
-
4
-
5
-
6
-
7
-
8
-
9
-
10
-
11
-
12
-
13
-
14
-
15
-
16
-
17
-
18
-
19
-
20
-
21
-
22
-
23
-
24
-
25
-
26
-
27
-
28
-
29
-
30
-
31
-
32
-
33
-
34
-
35
-
36
-
37
-
38
-
39
-
40
-
41
-
42
-
43
-
44
-
45
-
46
-
47
-
48
-
49
-
50
-
51
-
52
-
53
-
54
-
55
-
56
-
57
-
58
-
59
-
60
-
61
-
62
-
63
-
64
-
65
-
66
-
67
-
68
-
69
-
70
-
71
-
72
-
73
-
74
-
75
-
76
-
77
-
78
-
79
-
80
-
81
-
82
-
83
-
 84
84 -
 85
85 -
 86
86 -
 87
87 -
 88
88 -
 89
89 -
 90
90 -
 91
91 -
 92
92 -
 93
93 -
 94
94 -
95
-
96
-
97
-
98
-
99
-
100
-
101
-
102
-
103
-
104
-
105
-
106
-
107
-
108
-
109
-
110
-
111
-
112
-
113
-
114
-
115
-
116
-
117
-
118
-
119
-
120
-
121
-
122
-
123
-
124
 |
 |
