Panasonic KX-TGA4500B Telephone Equipment - Page 95
Useful Information, Wall mounting the charger
 |
View all Panasonic KX-TGA4500B manuals
Add to My Manuals
Save this manual to your list of manuals |
Page 95 highlights
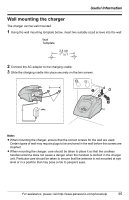
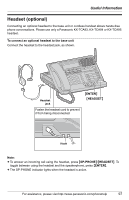
Useful Information Wall mounting the charger The charger can be wall mounted. 1 Using the wall mounting template below, insert two suitably sized screws into the wall. Wall Template 2.4 cm (31⁄32") 2 Connect the AC adaptor to the charging cradle. 3 Slide the charging cradle into place securely on the two screws. Screws A B C Note: L When mounting the charger, ensure that the correct screws for the wall are used. Certain types of wall may require plugs to be anchored in the wall before the screws are inserted. L When mounting the charger, care should be taken to place it so that the cordless handset antenna does not cause a danger when the handset is docked in the charger unit. Particular care should be taken to ensure that the antenna is not mounted at eye level or in a position that may pose a risk to people's eyes. For assistance, please visit http://www.panasonic.com/phonehelp 95
-
 1
1 -
2
-
3
-
4
-
5
-
6
-
7
-
8
-
9
-
10
-
11
-
12
-
13
-
14
-
15
-
16
-
17
-
18
-
19
-
20
-
21
-
22
-
23
-
24
-
25
-
26
-
27
-
28
-
29
-
30
-
31
-
32
-
33
-
34
-
35
-
36
-
37
-
38
-
39
-
40
-
41
-
42
-
43
-
44
-
45
-
46
-
47
-
48
-
49
-
50
-
51
-
52
-
53
-
54
-
55
-
56
-
57
-
58
-
59
-
60
-
61
-
62
-
63
-
64
-
65
-
66
-
67
-
68
-
69
-
70
-
71
-
72
-
73
-
74
-
75
-
76
-
77
-
78
-
79
-
80
-
81
-
82
-
83
-
84
-
85
-
86
-
87
-
88
-
89
-
 90
90 -
 91
91 -
 92
92 -
 93
93 -
 94
94 -
 95
95 -
 96
96 -
 97
97 -
 98
98 -
 99
99 -
 100
100 -
101
-
102
-
103
-
104
-
105
-
106
-
107
-
108
-
109
-
110
-
111
-
112
-
113
-
114
-
115
-
116
-
117
-
118
-
119
-
120
-
121
-
122
-
123
-
124
 |
 |
