Panasonic KX-TGA4500B Telephone Equipment - Page 78
Clearing the redial list, Erasing messages, Initial setting, Initialize base, Redial list
 |
View all Panasonic KX-TGA4500B manuals
Add to My Manuals
Save this manual to your list of manuals |
Page 78 highlights
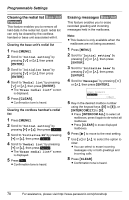
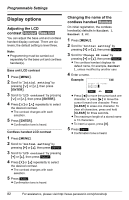
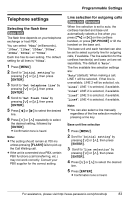
Programmable Settings Clearing the redial list Base Unit Handset This feature enables you to remove all held data in the redial list. Each redial list can only be cleared by the cordless handset or base unit associated with it. Clearing the base unit's redial list 1 Press {MENU}. 2 Scroll to "Initial setting" by pressing {}, then press {ENTER}. 3 Scroll to "Initialize base" by pressing {}, then press {ENTER}. 4 Scroll to "Redial list" by pressing {}, then press {ENTER}. L The "Erase redial list?" screen is displayed. 5 Press {CLEAR}. L Confirmation tone is heard. Clearing the cordless handset's redial list 1 Press {MENU}. 2 Scroll to "Initial setting" by pressing {V} or {^}, then press Select . 3 Scroll to "Initialize HS" by pressing {V} or {^}, then press Select . 4 Scroll to "Redial list" by pressing {V} or {^}, then press Select . L The "Erase redial list?" screen is displayed. 5 Press Yes . L Confirmation tone is heard. Erasing messages Base Unit This feature enables you to erase recorded greeting and incoming messages held in the mailboxes. Note: L This feature is only available when the mailboxes are not being accessed. 1 Press {MENU}. 2 Scroll to "Initial setting" by pressing {}, then press {ENTER}. 3 Scroll to "Initialize base" by pressing {}, then press {ENTER}. 4 Scroll to "Messages" by pressing {}, then press {ENTER}. Erase messages Box No.:--------- >=Next 5 Key-in the desired mailbox number using the keypad keys ({0} to {8}), or {INTERCOM} {1} to {8}. L Press {INTERCOM ALL} to select all mailboxes, press it again to de-select all mailboxes. L Press {CLEAR} to erase displayed mailboxes. 6 Press {g} to move to the next setting. 7 Use {}, to select the option to clear. L You can select to erase incoming messages only or both greetings and incoming calls. 8 Press {CLEAR}. L Confirmation tone is heard. 78 For assistance, please visit http://www.panasonic.com/phonehelp
-
 1
1 -
2
-
3
-
4
-
5
-
6
-
7
-
8
-
9
-
10
-
11
-
12
-
13
-
14
-
15
-
16
-
17
-
18
-
19
-
20
-
21
-
22
-
23
-
24
-
25
-
26
-
27
-
28
-
29
-
30
-
31
-
32
-
33
-
34
-
35
-
36
-
37
-
38
-
39
-
40
-
41
-
42
-
43
-
44
-
45
-
46
-
47
-
48
-
49
-
50
-
51
-
52
-
53
-
54
-
55
-
56
-
57
-
58
-
59
-
60
-
61
-
62
-
63
-
64
-
65
-
66
-
67
-
68
-
69
-
70
-
71
-
72
-
 73
73 -
 74
74 -
 75
75 -
 76
76 -
 77
77 -
 78
78 -
 79
79 -
 80
80 -
 81
81 -
 82
82 -
 83
83 -
84
-
85
-
86
-
87
-
88
-
89
-
90
-
91
-
92
-
93
-
94
-
95
-
96
-
97
-
98
-
99
-
100
-
101
-
102
-
103
-
104
-
105
-
106
-
107
-
108
-
109
-
110
-
111
-
112
-
113
-
114
-
115
-
116
-
117
-
118
-
119
-
120
-
121
-
122
-
123
-
124
 |
 |