Panasonic KX-TGA4500B Telephone Equipment - Page 72
Recording a greeting message, Changing a recorded message, Turning off the Answering System, System
 |
View all Panasonic KX-TGA4500B manuals
Add to My Manuals
Save this manual to your list of manuals |
Page 72 highlights
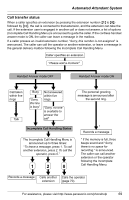
Answering System Recording a greeting message 1 Press the line's {ANSWER ON} key. 2 Scroll to "Setup" by pressing {}, then press {ENTER}. 3 Scroll to "User greetings" by pressing {}, then press {ENTER}. 4 Scroll to "Greeting 1" by pressing {}, then press {ENTER}. L If a message has not been stored, "(none)" is displayed against the greeting. L Each time you press {
-
 1
1 -
2
-
3
-
4
-
5
-
6
-
7
-
8
-
9
-
10
-
11
-
12
-
13
-
14
-
15
-
16
-
17
-
18
-
19
-
20
-
21
-
22
-
23
-
24
-
25
-
26
-
27
-
28
-
29
-
30
-
31
-
32
-
33
-
34
-
35
-
36
-
37
-
38
-
39
-
40
-
41
-
42
-
43
-
44
-
45
-
46
-
47
-
48
-
49
-
50
-
51
-
52
-
53
-
54
-
55
-
56
-
57
-
58
-
59
-
60
-
61
-
62
-
63
-
64
-
65
-
66
-
 67
67 -
 68
68 -
 69
69 -
 70
70 -
 71
71 -
 72
72 -
 73
73 -
 74
74 -
 75
75 -
 76
76 -
 77
77 -
78
-
79
-
80
-
81
-
82
-
83
-
84
-
85
-
86
-
87
-
88
-
89
-
90
-
91
-
92
-
93
-
94
-
95
-
96
-
97
-
98
-
99
-
100
-
101
-
102
-
103
-
104
-
105
-
106
-
107
-
108
-
109
-
110
-
111
-
112
-
113
-
114
-
115
-
116
-
117
-
118
-
119
-
120
-
121
-
122
-
123
-
124
 |
 |

Answering System
72
For assistance, please visit http://www.panasonic.com/phonehelp
Recording a greeting message
1
Press the line’s
{
ANSWER ON
}
key.
2
Scroll to “
Setup
” by pressing
{
<
}
or
{
>
}
, then press
{
ENTER
}
.
3
Scroll to “
User greetings
” by
pressing
{
<
}
or
{
>
}
, then press
{
ENTER
}
.
4
Scroll to “
Greeting 1
” by pressing
{
<
}
or
{
>
}
, then press
{
ENTER
}
.
L
If a message has not been stored,
“
(none)
” is displayed against the
greeting.
L
Each time you press
{
<
}
, the display
changes from “
Greeting 1
” through
“
Greeting 5
”.
5
Press
{g}
to start recording.
6
After the tone, talk clearly, about 8
inches (20 cm) away from the
microphone (see page 18 for its
location). To end, press
{
1
}
.
L
If the elapsed recording time exceeds
two minutes, the unit will stop recording.
L
The recorded message will be played.
L
To change the message, press
{
1
}
and
restart from step 5.
7
Press
{
2
}
to accept the recorded
message.
L
Confirmation tone is heard.
Selecting a greeting message
1
Press the line’s
{
ANSWER ON
}
key.
2
Scroll to “
Setup
” by pressing
{
<
}
or
{
>
}
, then press
{
ENTER
}
.
3
Scroll to “
Mailbox
” by pressing
{
<
}
or
{
>
}
, then press
{
ENTER
}
.
4
Scroll to “
Select greeting
” by
pressing
{
<
}
or
{
>
}
, then press
{
ENTER
}
.
5
Select “
Greeting 1
” to “
Greeting 5
”
by pressing
{
<
}
or
{
>
}
, then press
{
ENTER
}
.
L
The selected message is played.
Changing a recorded message
1
Press the line’s
{
ANSWER ON
}
key.
2
Scroll to “
Setup
” by pressing
{
<
}
or
{
>
}
, then press
{
ENTER
}
.
3
Scroll to “
User greetings
” by
pressing
{
<
}
or
{
>
}
, then press
{
ENTER
}
.
4
Select “
Greeting 1
” to “
Greeting 5
”
by pressing
{
<
}
or
{
>
}
, then press
{
ENTER
}
.
L
The current greeting is played.
5
To accept the message
, press
{
2
}
.
L
Confirmation tone is heard.
Or:
To change the message
:
Press
{
1
}
. Press
{g}
to start recording.
After the tone, talk into the microphone.
To end, press
{
1
}
. Press
{
2
}
to accept
the message.
Erasing a greeting message
Whilst listening to the current message,
press
{
CLEAR
}
.
L
The greeting is erased.
Turning off the Answering
System
Press the line’s
{
ANSWER ON
}
key and
scroll to “
Off
”, then press
{
ENTER
}
.
L
The ANSWER ON indicator light goes
out.