Panasonic KX-TGA4500B Telephone Equipment - Page 84
Setting up the telephone line, Restricting calls
 |
View all Panasonic KX-TGA4500B manuals
Add to My Manuals
Save this manual to your list of manuals |
Page 84 highlights
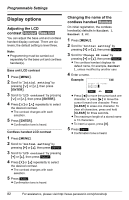
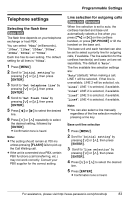
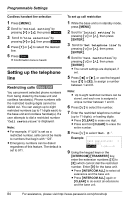
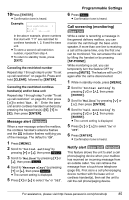
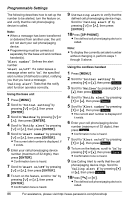
Programmable Settings Cordless handset line selection 1 Press {MENU}. 2 Scroll to "Initial setting" by pressing {V} or {^}, then press Select . 3 Scroll to "Line selection" by pressing {V} or {^}, then press Select . 4 Press {V} or {^} to select the desired line. 5 Press Save . L Confirmation tone is heard. Setting up the telephone line Restricting calls Base Unit You can prevent selected phone numbers from being dialed by the base unit and cordless handset(s). Phone numbers with the restricted leading digits cannot be dialed out. You can assign up to eight restricted numbers (up to 11 digits each) to the base unit and cordless handset(s). If a user attempts to dial a restricted number "Call restriction" is displayed. Note: L For example, if "123" is set as a restricted number, calls cannot be made to numbers that begin with "123". L Emergency numbers can be dialed regardless of this feature. The default is set to 911. To set up call restriction 1 While the base unit is in standby mode, press {MENU}. 2 Scroll to "Initial setting" by pressing {}, then press {ENTER}. 3 Scroll to "Set telephone line" by pressing {}, then press {ENTER}. 4 Scroll to "Call restriction" by pressing {}, then press {ENTER}. L The current settings are displayed, if set. 5 Press {f} or {g}, or use the keypad keys ({1} to {8}), to assign a number between 1 and 8. Note: L Up to eight restricted numbers can be stored, and each one is assigned a unique number between 1 and 8. 6 Press {
-
 1
1 -
2
-
3
-
4
-
5
-
6
-
7
-
8
-
9
-
10
-
11
-
12
-
13
-
14
-
15
-
16
-
17
-
18
-
19
-
20
-
21
-
22
-
23
-
24
-
25
-
26
-
27
-
28
-
29
-
30
-
31
-
32
-
33
-
34
-
35
-
36
-
37
-
38
-
39
-
40
-
41
-
42
-
43
-
44
-
45
-
46
-
47
-
48
-
49
-
50
-
51
-
52
-
53
-
54
-
55
-
56
-
57
-
58
-
59
-
60
-
61
-
62
-
63
-
64
-
65
-
66
-
67
-
68
-
69
-
70
-
71
-
72
-
73
-
74
-
75
-
76
-
77
-
78
-
 79
79 -
 80
80 -
 81
81 -
 82
82 -
 83
83 -
 84
84 -
 85
85 -
 86
86 -
 87
87 -
 88
88 -
 89
89 -
90
-
91
-
92
-
93
-
94
-
95
-
96
-
97
-
98
-
99
-
100
-
101
-
102
-
103
-
104
-
105
-
106
-
107
-
108
-
109
-
110
-
111
-
112
-
113
-
114
-
115
-
116
-
117
-
118
-
119
-
120
-
121
-
122
-
123
-
124
 |
 |
