Panasonic KX-TGA4500B Telephone Equipment - Page 90
Storing speed dial numbers, PAUSE, FLASH, Using the base unit, ENTER, Using the cordless handset
 |
View all Panasonic KX-TGA4500B manuals
Add to My Manuals
Save this manual to your list of manuals |
Page 90 highlights
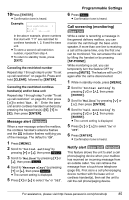
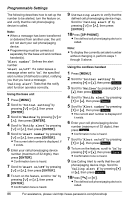
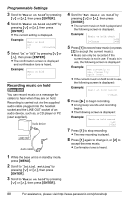
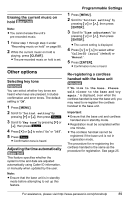
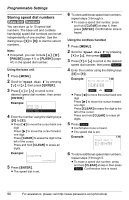
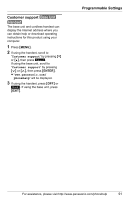
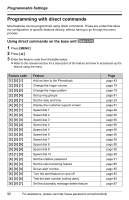
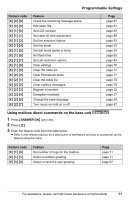
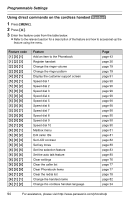
Programmable Settings Storing speed dial numbers Base Unit Handset You can store up to 10 speed dial numbers. The base unit and cordless handset(s) speed dial numbers can be set independently of one another. Use the dialing keys ({0} to {9}) to dial the stored numbers. Note: L If required, you can include {*}, {#}, {PAUSE} (page 41) or {FLASH} (page 41) in the speed dial number. Using the base unit 1 Press {MENU}. 2 Scroll to "Speed dial #" by pressing {}, then press {ENTER}. 3 Press {} to scroll to the desired speed dial number, then press {ENTER}. Example: Speed dial 1 Speed dial 2 Speed dial 3 4 Enter the number using the dialing keys ({0} to {9}). L Press {f} to move the cursor back one digit. Press {g} to move the cursor forward one digit. Press {CLEAR} to erase the digit to the left of the cursor. Press and hold {CLEAR} to erase all digits. Example: 0123456789 ENTER=Save 5 Press {ENTER}. L The speed dial is set. 6 To store additional speed dial numbers, repeat steps 3 through 5. L To erase a speed dial number, press and hold {CLEAR} at step 4, then press {ENTER}. Confirmation tone is heard. Using the cordless handset 1 Press {MENU}. 2 Scroll to "Speed dial #" by pressing {V} or {^}, then press Select . 3 Press {V} or {^} to scroll to the desired speed dial number, then press Select . 4 Enter the number using the dialing keys ({0} to {9}). Example: 2 Enter phone no.: 0123456789 Back Save L Press {f} to move the cursor back one digit. Press {g} to move the cursor forward one digit. Press {CLEAR} to erase the digit to the left of the cursor. Press and hold {CLEAR} to erase all digits. 5 Press Save . L Confirmation tone is heard. L The speed dial is set. Example: 2 Speed dial 1: 012-345-6789 6 To store additional speed dial numbers, repeat steps 3 through 5. L To erase a speed dial number, press and hold {CLEAR} at step 4, then press Save . Confirmation tone is heard. 90 For assistance, please visit http://www.panasonic.com/phonehelp
-
 1
1 -
2
-
3
-
4
-
5
-
6
-
7
-
8
-
9
-
10
-
11
-
12
-
13
-
14
-
15
-
16
-
17
-
18
-
19
-
20
-
21
-
22
-
23
-
24
-
25
-
26
-
27
-
28
-
29
-
30
-
31
-
32
-
33
-
34
-
35
-
36
-
37
-
38
-
39
-
40
-
41
-
42
-
43
-
44
-
45
-
46
-
47
-
48
-
49
-
50
-
51
-
52
-
53
-
54
-
55
-
56
-
57
-
58
-
59
-
60
-
61
-
62
-
63
-
64
-
65
-
66
-
67
-
68
-
69
-
70
-
71
-
72
-
73
-
74
-
75
-
76
-
77
-
78
-
79
-
80
-
81
-
82
-
83
-
84
-
 85
85 -
 86
86 -
 87
87 -
 88
88 -
 89
89 -
 90
90 -
 91
91 -
 92
92 -
 93
93 -
 94
94 -
 95
95 -
96
-
97
-
98
-
99
-
100
-
101
-
102
-
103
-
104
-
105
-
106
-
107
-
108
-
109
-
110
-
111
-
112
-
113
-
114
-
115
-
116
-
117
-
118
-
119
-
120
-
121
-
122
-
123
-
124
 |
 |