Panasonic KX-TGA4500B Telephone Equipment - Page 26
Handset and Base Unit, Registering, Method 1, ENTER
 |
View all Panasonic KX-TGA4500B manuals
Add to My Manuals
Save this manual to your list of manuals |
Page 26 highlights
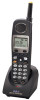
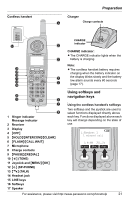
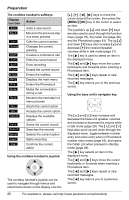
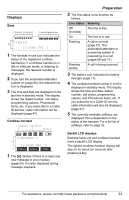
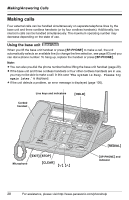
Preparation Registering Handset and Base Unit You can register handsets in two ways, both are described below. The latter way uses direct commands. For a complete list of direct commands refer to pages 92 through 94. Method 1: 1 From the base unit, press {MENU}. 2 Scroll to "Initial setting" by pressing {}, then press {ENTER}. 3 Scroll to "Registration" by pressing {}, then press {ENTER}. 4 Scroll to "HS registration" by pressing {}, then press {ENTER}. L The handset registration screen is displayed. Press MENU, #, 123 on the handset, then press ENTER on base. 5 Press {ENTER}. 6 From the cordless handset, press OK . Registration. 2 Press MENU, #, 123 on the base, then press OK L The cordless handset attempts to register to the base unit. L After linking to the base unit, the completion screen is displayed and confirmation tone is heard on both the base unit and registered cordless handset. L Once successfully linked, "Handset registered" is displayed on both the base unit and the cordless handset. Repeat to register additional cordless handsets. L To rename the cordless handset to something memorable, refer to page 82. Method 2: 1 From the base unit, press {MENU}, followed by {#}, {1}, {2}, {3}. Press MENU, #, 123 on the handset, then press ENTER on base. 2 Press {ENTER}. 3 From the handset, press {MENU}, followed by {#}, {1}, {2}, {3}. Registration. 2 Press MENU, #, 123 on the base, then press Back OK 4 Press OK . L The cordless handset attempts to register to the base unit. L After linking to the base unit, the completion screen is displayed and confirmation tone is heard on both the base unit and registered cordless handset. L Once successfully linked, "Handset registered" is displayed on both the base unit and the cordless handset. Repeat to register additional cordless handsets. L To rename the cordless handset to something memorable, refer to page 82. 26 For assistance, please visit http://www.panasonic.com/phonehelp
-
 1
1 -
2
-
3
-
4
-
5
-
6
-
7
-
8
-
9
-
10
-
11
-
12
-
13
-
14
-
15
-
16
-
17
-
18
-
19
-
20
-
 21
21 -
 22
22 -
 23
23 -
 24
24 -
 25
25 -
 26
26 -
 27
27 -
 28
28 -
 29
29 -
 30
30 -
 31
31 -
32
-
33
-
34
-
35
-
36
-
37
-
38
-
39
-
40
-
41
-
42
-
43
-
44
-
45
-
46
-
47
-
48
-
49
-
50
-
51
-
52
-
53
-
54
-
55
-
56
-
57
-
58
-
59
-
60
-
61
-
62
-
63
-
64
-
65
-
66
-
67
-
68
-
69
-
70
-
71
-
72
-
73
-
74
-
75
-
76
-
77
-
78
-
79
-
80
-
81
-
82
-
83
-
84
-
85
-
86
-
87
-
88
-
89
-
90
-
91
-
92
-
93
-
94
-
95
-
96
-
97
-
98
-
99
-
100
-
101
-
102
-
103
-
104
-
105
-
106
-
107
-
108
-
109
-
110
-
111
-
112
-
113
-
114
-
115
-
116
-
117
-
118
-
119
-
120
-
121
-
122
-
123
-
124
 |
 |
